# Edusuite Online User Guide

### 🌐 What Is the Edusuite Online User Guide?

The **Edusuite Online User Guide** is the official, web-based manual designed to support all user roles across Edusuite products—including **Administrators, Faculty, Students, Guardians/Parents**, and **Applicants**. It offers clear, step-by-step instructions for navigating and managing tasks within Edusuite’s three core platforms: **Admissions**, **K12**, and **UNI**.

Whether you're configuring enrollment workflows, grading templates, financial settings, or simply checking application status as an applicant, this guide ensures you have the right information when you need it.

{% hint style="danger" %}
Currently, the guide is undergoing updates—some articles may be temporarily incomplete or in revision.
{% endhint %}

***

### 💻 Module Overview

Here’s a summary of the major modules typically covered in the User Guide:

* **Registration & Enrollment Setup**: Online registration workflows, requirement tagging, subject enlistment, and real‑time monitoring dashboards
* **Finance Module**: Manage payments, SOA generation, reconciliation, tuition plans, discounts, and receipt numbering
* **Users & Access Management**: Configure user groups across administrators, faculty, guardians, and students; define user info fields and permissions
* **Academic Setup & Grading**: Set grading templates (academic and non‑academic), advisers’ remarks, principal’s comments, club activities, and promotion tagging
* **Utilities & Communication Tools**: Manage clearance workflows, announcements, notifications, and links panel
* **Custom Reports**: Generate finance, faculty, and student reports and configure system templates
* **Security & Audit Controls**: Monitor audit logs, set session policies, and configure system security settings

***

### 🧑 Role-Based Coverage

* **Administrators/System Managers**: Full guide to system setup—including security, finance, enrollment, user groups, and reporting
* **Registrars & Academic Officers**: Tasks as they relate to student/guardian management, academic scheduling, and data migration
* **Finance Teams**: Setting up payment processes, schemes, reconciliation, and SOA instruction workflows
* **Faculty**: Using the portal for entering academic and non-academic scores, adviser/principal remarks, and participating in promotion tagging
* **Guardians/Parents & Students**: Portal guidance for account login, enrollment submission, payment tracking, grades viewing, and notifications access
* **Applicants:** Portal guidance for account login, submit requirements, track application progress, monitor payment status, communicate with the addmissions team, view results and admission decisions

***

<figure><img src="https://3973081029-files.gitbook.io/~/files/v0/b/gitbook-x-prod.appspot.com/o/spaces%2F-M1SysIMhMO_ls3VlZcw%2Fuploads%2FzXUfPwvKB8SFwdnutECd%2FUNI.png?alt=media&amp;token=87cc977f-f16f-4b66-9bd1-f5a2fa5b613d" alt=""><figcaption></figcaption></figure>

**Edusuite UNI** is a cloud-based school management system optimized for colleges, universities, technical-vocational schools, and postgraduate programs. It harnesses AI-driven smart algorithms to support decision-making across academic planning, scheduling, student advising, enrollment, finance, and reporting.

{% content-ref url="/pages/-M1T-QXs2w\_s70AQYyIy" %}
[Administrator](/product-guide-uni/admin-home)
{% endcontent-ref %}

{% content-ref url="/pages/-M1T-tnJLzrvyRygshUk" %}
[Faculty](/product-guide-uni/faculty-home)
{% endcontent-ref %}

{% content-ref url="/pages/-M1T01et0bRyuBDcyboK" %}
[Student](/product-guide-uni/student-home)
{% endcontent-ref %}

***

<figure><img src="https://3973081029-files.gitbook.io/~/files/v0/b/gitbook-x-prod.appspot.com/o/spaces%2F-M1SysIMhMO_ls3VlZcw%2Fuploads%2FFQ7Jz9BWOfBRnrXK2a6a%2FK12.png?alt=media&amp;token=cf021b3b-c7e6-4731-9ce7-70d15fbc8cb3" alt=""><figcaption></figcaption></figure>

**Edusuite K12** is a cloud-based school management and student information system built specifically for **Kindergarten through Senior High School**. It automates critical academic and administrative workflows, including enrollment, grading, course planning, fee management, and parent–teacher communication, all through a single integrated platform.

{% content-ref url="/pages/-M1T07CvR5D25tTQUpA\_" %}
[Administrator](/product-guide-k12/admin-home)
{% endcontent-ref %}

{% content-ref url="/pages/-M1T09eTJ3HPiR6rGNEb" %}
[Faculty](/product-guide-k12/faculty-home)
{% endcontent-ref %}

{% content-ref url="/pages/-M1T0CAStT4BBCe-zWr0" %}
[Guardian/Parents](/product-guide-k12/guardian-home)
{% endcontent-ref %}

***

<figure><img src="https://3973081029-files.gitbook.io/~/files/v0/b/gitbook-x-prod.appspot.com/o/spaces%2F-M1SysIMhMO_ls3VlZcw%2Fuploads%2FppFrC5Y6kDP3iUdKkuIF%2FADM.png?alt=media&amp;token=84816763-b80f-42d8-904b-e25bf8fdb629" alt=""><figcaption></figcaption></figure>

**Edusuite Admissions** is a cloud-based admissions management system designed for educational institutions—such as K-12 schools, universities, colleges, vocational institutions, and postgraduate programs—to streamline the entire applicant journey. It enables the management of thousands of applications, student records, entrance exams, and communications through one integrated platform.

{% content-ref url="/pages/mnzqDWXSdi3Dz0wxZRne" %}
[Administrator](/product-guide-admissions/administrator)
{% endcontent-ref %}

{% content-ref url="/pages/MYtDbOpxnZMKnet8bzsT" %}
[Applicant](/product-guide-admissions/applicant)
{% endcontent-ref %}


# Administrator

Dear School Administrators/System Manager,

Welcome to **Edusuite UNI!** The **System Administrator Guide** provides instructions for managing and maintaining the **Edusuite UNI** platform. As a system administrator, you are responsible for configuring settings, managing user accounts, ensuring system security, and troubleshooting issues.

Let's get started!

{% content-ref url="/pages/-M1T-WCrLU-mdwzglM2R" %}
[Getting Started](/product-guide-uni/admin-home/getting-started)
{% endcontent-ref %}

{% content-ref url="/pages/-M630jkxsblzLJQdQpE0" %}
[Planning](/product-guide-uni/admin-home/planning-1)
{% endcontent-ref %}

{% content-ref url="/pages/-MHnX81fh91wJFLm5o1h" %}
[Registrations](/product-guide-uni/admin-home/registrations)
{% endcontent-ref %}

{% content-ref url="/pages/-M1T-aYVm79mhrmYmxBk" %}
[Enrollment](/product-guide-uni/admin-home/enrollment)
{% endcontent-ref %}

{% content-ref url="/pages/-M1T-cssI\_FLLFNvBvi3" %}
[Finance](/product-guide-uni/admin-home/finance)
{% endcontent-ref %}

{% content-ref url="/pages/-M62ugNpaNUjcnrulhFy" %}
[Users](/product-guide-uni/admin-home/users)
{% endcontent-ref %}

{% content-ref url="/pages/-M62uWAkZRWzAXI16Zfb" %}
[Utilities](/product-guide-uni/admin-home/utilities)
{% endcontent-ref %}

{% content-ref url="/pages/-M62upZanmRLDZvrFFNd" %}
[Security](/product-guide-uni/admin-home/security)
{% endcontent-ref %}

{% content-ref url="/pages/-M62usMszIvGKKFvGt1Z" %}
[Reports](/product-guide-uni/admin-home/reports)
{% endcontent-ref %}

{% content-ref url="/pages/-M62uvVQqdfyLIjgL6jQ" %}
[Settings](/product-guide-uni/admin-home/settings)
{% endcontent-ref %}


# Getting Started

Last updated: March 2025

Welcome to the **Edusuite UNI Implementation User Guide**! This guide provides step-by-step instructions to help you set up the system effectively. Each function can be viewed or edited depending on the privileges or access granted to a user.

For concerns not covered in this user guide, please get in touch with Edusuite's Support Team or file a ticket [here](https://edusuite.atlassian.net/servicedesk/customer/portal/1).

{% hint style="success" %}
Edusuite works best on a desktop computer using **Google Chrome**.
{% endhint %}

If your school is a new Edusuite partner, refer to the checklist below for the recommended setup order.

{% hint style="warning" %}
Parts **1** and **2** must be done in the order indicated.
{% endhint %}

## Part 1: For the System Administrator

{% hint style="info" %}
**Pre-requisite:** None

**Outputs:** All users with correct privileges and administrative settings
{% endhint %}

* [User Groups](/product-guide-uni/admin-home/users/user-setup/user-groups)
* [Users](/product-guide-uni/admin-home/users/user-setup/users)
* [User Information Fields](/product-guide-uni/admin-home/users/user-setup/user-information-fields)
* [School Profile ](/product-guide-uni/admin-home/settings/school-settings/school-profile)
* [Label Settings](/product-guide-uni/admin-home/settings/school-settings/label-settings)
* [Links Manager](/product-guide-uni/admin-home/utilities/links-manager)
* [Notification Templates](/product-guide-uni/admin-home/settings/notification-templates)

## Part 2: For the Registrar and Academics Team

{% hint style="info" %}
**Pre-requisite:** All users must have the correct privileges

**Output:** Components for the Scheduler
{% endhint %}

* [Room Types](/product-guide-uni/admin-home/planning-1/planning/room-types)
* [Rooms](/product-guide-uni/admin-home/planning-1/planning/rooms)
* [Schedule Types](/product-guide-uni/admin-home/planning-1/planning/schedule-types)
* [Departments](/product-guide-uni/admin-home/planning-1/planning/colleges)
* [Colleges](/product-guide-uni/admin-home/planning-1/planning/colleges-1)
* [Grading Systems](/product-guide-uni/admin-home/planning-1/planning/grading-systems)
* [Grading Templates](/product-guide-uni/admin-home/planning-1/planning/grading-systems-1)
* [Courses](/product-guide-uni/admin-home/planning-1/planning/courses)
* [Electives](/product-guide-uni/admin-home/planning-1/planning/courses-1)
* [Course Equivalencies](/product-guide-uni/admin-home/planning-1/planning/course-equivalency)
* [Program and Curriculum](/product-guide-uni/admin-home/planning-1/planning/programs)
* [Block Sections](/product-guide-uni/admin-home/planning-1/planning/block-sections)

## Part 3: For the Finance Team

{% hint style="info" %}
**Pre-requisite:** All users must have the correct privileges

**Output:** Components for managing financial processes
{% endhint %}

* [Payment Mode Settings](/product-guide-uni/admin-home/finance/finance-setup/payment-mode-settings)
* [Payment Schemes](/product-guide-uni/admin-home/finance/finance-setup/payment-schemes)
* [Account Codes Setup](/product-guide-uni/admin-home/finance/finance-setup/account-codes)
* [Tuition Plans](/product-guide-uni/admin-home/finance/finance-setup/tuition-plans)
* [Discounts](/product-guide-uni/admin-home/finance/finance-setup/discounts)
* [Penalties](/product-guide-uni/admin-home/finance/finance-setup/penalties)
* [Other Fees](/product-guide-uni/admin-home/finance/finance-setup/other-fees)
* [Payment Settings](/product-guide-uni/admin-home/finance/finance-setup/payment-settings)
* [Refund Settings](/product-guide-uni/admin-home/finance/finance-setup/or-formatting)
* [Adjustment Charges](/product-guide-uni/admin-home/finance/finance-setup/or-formatting-1)
* [Preview SOA Instructions](/product-guide-uni/admin-home/finance/finance-setup/preview-soa-instructions)
* [Enrollment Payment Instructions](/product-guide-uni/admin-home/finance/finance-setup/enrollment-payment-instructions)
* [Receipt Number Settings](/product-guide-uni/admin-home/finance/finance-setup/receipt-number-format)
* [Payment Channels (if applicable)](/product-guide-uni/admin-home/finance/finance-setup/payment-channels)
* [Add Bank Account](/product-guide-uni/admin-home/finance/reconciliation)

{% hint style="success" %}
You can already start working on Part 3 once the **courses** from Part 2 have been completed.
{% endhint %}

## Part 4: Data Migration and Management

{% hint style="info" %}
**Pre-requisite:** All users must have the correct privileges

**Output:** Profiles of students and faculty
{% endhint %}

* [S](/product-guide-uni/admin-home/users/students)[tudents](/product-guide-uni/admin-home/users/students)
* [Faculty](/product-guide-uni/admin-home/users/faculty)

## Part 5: Planning For Enrollment

{% hint style="info" %}
**Pre-requisites:**

1. Planning Setup Components (Part 2)
2. Faculty's Teaching Profiles

**Output:**

1. **Scheduler**: Configured schedules for classes and faculty
   {% endhint %}

* [Configure Enrollment Settings and Policy](https://info.edusuite.asia/product-guide-uni/admin-home/pages/-M5dqKtuogBCQICKg4Nb#h.p___81Hg9mykfw)
* [Generate a Class Demand or Run a Forecast](/product-guide-uni/admin-home/planning-1/class-demand)
* [Create a Schedule](/product-guide-uni/admin-home/planning-1/schedules)

## Part 6: Opening Enrollment for the Next Term

* [Open Enrollment](https://info.edusuite.asia/product-guide-uni/admin-home/pages/-M630rd3SI7u9ueKGvHi#h.p_bjL_ST3EFMPd)
* [Enable Student Portal Enlistment](https://info.edusuite.asia/product-guide-uni/admin-home/pages/-M5dqKtuogBCQICKg4Nb#h.p___81Hg9mykfw-1)

{% hint style="info" %}
To prevent students with payables or pending requirements from various offices of the school from enlisting, set up [Clearances](/product-guide-uni/admin-home/utilities/clearances) first before Part 6.&#x20;
{% endhint %}


# Account Management

Last updated: March 2025

## How to access Edusuite UNI

To access Edusuite, visit your school’s Edusuite URL. The format typically looks like this:\
`[YourSchoolsInitials].edusuite.asia`

<figure><img src="https://lh7-rt.googleusercontent.com/docsz/AD_4nXduihNt6pmxpNXNbpu_yz-t1j7I6cGWhJaCBZLVG2mK-RfMym4hYQ7Twwy_8xvl3dvgjXo5Psg1TituWqbZb86yFBFZW8dKTHo2hy-ehAlvT_AP8yJEUQm3OyueBu_hNIkTUYzgZ3v4PhYKdO9PMrEC3a2D?key=RJKy0MM-r5p0HGL4_PbKSQ" alt=""><figcaption></figcaption></figure>

The default landing page is the **Login Page**, where you can view your school’s latest public announcements, updates, and helpful resource links.

## How to Activate your Account

{% hint style="warning" %}
If you haven’t received an account activation notification, please contact your school’s system administrator.
{% endhint %}

Once the system has been set up for your school, you should receive an activation email. This email includes a link labeled **“Go to Edusuite.”**

<figure><img src="https://lh7-rt.googleusercontent.com/docsz/AD_4nXfgjrQP0P8NbITlBWJR0vuGZTG5KPC9590gA7qOe4Ool69sQSoCNyemIG-4vZberSOGLDxxiRklF5W5Q4BOONWpAz5npeGMutrPpRZFQMr4rL6Xea756ENUvCXc8ITXAkUioN_dlKl2Yt9kdGOqsuUfSZ6V?key=RJKy0MM-r5p0HGL4_PbKSQ" alt=""><figcaption></figcaption></figure>

* Click on the **Go to Edusuite** link — this will redirect you to the password reset page

<figure><img src="https://lh7-rt.googleusercontent.com/docsz/AD_4nXfaNr-TKXOpKS-OFxQ4-NDmcA8r9VdiymfD2e6YZVuDUQXXVrwaV3n1Dg07Bxv_yuPZOFyQqvEP4gjzvH4KhZTmu6zKrpNcLKKp-QPSRY8ECY9-hpB3tI9tWHE04L7DGuKPICz2p85MvEgn_4x950AN0hLg?key=RJKy0MM-r5p0HGL4_PbKSQ" alt=""><figcaption></figcaption></figure>

* Follow the on-screen instructions to create your password
* Once confirmed, you can proceed to log in to your account

## How to Reset your Password

If you forgot your password:

* On the login page, click **“Forgot Password?”**

<figure><img src="https://lh7-rt.googleusercontent.com/docsz/AD_4nXdQq_MQPRMWBxMt2wZRbSo-Vm5rfiJmi4yDKegcTNTxBSsf4eVC4hhhPoifSrNOm3d-JayNebKi9BDsPsq3DXl3mERshXeZ5EnnISaWenzs65CFA5GFsmOsTXXOl145KacTkWEpwalCHWIsq3c3llqaBRo?key=RJKy0MM-r5p0HGL4_PbKSQ" alt=""><figcaption></figcaption></figure>

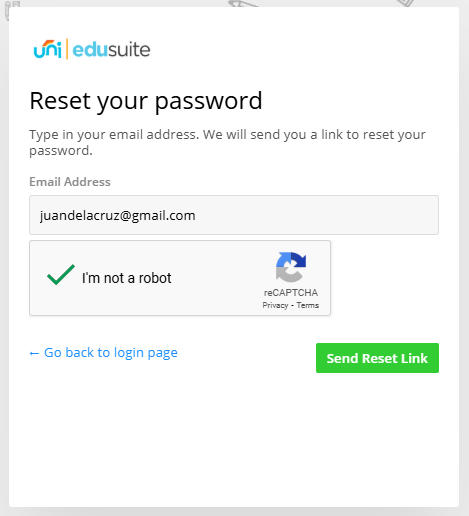
* Enter your registered email address and complete the CAPTCHA verification

<figure><img src="https://lh7-rt.googleusercontent.com/docsz/AD_4nXc5k76BDiofvMl24Jb_mgg_jq8j8i4EENM-j9ozEX-r6j2ZGoMUCFAw5dMamV8cZQO_TKBHh_vxZOm16yk2fwY_tLuRiAVKoAeOxlXA1HoGujk1m1gsYaKG755pw2MFc7RKh6x8R1EsAIpqsNxDuh7ag3E?key=RJKy0MM-r5p0HGL4_PbKSQ" alt=""><figcaption></figcaption></figure>

* Click **Send Reset Link**
* Check your email inbox (and spam/junk folder) for the reset instructions

## How to Log In

<figure><img src="https://lh7-rt.googleusercontent.com/docsz/AD_4nXd8OjqUYpmUXeSiXkNruH2-cVnFtP07XmszGhN0AqNHcudCRd3LXHufnYqxLKFTWcVss6Fdcs9L39oc2dCRDJy3sXIWGSbYUhQj8WTL7g7YKfW93lMHoOl-LDz4AyycnQ1DRmp0LW2_mGrX4gindjgQC5sd?key=RJKy0MM-r5p0HGL4_PbKSQ" alt=""><figcaption></figcaption></figure>

* On the login page, enter your registered **email address** and **password**
* Click the **Login** button to access your account

## How to Log Out

<figure><img src="https://lh7-rt.googleusercontent.com/docsz/AD_4nXd0BJkGJK-t1NlglzbELMSX-i062ypU1ezCJ0b_31qdCzHNY4EJObrD95Oyr0FqTOYjSJU8pIYuzW-WjkN2Qr0xnrMQT63p5i2igjLMoCigIxrmzNemrGRAnSnYmS5NyKitkpC5P96wy1LrN1MIn8l3ba11?key=RJKy0MM-r5p0HGL4_PbKSQ" alt=""><figcaption></figcaption></figure>

* While logged in, click your **display name** located below the school logo
* Select **“Logout”** from the dropdown menu

## Frequently Asked Questions (FAQs)

**Question:** What is the session timeout duration in Edusuite?

**Answer:** The system automatically logs out after **1 hour** of inactivity.

***

**Question:** How many failed login attempts are allowed before a lockout?

**Answer:** You are allowed up to **3 failed attempts** before your account is temporarily locked.

***

**Question:** How long should I wait before attempting to log in again after being locked out?

**Answer:** Please wait **10 minutes** before trying to log in again.

***

**Question:** I'm not receiving emails from Edusuite (e.g., password reset, verification). What should I do?

**Answer:**

* Check your **Spam** or **Trash** folders in case the email was filtered.
* If using a school email, review any active filters that may block incoming messages.
* If the issue persists, contact the **Edusuite Support Team** to verify system logs and email delivery status.


# System Home Page

Last updated: March 2025

Upon logging in, administrators are greeted with their home page, providing quick access to essential tools and information.

## Access and Navigation

The "Home" page is the first screen admins see upon logging in and can be accessed anytime by clicking the **Home** button.

<figure><img src="https://3973081029-files.gitbook.io/~/files/v0/b/gitbook-x-prod.appspot.com/o/spaces%2F-M1SysIMhMO_ls3VlZcw%2Fuploads%2F1YA4NFl3QHvD7UeK4XPg%2Fimage.png?alt=media&amp;token=917bfc90-2212-40ff-83cb-58a5bddbbdaf" alt=""><figcaption></figcaption></figure>

## School Year Selector

To load data for a specific school year, select the desired year from the dropdown at the top of the page. The widget data will be updated accordingly.

<figure><img src="https://3973081029-files.gitbook.io/~/files/v0/b/gitbook-x-prod.appspot.com/o/spaces%2F-M1SysIMhMO_ls3VlZcw%2Fuploads%2FWxdiS42b1wAQVOTi4Rt7%2Fimage.png?alt=media&amp;token=14c1d3fa-6d10-4c08-b52c-e274bd2b66ee" alt=""><figcaption></figcaption></figure>

## Tasks

Your **Tasks** panel, located on the **right side** of the dashboard, lists the items you need to complete. Each task includes the **title**, a **brief description**, and the **due date**.

<figure><img src="https://3973081029-files.gitbook.io/~/files/v0/b/gitbook-x-prod.appspot.com/o/spaces%2F-M1SysIMhMO_ls3VlZcw%2Fuploads%2FX1DBZuY9CSQ3M6LSMmq0%2Fimage.png?alt=media&amp;token=d76bcfd3-9165-47e3-b98e-a47ad77827b3" alt=""><figcaption></figcaption></figure>

#### Task Statuses:

* **Pending**

  * The default status when a task is first assigned
  * Represented by a **hollow circle**
  * If you believe the task is completed, click the circle or task name to notify your clearance reviewer

  *Note: This action does not automatically mark the task as complete*
* **For Verification**
  * Represented by a **blue clock icon**
  * Indicates you’ve marked the task as completed, and it is now awaiting review
* **Done**
  * Marked by a **checked circle** and **crossed-out task details**
  * Indicates the clearance reviewer has officially confirmed your task as complete

## Announcements

Announcements are displayed in the upper-middle section of the page.

<figure><img src="https://3973081029-files.gitbook.io/~/files/v0/b/gitbook-x-prod.appspot.com/o/spaces%2F-M1SysIMhMO_ls3VlZcw%2Fuploads%2FmN4NZlOySDHdL8Zhxu40%2Fimage.png?alt=media&amp;token=ce2fdae9-8a34-41f4-afa6-6ca107ec3295" alt=""><figcaption></figcaption></figure>

## Dashboard

Welcome to your **Dashboard**—the main page where you’ll see a summary of your school’s **enrollment data**, **financials**, and **pending tasks or clearance items**, displayed as **widgets**.

The widgets available to you depend on your **user role** and the settings configured by your **school’s system administrator**. Some users may see all widgets, while others may see only a few.

By default, the dashboard displays data for the **current school term**. You can switch to a **previous** or **upcoming term** by using the dropdown located in the **upper-left corner** of the page.

<figure><img src="https://3973081029-files.gitbook.io/~/files/v0/b/gitbook-x-prod.appspot.com/o/spaces%2F-M1SysIMhMO_ls3VlZcw%2Fuploads%2FAKDJenUZYCo5tjwocyN3%2Fimage.png?alt=media&amp;token=6741f6b7-8dae-4a5e-8e69-2e2f9e70da57" alt=""><figcaption></figcaption></figure>

## Widgets

#### Currently Teaching Faculty

Displays the teaching load information for your school’s faculty.

<figure><img src="https://3973081029-files.gitbook.io/~/files/v0/b/gitbook-x-prod.appspot.com/o/spaces%2F-M1SysIMhMO_ls3VlZcw%2Fuploads%2FYiX2DOod25FGBsiLmxBv%2Fimage.png?alt=media&amp;token=7d010be6-917c-4844-86a5-6d2f27a9f040" alt=""><figcaption></figcaption></figure>

* **Active Faculty**: Total number of faculty members with teaching assignments for the selected term
* **Average Hours per Faculty**: Average number of scheduled teaching hours per faculty member, based on scheduling data
* **Average Sections per Faculty**: Average number of sections assigned to each faculty member
* **Average Units per Faculty**: Average academic units handled per faculty
* **Teachers Teaching Next Term**: Faculty who answered **“YES”** to the Intent to Teach survey for the upcoming term

#### Students Enrolled by Type

Shows the breakdown of enrolled students based on their enrollment status:

<figure><img src="https://3973081029-files.gitbook.io/~/files/v0/b/gitbook-x-prod.appspot.com/o/spaces%2F-M1SysIMhMO_ls3VlZcw%2Fuploads%2FcAxitYQgVHMrV3rpWK51%2Fimage.png?alt=media&amp;token=1d591cbe-18c2-49b3-9c17-4d9743216879" alt=""><figcaption></figcaption></figure>

* **NEW**: Students whose starting term is the current term
* **RETURNEE**: Previously enrolled students who skipped the last term but are now re-enrolled
* **OLD**: Students who were enrolled last term and continue into the current term

#### Students Per Program

Displays the number of students enrolled in each academic program for the selected term.

<figure><img src="https://3973081029-files.gitbook.io/~/files/v0/b/gitbook-x-prod.appspot.com/o/spaces%2F-M1SysIMhMO_ls3VlZcw%2Fuploads%2FRo2AK4hSGsKz1MFp1uEf%2Fimage.png?alt=media&amp;token=962b1451-d215-4709-88bf-6735b06323e4" alt=""><figcaption></figcaption></figure>

#### Incoming Students

Shows the expected enrollees for the **next term** based on admissions and confirmed interest.

<figure><img src="https://3973081029-files.gitbook.io/~/files/v0/b/gitbook-x-prod.appspot.com/o/spaces%2F-M1SysIMhMO_ls3VlZcw%2Fuploads%2FroOqvxuhcd07umhkhUTN%2Fimage.png?alt=media&amp;token=99809bd0-51b4-4400-b98a-4a8a8b5a4c58" alt=""><figcaption></figcaption></figure>

> *Example: If viewing Term 3 of SY 2024–2025, this widget will show students with a starting term of Term 1, SY 2025–2026.*

#### Term Revenue

Displays the total **assessments** and **payments** for the selected term.

<figure><img src="https://3973081029-files.gitbook.io/~/files/v0/b/gitbook-x-prod.appspot.com/o/spaces%2F-M1SysIMhMO_ls3VlZcw%2Fuploads%2Fqk7dQJXC44KXjU3nLXcM%2Fimage.png?alt=media&amp;token=ee5da2e3-804a-4322-b46f-7a7f2075e4e1" alt=""><figcaption></figcaption></figure>

* **Collected**: Total payments received from students
* **Balance**: Outstanding assessments that are yet to be paid

> *Note: This widget excludes transactions under "Other Fees".*

#### Collectibles per Chart of Account

Breaks down collectibles according to their assigned **Ledger/Account Codes**.

<figure><img src="https://3973081029-files.gitbook.io/~/files/v0/b/gitbook-x-prod.appspot.com/o/spaces%2F-M1SysIMhMO_ls3VlZcw%2Fuploads%2FyNAXrfzV6v7fOu5JlKAF%2Fimage.png?alt=media&amp;token=11d78541-1e1e-47bb-83f0-424d7e6789d2" alt=""><figcaption></figcaption></figure>

> *Tuition plan fees without assigned account codes are grouped under “Uncategorized Tuition Fee.”*

#### Collections per Payment Type

Shows a summary of all payments received, categorized by **payment method** (e.g., online payment, bank deposit, over-the-counter, etc.).

<figure><img src="https://3973081029-files.gitbook.io/~/files/v0/b/gitbook-x-prod.appspot.com/o/spaces%2F-M1SysIMhMO_ls3VlZcw%2Fuploads%2FicsCKTOeScVIjknlKFOH%2Fimage.png?alt=media&amp;token=963f6752-fd38-416d-a3a4-a0bcb2e2d6ae" alt=""><figcaption></figcaption></figure>

#### Overpayment Summary

Provides a quick visual overview of how student overpayments are being tracked and allocated within the current term. It helps school administrators and finance personnel monitor:

* Overpayments **applied to the current term** from previous terms
* Overpayments **originating in the current term** that may be moved to future terms
* The **total amount of overpayment** recorded for the current term (when you hover over the bar)

<figure><img src="https://3973081029-files.gitbook.io/~/files/v0/b/gitbook-x-prod.appspot.com/o/spaces%2F-M1SysIMhMO_ls3VlZcw%2Fuploads%2Fv7xUNDTsgOEkYzXkuWEs%2Fimage.png?alt=media&amp;token=e74fb4ca-d907-4e06-a573-1b98be59b215" alt=""><figcaption></figcaption></figure>

#### Opened Sections

Provides a summary of the section offerings for the selected term:

<figure><img src="https://3973081029-files.gitbook.io/~/files/v0/b/gitbook-x-prod.appspot.com/o/spaces%2F-M1SysIMhMO_ls3VlZcw%2Fuploads%2Fak1cV0ZhVDd8WzU9kT01%2Fimage.png?alt=media&amp;token=bf52b44e-8032-4f47-8699-5b7f28d14aa3" alt=""><figcaption></figcaption></figure>

* **Courses**: Total number of unique subjects/courses offered
* **Opened Sections**: Total number of sections created across courses
* **Average Students per Section**: Computed average based on total enrollees and number of sections (when you hover over the bar)


# Planning

Last updated: March 2025

The **Edusuite UNI Planning** **Features** are essential tools that simplify the entire setup process, from curriculum development to scheduling for the upcoming term.

{% content-ref url="/pages/-M1T-YnX5vnBlTgttuxN" %}
[Planning Setup](/product-guide-uni/admin-home/planning-1/planning)
{% endcontent-ref %}

{% content-ref url="/pages/-M630oOzijis6jIuWM9G" %}
[Class Demand](/product-guide-uni/admin-home/planning-1/class-demand)
{% endcontent-ref %}

{% content-ref url="/pages/-M630rd3SI7u9ueKGvHi" %}
[Schedules](/product-guide-uni/admin-home/planning-1/schedules)
{% endcontent-ref %}


# Planning Setup

## Resource Management

{% hint style="info" %}
Aside from [Faculty Data](https://info.edusuite.asia/product-guide-uni/admin-home/planning-1/pages/-M62vG1ZCHhMIQPIIAbk#h.p__CbrIYgyUwxt), the Resource Management items contain the necessary resources to be able to generate a [class schedule](/product-guide-uni/admin-home/planning-1/schedules).&#x20;
{% endhint %}

{% content-ref url="/pages/-M6lkol0HA6rDCyneEX0" %}
[Room Types](/product-guide-uni/admin-home/planning-1/planning/room-types)
{% endcontent-ref %}

{% content-ref url="/pages/-M5ddflqL9Ii7KTELKAX" %}
[Rooms](/product-guide-uni/admin-home/planning-1/planning/rooms)
{% endcontent-ref %}

{% content-ref url="/pages/-M5ddmgCiYIYL8TspzDz" %}
[Schedule Types](/product-guide-uni/admin-home/planning-1/planning/schedule-types)
{% endcontent-ref %}

{% content-ref url="/pages/-M5ddpeImW0s7BH-E6ts" %}
[Departments](/product-guide-uni/admin-home/planning-1/planning/colleges)
{% endcontent-ref %}

{% content-ref url="/pages/-MRGWX5UJwomQ4gTHguZ" %}
[Colleges](/product-guide-uni/admin-home/planning-1/planning/colleges-1)
{% endcontent-ref %}

## Curriculum Building

{% content-ref url="/pages/-M6ln6x7tTe0qWC3tvdZ" %}
[Grading Systems](/product-guide-uni/admin-home/planning-1/planning/grading-systems)
{% endcontent-ref %}

{% content-ref url="/pages/-M5ddv29We9ceskpoIEf" %}
[Courses](/product-guide-uni/admin-home/planning-1/planning/courses)
{% endcontent-ref %}

{% content-ref url="/pages/-M5ddyMc8Ca5XSJKopw9" %}
[Course Equivalencies](/product-guide-uni/admin-home/planning-1/planning/course-equivalency)
{% endcontent-ref %}

{% content-ref url="/pages/-M5de0NnxRButlQPJRoe" %}
[Programs](/product-guide-uni/admin-home/planning-1/planning/programs)
{% endcontent-ref %}

## Block Sections Management

{% content-ref url="/pages/-M5de2jC0PEOZPuk27ZC" %}
[Block Sections](/product-guide-uni/admin-home/planning-1/planning/block-sections)
{% endcontent-ref %}


# Room Types

Last updated: March 2025

Room types define the classification of your school's classrooms, laboratories, and other facilities. This module must be set up before adding rooms.

## Access and Navigation

The **Room Types** module can be found under **Planning** > **Planning Setup**

<figure><img src="https://lh7-rt.googleusercontent.com/docsz/AD_4nXeqfcmSrs81XEXkS5uoSoXm4zypSc_kEeW17COu9PiInlYQKYKjenFe7WJPqAYq7gLfFHEXxhbpcD3kK8gMhRqgKIW34XKXcAxhOQj_leBILPf2fbr0LLZ0RIVyTC9qsUGV15P7xYv7w5M6_piHdPDAMv0I?key=8s5pClNFFKmQ8k6ExJ2D8A" alt=""><figcaption></figcaption></figure>

If you cannot view a link from the list, check the privilege assigned to your user account or role.

{% hint style="danger" %}
Contact your school’s system administrator to request view or edit access if you cannot access the rights management screen.
{% endhint %}

## Create a New Room Type

* To create a new room type, click **+ New Room Type** found in the upper right corner

<figure><img src="https://lh7-rt.googleusercontent.com/docsz/AD_4nXdPw4NytRPNdPdtSjGic65pYZhH1tigCwrfj7wTNSEgyfkUKJDbK3gqRyNaG8gCJie7koxlBgmZESAPbY81kmQ1hX79BsPgeyqHrMq8VcBAFJiqiXIJxvaeGqBEOeGFF_9XibUt_muT01Gn_Ie-0Vniavc3?key=8s5pClNFFKmQ8k6ExJ2D8A" alt=""><figcaption></figcaption></figure>

* Fill out the necessary details
  * **Room Type Code** -  Must be unique
  * **Description** - Provides details about the room type
  * **Color Tag** - The assigned color will be used for identification in the Scheduler

<figure><img src="https://lh7-rt.googleusercontent.com/docsz/AD_4nXdeuB7CKumOa0qHolPIpdCNSAE5TJy4VqrwcJr3PgEJYAlKyAu_V7EXOkd4uu8R9oHuODONNMl4vtp4w8CaPtUVoc9YS1Xvb1cXT-EuaSJL82xZBq6sTnva4Nto6Fk7mB_7PN_TKKxjb0L5SWKqCEF1S2Q?key=8s5pClNFFKmQ8k6ExJ2D8A" alt=""><figcaption></figcaption></figure>

* Click the **Add Room Type** button once you are done filling out the details

<figure><img src="https://3973081029-files.gitbook.io/~/files/v0/b/gitbook-x-prod.appspot.com/o/spaces%2F-M1SysIMhMO_ls3VlZcw%2Fuploads%2FPnjBuTKgY2e5HLyByVDu%2Fimage.png?alt=media&amp;token=d0bdbb0f-0084-4a44-92d6-0b76f3d1d41a" alt=""><figcaption></figcaption></figure>

## Edit a Room Type

{% hint style="info" %}
Edits to Room Types are instantly reflected in the Scheduler View, regardless of the term selected in the main Planning menu.
{% endhint %}

To edit a room type:

* Select the room type you want to modify and click the **Pencil** icon

<figure><img src="https://lh7-rt.googleusercontent.com/docsz/AD_4nXehLNJaXSHD4T5dnXfOxgxrjFkIacXYaDGdUmO8xqU0bCtfmbs5wJsTKDEI8j3-P20ESzSpiglCMHInJkt9fvpYpS_VPVuEJ74_bnebBLXjVQKLZaaWjl1GizqRi5HH8tZdOoVkr6Q39thWJqnyYY72nP4?key=8s5pClNFFKmQ8k6ExJ2D8A" alt=""><figcaption></figcaption></figure>

* In the Update Room Type Information form, update the necessary fields. Note: Room type codes must remain unique
* Click the **Update Room Type** button to save your changes. You will be redirected to the Room Types page, where the updates will be immediately reflected

## Delete a Room Type

{% hint style="warning" %}
Room types that have already been assigned to a course cannot be deleted.
{% endhint %}

{% hint style="info" %}
Edits to Room Types are instantly applied to the Scheduler View, regardless of the term selected in the main Planning menu.
{% endhint %}

To delete a room type:

* Select the room type you want to remove and click the **Trash Bin** icon

<figure><img src="https://lh7-rt.googleusercontent.com/docsz/AD_4nXeO5UgKrrMyxsRfNI-FjyngLj2mOMfzMC1M7mu8uPZ8gD8LTyeZ7vuxUqUrDjz6cjBKVb85V-bRukNamBrsGuSdH6M-KDOICF6-YgVsYCJJQRhdIO7UbuQnShnCBNGNcByIHCDxbdDtQPqsbn-w8XDSezbQ?key=8s5pClNFFKmQ8k6ExJ2D8A" alt=""><figcaption></figcaption></figure>

* A confirmation alert will appear asking if you want to proceed with the deletion

<figure><img src="https://lh7-rt.googleusercontent.com/docsz/AD_4nXfmuXoe15A5DidcK_yRp21UN9oO5fy5VJEGanqjSKhnaHCs3p_ZmFR45T-BaLco_RdhxJ5te0KdWKNC70lFFskdYCIVWu9KYPPkQXqwqk3ALaOVAy3AYaro0qEBm4N7fEzchsIZXM_npYd_oGzq32KkacA?key=8s5pClNFFKmQ8k6ExJ2D8A" alt=""><figcaption></figcaption></figure>

* Click **Delete** to confirm. The room type will be removed from the list

<figure><img src="https://lh7-rt.googleusercontent.com/docsz/AD_4nXfS_MY1VH67vllWv8yZqxR2GypHjEL0NaKr2kBtV4tKRj-62U9pG8IPs6jXcLj3YTK9rSmGkkYNQH-xj4bWOmjAisxpDTN_kdj_M0fAeXKEjxnYMOC9uZPm3bIAkxThBQPcDqLlfISS_JDFsrMFZ72w-4Q?key=8s5pClNFFKmQ8k6ExJ2D8A" alt=""><figcaption></figcaption></figure>

## Search a Room Type

To search for a room type, enter a keyword or the exact text in the search bar at the upper-right corner and press **Enter**. The system will display all matching results.

<figure><img src="https://lh7-rt.googleusercontent.com/docsz/AD_4nXdWBl0QkSHacZPwso5DdeGCJW_Xf_oFJOi3WVTi_P2GFy3rvhUjnU0ZfXG4oDwkEx5wTGsvldbqm2RhpQ0RR0ISx_jTNVSWN8VWGblYXwI3PRNcTGQXkDSUAT6QJbR2MCC3ZMQ9BR8UTCkzbyNqAnYXlDo?key=8s5pClNFFKmQ8k6ExJ2D8A" alt=""><figcaption></figcaption></figure>

## Frequently Asked Questions (FAQs)

Question: Why can't I see the "Room Types" menu in my account?

Answer: Ensure that your user account or role has the necessary privileges. To verify:

1. Navigate to **Users > User Setup > User Groups**.
2. Check if your account has the required permissions to access the "Room Types" menu.


# Rooms

Last updated: March 2025

Rooms are labeled for your school's resources, including classrooms, laboratories, and other facilities. To enable the Room Module, you must first complete the Room Type Module.

## Access and Navigation

The **Rooms** module can be found under **Planning** > **Planning Setup**.

<figure><img src="https://lh7-rt.googleusercontent.com/docsz/AD_4nXdIHBta2eWZeJCBDHdZFZLMQvQP0f-28j7yhF2BHYuGFs67VkjOavNvVwIN8KpzJgIllbUIX_fcN7oJfbfNHKVt3OXGVr0UqJgWkORjwrpoWncUxReTK0-aOvPXK0sqnzAV5e4xnYO7k8u3TDLqDFJqXNQ_?key=8s5pClNFFKmQ8k6ExJ2D8A" alt=""><figcaption></figcaption></figure>

If you cannot view a link from the list, check the privilege assigned to your user account or role.

{% hint style="danger" %}
Contact your school’s system administrator to request view or edit access if you cannot access the rights management screen.
{% endhint %}

## Create a New Room

* To create a new room, click **+ New Room** in the upper right corner

<figure><img src="https://lh7-rt.googleusercontent.com/docsz/AD_4nXfOB5C-EQvN9qQTMuV90mbqlL7YoHuHCXUHlxkBt1mK6qvxu0bR02PkkQ1VxEojk0j2DeGoiHzAuBIr6mVTbyCDIpSlqtcAe6Sr5biW-MlLC4bJVMMI8Qzgb3FnLEXR0VUvzCdl7ZamvKT1OjuFe5pD5BAk?key=8s5pClNFFKmQ8k6ExJ2D8A" alt=""><figcaption></figcaption></figure>

* Fill out the required details
  * **Room Code** - ensure the Room Code is unique
  * **Description** - provides details about the room
  * **Capacity** - define the maximum number of occupants
  * **Room Type** - will display the room types from the previous module

<figure><img src="https://lh7-rt.googleusercontent.com/docsz/AD_4nXde2a9ZETghCOe36pJcVP5GtlPUgY7ipZE4GYx2EOvd53PZM0SvE805sfGBYW9kBcZ8efLtuWDNooH9IvuCtNaMdosDIgQIGK1ciH9V4gQQHks5xG5gdAAD_DEaI6JVmF02Qoki1J-_I31KdeB1SswItgto?key=8s5pClNFFKmQ8k6ExJ2D8A" alt=""><figcaption></figcaption></figure>

* Click the **Add Room** button to save the new room

## Edit a Room

{% hint style="info" %}
Edits to Room Types are instantly reflected in the Scheduler View, regardless of the term selected in the main Planning menu.
{% endhint %}

* To edit a room, select the room you want to edit and click the **Pencil** icon

<figure><img src="https://lh7-rt.googleusercontent.com/docsz/AD_4nXdbB_fc73wGrFPS8eIejdRhch0xn_V8aAE9OGAkfXwD8Mi9_2CK7pi0hQ3ZybDAAOUXYSj4VWYcCZNiU8Uqyj83y7ugH0iR4LyiXvhze4ZoAJWY3aLAOTz-pmRnGHyAxJrYNRj_JUZFbVVB0A7SIBWqv5r7?key=8s5pClNFFKmQ8k6ExJ2D8A" alt=""><figcaption></figcaption></figure>

* In the Update Room Information form, update the necessary fields. Note: Room codes must remain unique
* Click the **Update Room** button to save your changes. You will be redirected to the Room page, where the updates will be immediately reflected

## Delete a Room

{% hint style="warning" %}
Rooms that are already scheduled, assigned, or in use for a course cannot be deleted.
{% endhint %}

{% hint style="info" %}
Edits to Rooms are instantly applied to the Scheduler View, regardless of the term selected in the main Planning menu.
{% endhint %}

To delete a room type:

* Select the room you want to remove and click the **Trash Bin** icon

<figure><img src="https://lh7-rt.googleusercontent.com/docsz/AD_4nXec3XR4fjwwySAcMjmsgQpDlHBUeQ2ZO8V57-1n_GsOt0Xj2v7FRw4V28yg9wnn0rkSgZaJlRxIXjDZMnSsJjN0w05aQf7vUpEHITsGQOclEn4sPUqVlYvWQYXw8_vGZdcUic91skcj1V-HeBXa5qSuD18C?key=8s5pClNFFKmQ8k6ExJ2D8A" alt=""><figcaption></figcaption></figure>

* A confirmation alert will appear asking if you want to proceed with the deletion

<figure><img src="https://lh7-rt.googleusercontent.com/docsz/AD_4nXeOJGFImg4VYjHxlsLt3Yp5DsbaS5c2p4GFYnC_ewra_WATL6AJIa4ne1Tz4eRB3DWWsoAUaNWKoNF8o6hSAydpobYaVLGcYc_yGeeM0-EBKxPWaZf9uyjnsHw3KlcTZfkC8Hy-1YUcZhp_8dBOhIy5Sv0?key=8s5pClNFFKmQ8k6ExJ2D8A" alt=""><figcaption></figcaption></figure>

* Click **Delete** to confirm. The room type will be removed from the list

<figure><img src="https://lh7-rt.googleusercontent.com/docsz/AD_4nXeYV9rtz-HfXwS50RgZiF3Cc3ILNbvSlaHxCBssz_qSzhsLh7zp3QZ9YV9kxhqdiQgcqdnOZOqE44Kg88pBMko8QfGKcU3y5vSD1HGbdZpxwu-Wx6AqcrfJVyiVX1veaRgsI-m-R3NszN4SFrU4hyydjPg?key=8s5pClNFFKmQ8k6ExJ2D8A" alt=""><figcaption></figcaption></figure>

## Add an Unavailable Schedule

* Click **Edit Availability** on the right side of the room

<figure><img src="https://lh7-rt.googleusercontent.com/docsz/AD_4nXdndF1cBk8hT8nQGsaiUYhQEpuKI-6mSKgKRFUWq506V6HNvmG4p73SuIbb4N1hhQWsJEkrH3jKPiuWkmysYH3WWxpEQ2fYGVubBlXSlUkOutWvXM0uWhNbbOpiu7qiPelNnt9gzffP_SIKL_nrr3oM79kA?key=8s5pClNFFKmQ8k6ExJ2D8A" alt=""><figcaption></figcaption></figure>

* To mark the room as unavailable, click **+ Unavailable Schedule** in the upper right corner. This will open the **Create New Room Unavailability** form

<figure><img src="https://lh7-rt.googleusercontent.com/docsz/AD_4nXdoi6W4r6E341og-XUIXyzxHlkx8yY7LEN6W7o9iZhjP-hUyhRJPFHZyu21hjHCDduHJxoxirTBziy6lmR2p9e8vBC8ja-6QI8zsUbz4h6xPgvpLQrBLL8suHhmHYsdcshZoc3xxyu8oR0X7J7kNImRe267?key=8s5pClNFFKmQ8k6ExJ2D8A" alt=""><figcaption></figcaption></figure>

* Fill in all required details. Ensure that no fields are left blank
  * Start Time
  * End Time
  * Day of the Week

<figure><img src="https://lh7-rt.googleusercontent.com/docsz/AD_4nXeKQ-FHmeWsOlKwntcEH6XCIniNPNUmTv_75mbTIUmSIJkORYXHH5Mx69U5X6eIE8DDYqYvOoWyrHimcGKkfafPDdK4YR852ra-fnemSXyiTGppsIDzGxLoXsbm3HIbMpLnAB8k93oNyIRgAzqK5Uu6lzLm?key=8s5pClNFFKmQ8k6ExJ2D8A" alt=""><figcaption></figcaption></figure>

* Click **Add Room Unavailability** to save the schedule. Once submitted, the new unavailability schedule will appear in the list

<figure><img src="https://lh7-rt.googleusercontent.com/docsz/AD_4nXcRijrNuIL4nWl9h-Rw4zaPC5hXORCquqExCZcsnkrZvy0y8CrUO7ZKdts7Lz2YzZsM5GTDNMmKbfv-9H9juslLCgizjxfRuTZdFAXdX8OeajHT6pkTenaSxDp7aSlnQUm43EBF9tiGKT-nS3gananywL-_?key=8s5pClNFFKmQ8k6ExJ2D8A" alt=""><figcaption></figcaption></figure>

## Delete an Unavailable Schedule

* Click **Edit Availability** on the right side of the room. A list of unavailable schedules for that room will be displayed

<figure><img src="https://lh7-rt.googleusercontent.com/docsz/AD_4nXdndF1cBk8hT8nQGsaiUYhQEpuKI-6mSKgKRFUWq506V6HNvmG4p73SuIbb4N1hhQWsJEkrH3jKPiuWkmysYH3WWxpEQ2fYGVubBlXSlUkOutWvXM0uWhNbbOpiu7qiPelNnt9gzffP_SIKL_nrr3oM79kA?key=8s5pClNFFKmQ8k6ExJ2D8A" alt=""><figcaption></figcaption></figure>

* Find the schedule you want to delete and click the **Trash Bin** icon

<figure><img src="https://lh7-rt.googleusercontent.com/docsz/AD_4nXfx5ZO9-L3OehH3TR-lTdKLiX2FTDtnB2vCbF-OAmsEJD65i8HE62k-3d-myE-iRLrojXslZf6XRA1DOBNJRe2zJt3SYHZnuOWhB1uOt8fgHx7cVSSV99086MO0Prm6nOA_I0fnL-oP-TWoWhpn7TAPoXpg?key=8s5pClNFFKmQ8k6ExJ2D8A" alt=""><figcaption></figcaption></figure>

* A confirmation message will appear. Click **Delete** to proceed

<figure><img src="https://lh7-rt.googleusercontent.com/docsz/AD_4nXczHwTiCrpMXfgoccDJiriLHJ4g8SFMBSFnGgZR9FudDF69CRegWo31PrNk_4aIbC6qNSOW0p9FVVCITLWl69Cqq1bUKpnmt-d7cpQPgnNO6bDCcb2gYSKoutzn5odrw_6XBQUffmQfQEF5vOZi3jceKw-U?key=8s5pClNFFKmQ8k6ExJ2D8A" alt=""><figcaption></figcaption></figure>

* The selected schedule will be removed from the list

<figure><img src="https://lh7-rt.googleusercontent.com/docsz/AD_4nXet1WXS-u3xzYwCytvmU-m7Uif16qmC_2tDg24HwRw0TARuBAGc7gXLYnpXiJq0Bj52RxEdKp2Pl3LbRdnUMc_gy-uZZGkmMJr1h17wQwaKPbo6DYlejS1gTgjg42dc5Cow2AJUZrEnOeVZeiJkKB_rnEPJ?key=8s5pClNFFKmQ8k6ExJ2D8A" alt=""><figcaption></figcaption></figure>

## Search a Room

To search a room, enter a keyword or the exact room name in the **search bar** at the upper-right corner, then press **Enter** to search. The system will display all matching results based on your input.

<figure><img src="https://lh7-rt.googleusercontent.com/docsz/AD_4nXeaEL2u_xVEzl-lBgPEZzlo6pENEKKjb5I8fLikakQKZo6QKd6gYMixZQHQKTvOIeDnzCw3XkWXJRDY2wboSNi5pp5kb4fv1QnHJEhU29hQhgCQ387pA0L4gtwl0JejTtC7wUchFzvipC9k5Fm9b0a0Sz3-?key=8s5pClNFFKmQ8k6ExJ2D8A" alt=""><figcaption></figcaption></figure>

## Import Rooms via CSV file

{% hint style="info" %}
Using the bulk import feature saves time from creating room entries one by one
{% endhint %}

* Click the **Upload** button in the upper-right corner of the page, next to the search bar

<figure><img src="https://lh7-rt.googleusercontent.com/docsz/AD_4nXdXaNoP8A0ymiMOAmX3xX82mV9jGgQyUe1O-uF7kWAz76cjiqdHivST76PZFtumWCuU66-HRqVeVQ1WWQSN_CrxZwTiOgBIfNQEiIH8TvCjO6pAOyCfVXiPHhu2fftS1TyRziFoG3RwFAPixmjaoylxRoWK?key=8s5pClNFFKmQ8k6ExJ2D8A" alt=""><figcaption></figcaption></figure>

* To ensure the room details meet the required format, download the **template file** by clicking the provided link

<figure><img src="https://lh7-rt.googleusercontent.com/docsz/AD_4nXcJSqDHAB9krLNGLADInFC2yJq9HQFqCqO5-9c5mNHvvrQsd4vFdbZQswfIzXi0Wd3jiZyO7uO2KLKEHNg0Bwu8XM4Km55k_BM5bBthVqtyT71Fch-Zq1BYXR4ljgrCjHiAaLlEsEI3OwFIJgG-CdprX-I?key=8s5pClNFFKmQ8k6ExJ2D8A" alt=""><figcaption></figcaption></figure>

* Once your file is ready, click on the **Choose a File or Drag it Here** field to upload it

<figure><img src="https://lh7-rt.googleusercontent.com/docsz/AD_4nXdDLuAtLq5N9fTAXwdMvaM-kZmYBuMbKMYCHNYD9SVQDnVfpb2zSZGvvH5d1sdfawK1swJIAsPpQVh-iInjsACQ5oIZi6eYKtggoPkHvrRKprr_tuqCN0ElgH_vZos_GHw7peI-kaw1ltc8g7lKFTtC2-7_?key=8s5pClNFFKmQ8k6ExJ2D8A" alt=""><figcaption></figcaption></figure>

* Click **Import File** after the upload is complete. The uploaded rooms will now be displayed in the list

## Frequently Asked Questions (FAQs)

**Question:** Why Can’t I See the “Room” Menu in My Account?

**Answer:**  If the **"Room"** menu is not visible in your account, check if your user role has the necessary privileges:

1. Navigate to **Users > User Setup > User Groups**
2. Ensure that your account is assigned the correct permissions to access the **Room** module

<figure><img src="https://lh7-rt.googleusercontent.com/docsz/AD_4nXdO8qSZ-kn4mvtzFxzSoHtHzvQETYGiqscUCjWUb9zETZUprNOBHwnEQl0nOTUYs9LA--vxbDZQxoHM8qsOFjplzXp9PaF5Am4xzeTyMPEpQZvO0Ck-6MHYGir3dg1lkFtBVlXxtA9hQ-uX7WGHWmE2yKwn?key=8s5pClNFFKmQ8k6ExJ2D8A" alt=""><figcaption></figcaption></figure>

***

**Question:** Why Am I Getting an Error When Uploading?

**Answer:** If you're encountering an error during file uploads, check that your file meets the following requirements:

* **Room Code** must be unique
* **Capacity** must be a numeric value and not less than 1
* **Room Type Codes** must be separated by commas

Ensure all data is correctly formatted before uploading

***

**Question:** Why Is One Room Missing After Uploading?

**Answer:** The first line of the uploaded **CSV** file is ignored because it serves as the column header.

To ensure all rooms are included:

* Verify that the room entries start from the **second row** of the file
* Check for any formatting errors or missing data in the file before uploading


# Schedule Types

Last updated: March 2025

The **Schedule Types** section allows you to define the time allocation for each room (e.g., **“3 hours in a lecture room”**).

## Access and Navigation

The **Schedule Types** module can be found under **Planning** > **Planning Setup**.

<figure><img src="https://lh7-rt.googleusercontent.com/docsz/AD_4nXc4Ys6Tx1qoyNkip9_8VRMAKmxs6GVm2KA6aDa5LISa7cJgcGQz5CcdmcGiA4E2s1IyhANvfNzPZCb9M34-2MyN7hXkoWCG5eXToLV5QiTq608veiy4HiRr1WPe1Anu8aLZ0bT5zF44XWyLpk-2vSXnsuk?key=8s5pClNFFKmQ8k6ExJ2D8A" alt=""><figcaption></figcaption></figure>

If you cannot view the link from the list, check the privilege assigned to your user account or role.

{% hint style="danger" %}
Contact your school’s system administrator to request view or edit access if you cannot access the rights management screen.
{% endhint %}

## Create a New Schedule Type

* Click **+ New Schedule Type** in the upper-right corner

<figure><img src="https://lh7-rt.googleusercontent.com/docsz/AD_4nXfLnWdwUF45Ez6fHpCypF5op5YdpUXv7Cs28L3zRl8dJQLjOv1zJ_3BSqFK4KJHj4k__-ciKK_WkkbE21zTREaQCNGEmI5y9yhs_jLVSLYnsIY-nSD_Sqa2JM7phstTnO825nf_wKBTO8SpxxCDfQxUZ8jQ?key=8s5pClNFFKmQ8k6ExJ2D8A" alt=""><figcaption></figcaption></figure>

* Fill out the required details
  * Label - ensure the label is unique
  * Meetings - specify the required room type and the duration of each class session
    * Room Type
    * Hours
    * Alternative Room Types

<figure><img src="https://lh7-rt.googleusercontent.com/docsz/AD_4nXcscRrvO0V3DHbpsmc9mMf3cTSSoD-jg-uQZys1RFXP8394YAT2P4sSCV6ds-5PHZh7o_k0p4q_zyGPID0WagcR2YZw14buEbjO5IGDjB9Ff_gxOIs5ppB9-uWBK_WufM4MhQnp_ez23zoQb43IgQqQlEc?key=8s5pClNFFKmQ8k6ExJ2D8A" alt=""><figcaption></figcaption></figure>

* Click **Add Schedule Type** to save

## Edit a Schedule Type

{% hint style="info" %}
Edits to Schedule Types are instantly reflected in the Scheduler View, regardless of the term selected in the main Planning menu.
{% endhint %}

* To edit a schedule type, select the schedule type you want to edit and click the **Pencil** icon

<figure><img src="https://lh7-rt.googleusercontent.com/docsz/AD_4nXerMcojxnJVu-BwxDYI7m898kisZQvZtrEVWGLK-5SzeYCX_o5FRGBjTdUa2pJSHmxU0x9fYPLEsNQAVpxiFUA6uR_Eb9hKIZ0ep8sjsljqj05_pSl4pCHof3bWnbWcIX0xcf4P17mpLFZEsyCad0rjkQ7-?key=8s5pClNFFKmQ8k6ExJ2D8A" alt=""><figcaption></figcaption></figure>

* In the Edit Schedule Type Information form, update the necessary fields
  * The label must remain unique
  * The Room Type and Alternative Room Types fields cannot be edited once set
* Click the **Update Schedule Type** button to save your changes. You will be redirected to the Schedule Type page, where the updates will be immediately reflected

## Delete a Schedule Type

{% hint style="info" %}
Edits to Schedule Types are instantly reflected in the Scheduler View, regardless of the term selected in the main Planning menu.
{% endhint %}

* Select the Schedule Type you want to delete, then click the **Trash Bin** icon next to it

<figure><img src="https://lh7-rt.googleusercontent.com/docsz/AD_4nXemTHTHfVb3HyqsuaH8opNOBRqrH2skhKbNwrnmrhr4572urShLZim8Ok4qbhyJkG7RXTaKDYPPIjy8mJim_zkB4hrxXOVG4z0NErojW-y92q3B935VYEP5W_DBS6AQq2ziyvhV2QFLMenG6bnqAUv5qMXo?key=8s5pClNFFKmQ8k6ExJ2D8A" alt=""><figcaption></figcaption></figure>

* A confirmation message will appear—click **Delete** to proceed. The schedule type will be removed from the list

<figure><img src="https://lh7-rt.googleusercontent.com/docsz/AD_4nXdqCr0Q4lLX4LCVEhj7fXWpNBT15Sl0XGTOz8rTCYaDNHSBVONNJrm4Fpo_bpQZdJKqBL8hD9DfHrAQBpJXK8BY58xU7lsXsMAmFQuDDgLek16FddapsQYbyBiY3sA5iU4SgdG5pvr0_D43pstssjUrszwf?key=8s5pClNFFKmQ8k6ExJ2D8A" alt=""><figcaption></figcaption></figure>

## View Meetings

* Click the **View Meetings** button

<figure><img src="https://lh7-rt.googleusercontent.com/docsz/AD_4nXc4Z6HRO27woxygwEclo59omf17IZPlg9_7N1Xk2xNX-4CnYW7XCFvUWIOndU2R9VeaEChWq3rYV-OldWYfBM7Z0ja1tjVF2vd3uzssKHKNo-8RjxwZl_s5JlqnYsjE40YgxfFcl6aBpBn4-SQ9wSUU5h68?key=8s5pClNFFKmQ8k6ExJ2D8A" alt=""><figcaption></figcaption></figure>

* The system will display the plotted schedules, organized weekly and per hour

<figure><img src="https://lh7-rt.googleusercontent.com/docsz/AD_4nXc4qCkYTFHB8PBebetAvHoLuCiPBLfvoDPb3Sw1-55N6Rh6DPSO5EOpkbSGgCxV-TtZzaYmEcEArHq5gP2GoudURgXwct2lea36aEnHMk24fRwtv6ziZf27gyPLd75uQS-RwFo-XOfCcnZDNEzp22QbTIbl?key=8s5pClNFFKmQ8k6ExJ2D8A" alt=""><figcaption></figcaption></figure>

## Add a Possible Time Slot

* Click the **View Meetings** button

<figure><img src="https://lh7-rt.googleusercontent.com/docsz/AD_4nXc4Z6HRO27woxygwEclo59omf17IZPlg9_7N1Xk2xNX-4CnYW7XCFvUWIOndU2R9VeaEChWq3rYV-OldWYfBM7Z0ja1tjVF2vd3uzssKHKNo-8RjxwZl_s5JlqnYsjE40YgxfFcl6aBpBn4-SQ9wSUU5h68?key=8s5pClNFFKmQ8k6ExJ2D8A" alt=""><figcaption></figcaption></figure>

* Click the **Add Possible Time Slot** button at the bottom of the page

<figure><img src="https://lh7-rt.googleusercontent.com/docsz/AD_4nXcIbjwtWvvHsuPypQiEG0Fkj25wQlBhjYXUgIXsb_3lP0-eW5mAV9EyQWxDp3s-L7Fiyt4cclLVXxImCFX1Pmh-ZorclTMiyAn31IDl04pfzL8qVxdjfv3DGpKidtaLHQjHPggy-4BQDzASkcOsNJFqCSvT?key=8s5pClNFFKmQ8k6ExJ2D8A" alt=""><figcaption></figcaption></figure>

* The “New Possible Schedule” form will appear. Ensure the total hours per week match the schedule type’s required hours

<figure><img src="https://lh7-rt.googleusercontent.com/docsz/AD_4nXeazerZMb42xeiz7LDDF9uo67FLylqsF0R6jf1wWjqaybiZQ-AR6bCjBkJG5-ykfr-TcnurNih2cCKBAGwUwiAB_UODpnDDL8z525Tj_I9zy2uklBW3fXNiexNL81OXofMrFV-5MOrEL7HmXho92l-O_M-a?key=8s5pClNFFKmQ8k6ExJ2D8A" alt=""><figcaption></figcaption></figure>

* Click the **Add Possible Schedule** button to save. You will be redirected to the View Meetings page, where the newly added schedule will be displayed

## Upload Possible Time Slots via CSV file

* Click the **Upload** button in the upper-right corner of the page

<figure><img src="https://lh7-rt.googleusercontent.com/docsz/AD_4nXfIoDDvI6eNdgip5uu5EDzHfn8yT8BKKZjj9Fk_C_TlqeSbUD9aS4AGYrrXPgGgpafK1Zql_szkXdthN6EcYpJhmMonFllmCERIlQsNPBdwRzu4CpzhTKnOo1Fth3IxZeXip6lcGfoCk7P_0-xmnxQIix2Q?key=8s5pClNFFKmQ8k6ExJ2D8A" alt=""><figcaption></figcaption></figure>

* To ensure the uploaded details match the required format, download the **template file** by clicking the provided link

<figure><img src="https://lh7-rt.googleusercontent.com/docsz/AD_4nXfuvuHFbDl4uMgB6zrq4l8Bas1DVLC7U5ZRju2RRu45yagIbMuKV5JhVJaD0Ne09WT7Re1VzO0J9B9sCzGeNx0NWACH0Xf7N6x8Y-eQpGhu3LR2XmuneT80yo6Sgik7lxoYKCMTkQcW9v3Boon6sMkEBiuT?key=8s5pClNFFKmQ8k6ExJ2D8A" alt=""><figcaption></figcaption></figure>

* Once your file is ready, click **Choose the .CSV File or Drag It Here** to upload
* Click **Import Schedules** after the upload is complete. The imported time slots will now be displayed in the list

## Delete Possible Time Slots

* Locate the schedule you want to remove. Click the **X** button at the end of its row

<figure><img src="https://lh7-rt.googleusercontent.com/docsz/AD_4nXftNQdmzsnzvG7r_kDeDIsohEb4eqvbR7K0tASbSLESDXzYgb11BfbDfnVxczToTJlYMVy91Epg76zpYuL8sY3qTTABi9E1zKGlUXvazkQZI1BRG7_mqwsmtgsliNZz5VQcSG6PvSr7Qdgft0ZlA6dUHws?key=8s5pClNFFKmQ8k6ExJ2D8A" alt=""><figcaption></figcaption></figure>

* A confirmation message will appear—click **Delete** to confirm. The schedule will be removed from the list.

<figure><img src="https://lh7-rt.googleusercontent.com/docsz/AD_4nXe4EuFwzzpEeYiwEM6Iao4s0Ff3iV1wthnw69NFuZvOjhjBgtLsdFos9aAgn60jyMqJf4PaH-1x9OP3v6nwCi558JFmhfrmgjN9g74OT6-VQgrHzqCqKmwYa4s4DNDX_Hn4FUKoXAK3zHHFm4Ap9X-FZs1n?key=8s5pClNFFKmQ8k6ExJ2D8A" alt=""><figcaption></figcaption></figure>

## Search a Schedule Type

Enter a keyword or the exact schedule type name in the **search bar** at the upper-right corner, then press **Enter** to search. The system will display all matching results based on your input.

<figure><img src="https://lh7-rt.googleusercontent.com/docsz/AD_4nXeyOpGbUb74bGwLlXUIGrxdx6pDw62pYEby6Mvsi2cdn1K7G7Y6KDGrTsicDHCgrgH8_JvHYabY4mOO85Dvj-GA1FpVBvI_nrB2fko8vTxR5HkMB5KwqiWnUaDvaEaMaBgKz2njOEBVmoLUwnuCYYMOpcRc?key=8s5pClNFFKmQ8k6ExJ2D8A" alt=""><figcaption></figcaption></figure>

## Frequently Asked Questions (FAQs)

**Question:** Why Can’t I See the “Schedule Types” Menu in My Account?

**Answer:** If the **"Schedule Types"** menu is not visible in your account, check if your user role has the necessary privileges:

1. Navigate to **Users > User Setup > User Groups**
2. Ensure that your account is assigned the correct permissions to access the **Schedule Types** module

<figure><img src="https://lh7-rt.googleusercontent.com/docsz/AD_4nXdO8qSZ-kn4mvtzFxzSoHtHzvQETYGiqscUCjWUb9zETZUprNOBHwnEQl0nOTUYs9LA--vxbDZQxoHM8qsOFjplzXp9PaF5Am4xzeTyMPEpQZvO0Ck-6MHYGir3dg1lkFtBVlXxtA9hQ-uX7WGHWmE2yKwn?key=8s5pClNFFKmQ8k6ExJ2D8A" alt=""><figcaption></figcaption></figure>

***

**Question:** Why Am I Getting an Error When Uploading?

**Answer:** If you're encountering an error during file uploads, ensure that your file meets the following requirements:

* **Start Time** must follow the **HH:mm** format (e.g., **09:00**).
* **End Time** must follow the **HH:mm** format (e.g., **12:00**).
* **Days of the Week** must be represented as **M, T, W, TH, F, SAT, SUN** and can include multiple days, separated by **|** (e.g., **M|W|F**).
* **Total weekly hours** must match the **Schedule Type's** required hours.

Verify the file formatting before uploading to avoid errors.


# Departments

Last updated: March 2025

The **Department** section allows you to document the various departments and their respective heads within the school. Departments serve as groupings for subjects (such as **General Education** and **Religious Education**)

## Access and Navigation

The **Departments** module can be found under **Planning** > **Planning Setup**.

<figure><img src="https://lh7-rt.googleusercontent.com/docsz/AD_4nXfQk9dXwuRkvQ52t3ZYOzDiP9WKPKmf5OLQWLxDcz0jQSi-Psl2uaSJUddSyRoH9tRj-shX3UjcPRIgZqauKB_XZz7pcMHpk1iiP659YN51ll3Ru_EYbQ3pwh7Nl2Tt2ZjjH4xcjRyA6DhMq8KrwzHLDEk?key=8s5pClNFFKmQ8k6ExJ2D8A" alt=""><figcaption></figcaption></figure>

If you cannot view the link from the list, check the privilege assigned to your user account or role.

{% hint style="danger" %}
Contact your school’s system administrator to request view or edit access if you cannot access the rights management screen.
{% endhint %}

## Create a New Department

To create a new department:

* Click **+ New Department** in the upper right corner

<figure><img src="https://lh7-rt.googleusercontent.com/docsz/AD_4nXc1M-GvQe85wwSIFgBzfmsOt1eRjs9ghCH8d0eBTRBDbRJ8-EOLabbQ4qpg3lvQowRyZ2eamQjk4g27WCQRhm6v5zXhyoWt8e1zlJcpS6SN7TUA7GktJedye1TmEBJsu70d3iUtvNtHAlSaUlywMXd7IipZ?key=8s5pClNFFKmQ8k6ExJ2D8A" alt=""><figcaption></figcaption></figure>

* Fill out the required details
  * The **Department Code** and **Department Head** must be unique
  * The **Department Head** dropdown displays only users with the **Faculty** role

<figure><img src="https://lh7-rt.googleusercontent.com/docsz/AD_4nXf7kg_fsmQd3opAB3vobg9CPOxTwzLziZfTHvf--BO7aYHuePv_pqUouimGGOn0sPC2rsp7mbZALx91VdXRkUV9WiyUzVeAk9ezumSdgZqO9LM9hRo-zxKG3721C4HjpP9RC3zhpurU4hX0jMCtUVHheYUy?key=8s5pClNFFKmQ8k6ExJ2D8A" alt=""><figcaption></figcaption></figure>

* Click **Add Department** to save the new department

## Edit a Department

{% hint style="info" %}
Edits to Schedule Types are instantly reflected in the Scheduler View, regardless of the term selected in the main Planning menu.
{% endhint %}

To edit a department:

* Select the department you want to modify and click the **Pencil** icon

<figure><img src="https://lh7-rt.googleusercontent.com/docsz/AD_4nXcNla_pxf24lu4gkhEh5DwHSN3cD2MBQQ-HKIReYHWGMjG7eewCBg9K9LJwifFhGvF5j2TB4-pbVl30VYwrebXcA7JFlF8zEbW2x6SOaxou3-tY8SaWeq7ckdjBxe0PwQdtmqUGdTuFgv1AXgxPFknSUmkm?key=8s5pClNFFKmQ8k6ExJ2D8A" alt=""><figcaption></figcaption></figure>

* In the "Update Department Details" form, update the necessary fields. The **Department Code** and **Department Head** must remain unique

<figure><img src="https://lh7-rt.googleusercontent.com/docsz/AD_4nXdrSL8DeLppBrRWWEBrI1iHnNhgCWDJNMNQg6d91d-USPNC6CaNcWWfB7HELjHjJYUM-3C34KemL5y0Ce2m3sAgYziFHQr5dlKB9eH-xdmuHp3NSpRIss6IGkuCxF9f5xxQ_y3RGdKikI3utbzIyO9xKOPb?key=8s5pClNFFKmQ8k6ExJ2D8A" alt=""><figcaption></figcaption></figure>

* Click **Update Department** to save your changes. You will be redirected to the Departments page, where your updates will be reflected immediately

## Delete a Department

{% hint style="warning" %}
Departments that are currently assigned to a course cannot be deleted.
{% endhint %}

To delete a department:

* Select the department you want to remove and click the **Trash Bin** icon

<figure><img src="https://lh7-rt.googleusercontent.com/docsz/AD_4nXcXL79w8WVIn7zEgvDgCdbfOdH_iwj1lHTJI0JoL0tmud-iemQsdCqY1LvgrquLlv7af0CeHG3eCDum5KaxisBRT33zrPkNq1JOfOKVMyzmz5uq0mbiHoGYHtPMAX6ussNoYmVxrDsJP9kVVZDBTUzCEdHB?key=8s5pClNFFKmQ8k6ExJ2D8A" alt=""><figcaption></figcaption></figure>

* A confirmation message will appear asking you to confirm the deletion

<figure><img src="https://lh7-rt.googleusercontent.com/docsz/AD_4nXfQHONPETna2j59H6Ph_w1azYd7jGd4yMYNCrBtYiVIns0QnifmxYbhLXMd9sx0jVZdTxStR9gWfYaWxzFAJIcyl90mlx7V7wbuIooqPE8xMAOcx8lGL6JvprqlHgP0lYtJwJKQwigqTv9kc_4P7qWHm_jv?key=8s5pClNFFKmQ8k6ExJ2D8A" alt=""><figcaption></figcaption></figure>

* Click **Delete** to proceed. The department will be permanently removed from the list

<figure><img src="https://lh7-rt.googleusercontent.com/docsz/AD_4nXfxUpu0uz-va3rzdHOrTWdW13IqrNDR5jUeB6KkuNIo5fwURTzt5ImI-E4OsF8SABetfKFZEN6L1Cm3b0ddfMQ0n89qBMqd7NqaylgGE4ouFhT3Z6vnrEbtvvU1RNLxdVij7eBYaytT-Gcyj6s6ZtN2-xHV?key=8s5pClNFFKmQ8k6ExJ2D8A" alt=""><figcaption></figcaption></figure>

## Search a Department

To search for a department, enter a keyword or the exact department name in the **search bar** located in the upper-right corner. Press **Enter** to view all matching results.

<figure><img src="https://lh7-rt.googleusercontent.com/docsz/AD_4nXeYvkM8ksPB-Ne6WKrr0r3EmPWGUQqOhAV0f8YY9fpRCAodeqG2U9_mpHNCIO4TWflNQZxACwxFZHW4nbQIDEvx88s_KOWLC21kOBNSjrykDJS9UnA2jouJs9MunhS5JrgM_y9OBjA65l6vx2vmwLcxnSJy?key=8s5pClNFFKmQ8k6ExJ2D8A" alt=""><figcaption></figcaption></figure>

## Frequently Asked Questions (FAQs)

**Question:** What is the difference between a Department and a College?

**Answer:** A **Department** is a group of related subjects, while a **College** is a group of degree programs.


# Colleges

Last updated: March 2025

**Colleges** allow schools to organize programs into groups. This grouping also functions as a filter in the scheduler view.

## Access and Navigation

The **Colleges** module can be found under **Planning** > **Planning Setup**.

<figure><img src="https://lh7-rt.googleusercontent.com/docsz/AD_4nXekxZumTYtRlA7KlN4sIr-Ni2GfZ_NThJU5ExmtpIMQKwr82odd4bAyYdrAZdlUjSeHq62sCbgvfcVQp8VKwwWOeLi162yZBMfk0GBWcNKIkWgfphoMCwg-mvJasWAOldy6PN3zEO3m9KrKBymTCPYuEP2P?key=8s5pClNFFKmQ8k6ExJ2D8A" alt=""><figcaption></figcaption></figure>

If you cannot view the link from the list, check the privilege assigned to your user account or role.

{% hint style="danger" %}
Contact your school’s system administrator to request view or edit access if you cannot access the rights management screen.
{% endhint %}

## Create a New College

{% hint style="info" %}
The assigned **Dean** and **Assistant Deans** will have the **Colleges filter** applied, restricting their access to viewing and editing schedules. They can only manage sections and schedules within their assigned colleges.
{% endhint %}

To create a new college:

* Click **+ New College** in the upper-right corner

<figure><img src="https://lh7-rt.googleusercontent.com/docsz/AD_4nXcOyxKcdsaMapKgeYreVLdZGejVzsscfgOFGGeQUa9JszYgn9W0wpINKk4AoC3jqfLP11zcj_xTVhWiAdZi2ntgJqNXjz2PTwZvvfWGDnBhHqMAi5YlvenklR4a-HbosbaOiwRjIigisAxOFCJVYZ7IU_pC?key=8s5pClNFFKmQ8k6ExJ2D8A" alt=""><figcaption></figcaption></figure>

* Fill out the required details:
  * **College Code** – An abbreviation of the college
  * **Description** – The full name or description of the college
  * **Dean / Assistants to the Dean** – A list of available users. The **Assistants to the Dean** list will exclude the user assigned as **Dean**

<figure><img src="https://lh7-rt.googleusercontent.com/docsz/AD_4nXcyHXZRveTv0HlEdvB3LEQGe7HChQMZ2G5I0l5GbS5OwvDeOYEQue4H2tOvpcwvdRTQYMj8VKWA0rrbf4g5nnCr6vtTA5t3HqfMTOm-rRgYg571SRmj49OeDQ9z-4MCakFTlVepH6PItiJlu7K_q2bmF2o?key=8s5pClNFFKmQ8k6ExJ2D8A" alt=""><figcaption></figcaption></figure>

* Click **Add College** to save the new college

## Edit a College

{% hint style="info" %}
Edits to Colleges are instantly reflected in the Scheduler View, regardless of the term selected in the main Planning menu.
{% endhint %}

To edit a college:

* Select the college you want to edit and click the **Pencil** icon

<figure><img src="https://lh7-rt.googleusercontent.com/docsz/AD_4nXfmc9YualuDj1QwICj0ChSvHSOGyAGR9aEGPon5LxAHHp8AGA8qTFsAmDs2gm1lHq6HvibljgO52chDEih-ASumKxAfD0DlAbRhCXhNBJbE7nySUu6sZ-SVk9HVjRnoJPj1HPNyVr9MhlbuE6yB9aidUYw?key=8s5pClNFFKmQ8k6ExJ2D8A" alt=""><figcaption></figcaption></figure>

* In the **"**&#x55;pdate College Detail&#x73;**"** form, make the necessary changes
* Click **Update College** to save your edits. You will be redirected to the Colleges page, where your updates will be reflected immediately

## Delete a College

To delete a college:

* Select the college you want to delete and click the **Trash Bin** icon

<figure><img src="https://lh7-rt.googleusercontent.com/docsz/AD_4nXf47BJKjhQs65ZbsjFUBZIbh0nTPgoDJATiKKMvZGM9-61OI6eM6LghdeSXqGXDs5sw0cqZIYWSckx-xxsj5WIH25xZPN2rlUDsLkzlb_4DlMK3fMnMqjJqhwUBxou8_aGkuTRRJwMkflKPnUb6jc7fxJQZ?key=8s5pClNFFKmQ8k6ExJ2D8A" alt=""><figcaption></figcaption></figure>

* A confirmation message will appear asking you to confirm the deletion

<figure><img src="https://lh7-rt.googleusercontent.com/docsz/AD_4nXdbuoVkiUH4VELbE1naEGnMhHWZQpbopwvxKg4_UuQ29C-MBCrb-zfEJHBykrASsOhp5eY_TIQKCK_jL6GouJavZk9Z06hsAH5APh107ZVCJkFWuGTN7RPa6p6TxuX0c1nRc0wrGyy9AgIwdRZ2N0yJxAl8?key=8s5pClNFFKmQ8k6ExJ2D8A" alt=""><figcaption></figcaption></figure>

* Click **Delete** to proceed. The college will be permanently removed from the list

## Search a College

To search for a college, enter a keyword or the exact college name in the **search bar** located in the upper-right corner. Press **Enter** to display all matching results.

<figure><img src="https://lh7-rt.googleusercontent.com/docsz/AD_4nXcKYtlm6pEoWg0coSXlGuH6PPbpvVM7OfJRajEzaw_ZJ7wc74zCpSHae4CehSyv9wovAgTK6LRE_BTkhO4RD3F2D_m4j-_eJq8Bucxlmn30bcnTbyczPL6KZpZBSbGyoMczQNtL9yFenq2hRna5Tzbh4RGh?key=8s5pClNFFKmQ8k6ExJ2D8A" alt=""><figcaption></figcaption></figure>

## Frequently Asked Questions (FAQs)

**Question:** What is the difference between a Department and a College?

**Answer:**

* A **Department** is a grouping of related subjects
* A **College** is a grouping of degree programs

***

**Question:** How can I assign a program to a college?

**Answer:** Programs can be assigned to a college through the **Programs** page


# Grading Systems

Last updated: March 2025

Faculties will use different types of grading values to assess students. For example, a Numeric grading type may include values such as 0.0, 1.0, 1.5, etc.

## Access and Navigation <a href="#h.p_cpyve0nv-3pc" id="h.p_cpyve0nv-3pc"></a>

The **Grading Systems** module can be found under **Planning** > **Planning Setup**.

<figure><img src="https://lh7-rt.googleusercontent.com/docsz/AD_4nXfHUV8qQobSjI43EcAdrr9_PppIOEbQmUjl3HyByIfyX_CXUHoYVjzpq75Xu1VokW6qhufOS5QttAaLkNpZKyCvhOravag0FbAfY7dgglbchIWal3xlL9Awa25BCKRhK-ITjUKiGVHuETaqC7xpGww24HnJ?key=8s5pClNFFKmQ8k6ExJ2D8A" alt=""><figcaption></figcaption></figure>

If you cannot view the link from the list, check the privilege assigned to your user account or role.

{% hint style="danger" %}
Contact your school’s system administrator to request view or edit access if you cannot access the rights management screen.
{% endhint %}

## Create a New Grading System <a href="#h.p_cpyve0nv-3pc" id="h.p_cpyve0nv-3pc"></a>

To create a new grading system:

* Click **+ Add Grading System** in the upper-right corner

<figure><img src="https://lh7-rt.googleusercontent.com/docsz/AD_4nXfGd9ZPInktLQBiRxZQ-ackvW0Lxmgi0yjqwaTRNex1NC0oSFbCg0C4S6NnOy-aPfE5gi0cXHWUQDSJBKXYvC4junzyttzW5KIuPPwySH-j6HCEcYPOxutNRidXdf8zx3kshm4D3EpBGh1KaJF83rY9hoxv?key=8s5pClNFFKmQ8k6ExJ2D8A" alt=""><figcaption></figcaption></figure>

* Fill out the required details:
  * **Label** – The unique name of the grading system template or matrix
  * **Grading System Type** – Choose from:
    * **Pass or Fail** – Define a specific passing and failing value
    * **Numeric Range** – Set a range for passing and failing scores
  * **Value** – The scores faculty members will use to grade students
  * **Pass or Fail Dropdown** – Determines whether a given score is a passing or failing mark
  * **Students Should Not Retake Subject** – Prevents students from being forecasted for a subject if they receive the assigned score/value

<figure><img src="https://lh7-rt.googleusercontent.com/docsz/AD_4nXfbo9xbD_RSKvDyRNbI-SOadVmZ4UMmbB0bIMOfRjwEPPZYDKaM0zCEIGENlwF74ARQOoHPc7g1Q80ZgUB-pD9P5G82WqBFMDKH1snLMSZnDFmmhzybb6yGVXc4EjC0VtCe2tB9xcS-nGsd8ug4zt-XMu1_?key=8s5pClNFFKmQ8k6ExJ2D8A" alt=""><figcaption></figcaption></figure>

* Once all details are filled out, click **Add Grading System** to finalize the setup

{% hint style="info" %}
By default, students who fail a subject are advised to retake it. However, selecting the ‘Students should not retake subject’ option allows them to proceed with post-requisite subjects, such as those they have not yet completed.
{% endhint %}

## Edit a Grading System <a href="#h.p_bz3dh7so_8ji" id="h.p_bz3dh7so_8ji"></a>

{% hint style="info" %}
Editing a grading system will automatically update the academic standing of all students.
{% endhint %}

To edit a grading system, follow these steps:

* Select the grading system you want to edit and click the **Pencil** icon

<figure><img src="https://lh7-rt.googleusercontent.com/docsz/AD_4nXd-jrSldZLN8mVsMC1JJXt8eaf7t2EJAEwtoI_tAMul8mbsNWN0ljCRrmx_sFIgW4EIMBtBRlld3B1biymBOS2OQvQNsfQBVJzd3eF7Tv1NJVbT9B_MHZbssdoSvrX07d7pFk9iDfOK1tw-LUwllhbXDLsq?key=8s5pClNFFKmQ8k6ExJ2D8A" alt=""><figcaption></figcaption></figure>

* In the “Update Grading System” form, modify the necessary fields *(Note: The Grading System Type field cannot be edited)*
* Click **Update Grading System** to save your changes. You will be redirected to the Grading Systems page, where the updates will be reflected

## Delete a Grading System <a href="#h.p_73av0omrbact" id="h.p_73av0omrbact"></a>

{% hint style="warning" %}
The grading system currently in use by existing courses cannot be deleted.
{% endhint %}

To delete a grading system:

* Select the grading system you want to remove and click the **Trash Bin** icon

<figure><img src="https://lh7-rt.googleusercontent.com/docsz/AD_4nXdaah8AZMB7K0n3koFYbaGBSpCRmhPUqPF8Ua-muHfCMfvHMKMC7xsmHptde7Fmh_nIKedLzOe_lbNQjF-yD-pak80X6g-sjzbzakihSoUy2RoVnDhYY-Js12LhuW1DAaRifa0elqpSgTTCmgxEHprMFgLY?key=8s5pClNFFKmQ8k6ExJ2D8A" alt=""><figcaption></figcaption></figure>

* A confirmation message will appear asking if you are sure about the deletion. Click **Delete** to proceed

<figure><img src="https://lh7-rt.googleusercontent.com/docsz/AD_4nXe6DMzF7gjQoJzeRNZxQY6C7dTm_e8W4Exv0EYl6N8bLS5hDq1UhY5prQpIPVAulagdhAUlnnjikf4KjfQ7SEJDaamvAmq64o7q6vEN8dCBS4-XcmJlg1LFHcmV623j3_IAjJwZ5wQWvsCBWY_AF1rifGJn?key=8s5pClNFFKmQ8k6ExJ2D8A" alt=""><figcaption></figcaption></figure>

* The grading system will be removed from the list

<figure><img src="https://lh7-rt.googleusercontent.com/docsz/AD_4nXcujPGFTk3rBYUrPEARGgPkyZGE_IWk_W5QnzOskNdOZ44-IjqvW5Mzq2jLHJqT7aSERUYh4P02QNtxEZ6NaQUJ3OVQsUIQo8GTK74I3AtT-1s-1U_78N5wVciA9cuZ2R7MPQEvD7CpuwDGnWs56jSKGzR4?key=8s5pClNFFKmQ8k6ExJ2D8A" alt=""><figcaption></figcaption></figure>

## Frequently Asked Questions (FAQs)

**Question:** How to Refresh the Grading System?

**Answer:**&#x20;

* Navigate to **Planning Setup > Grading System**
* Click **Edit**, then **Save Changes** to trigger the academic standing refresh in the background. *(No actual changes are required.)*
* The process may take several minutes, depending on the school's data size


# Grading Templates

Last updated: March 2025

This feature enables the automatic calculation of a student’s final grade.

## Access and Navigation <a href="#h.p_cpyve0nv-3pc" id="h.p_cpyve0nv-3pc"></a>

The **Grading Templates** module can be found under **Planning** > **Planning Setup**.

<figure><img src="https://lh7-rt.googleusercontent.com/docsz/AD_4nXdTCKDoEMTiibphLaSLGciDIafWkjPG98wwl0DzO8Z-ODYDiOuIMkBkXbFpJWfPnq2rip95CASTRQH_WuUTsScPTj09u8RHjvnZ2lam7CxYWzJjxG34tpI7IPWamfFFKetL9l2Yf9QJg2Xt8NRUKNuW9dg?key=8s5pClNFFKmQ8k6ExJ2D8A" alt=""><figcaption></figcaption></figure>

If you cannot view the link from the list, check the privilege assigned to your user account or role.

{% hint style="danger" %}
Contact your school’s system administrator to request view or edit access if you cannot access the rights management screen.
{% endhint %}

## Create a New Grading Template <a href="#h.p_cpyve0nv-3pc" id="h.p_cpyve0nv-3pc"></a>

To create a new grading template:

* Click the **+ New Grading Template** button in the upper-right corner of the page

<figure><img src="https://lh7-rt.googleusercontent.com/docsz/AD_4nXc2MxaA-vxvOOqqTmBiOFcKyG7WImoQkGKU1cIDsClqC_YGxkzWAZAwML6eQ7VAWZjd6KgZ00TqLwTzXvax5Yr87fLrbcTTHfVvdM_xHR_uL0JFT3EgqViQats3MAyvwrKf6Ghv4Evltb4gcSbtpfGB4vg?key=8s5pClNFFKmQ8k6ExJ2D8A" alt=""><figcaption></figcaption></figure>

* In the pop-up window, enter the **name** of the new grading template

<figure><img src="https://lh7-rt.googleusercontent.com/docsz/AD_4nXfr-b6Hsa1UMOpRezMw127T86AnUr9nxqmVyyjFM032ADU1Z7E7LB9Sz-YxyDFe9qgflUOABsvMKn-fFuoYvrRsjFfdT-TBtifhBN8x0hxmfK7uIOElFYiA62IgIdpbGJk1BTowZHnjPhQOSA_QP0P4XTk?key=8s5pClNFFKmQ8k6ExJ2D8A" alt=""><figcaption></figcaption></figure>

* Click **Add Grading Template** to finalize the creation

## Edit a Grading Template <a href="#h.p_bz3dh7so_8ji" id="h.p_bz3dh7so_8ji"></a>

To edit a grading template, follow these steps:

* Hover over the grading template and click **View Grading Template**

<figure><img src="https://lh7-rt.googleusercontent.com/docsz/AD_4nXfXSlEtyya3r1MmOTnvXJvYbTLya0H-A-y5Gcp8KpvulJS-R0llQbTwWNBmIu60Z00Yujne6G-kl6t983PrBKLCFGJhTw7Fl08UUHWSNLtDOOXLSHSKOvZb0RfsW8GeTid_mNq6qLT52IuawuPI7l70jeVr?key=8s5pClNFFKmQ8k6ExJ2D8A" alt=""><figcaption></figcaption></figure>

* Update the necessary fields:
  * **Description** – A brief explanation of the grading template
  * **School Term** – Choose which school year and term the template is applicable
  * **Weight Distribution** – Define the weight for each grading period, ensuring the total equals **100%** for automatic final grade computation
  * **List of Possible Grades** – Set the numeric range of possible grades

<figure><img src="https://lh7-rt.googleusercontent.com/docsz/AD_4nXdXgGbYGS3p-lcrKpXSUSjoH7tlaKmCFAPtJomwD_G7j0BnxicSX61vtaTyCjf0aPwAJ_riAO3TDUIhKMLknfqlaeJaXQ7F093M8UT-QdUtBORXP7lGoY7REsuc1J677g8OE8gEIZszdoVMNqcsTsykSlI?key=8s5pClNFFKmQ8k6ExJ2D8A" alt=""><figcaption></figcaption></figure>

* Click **Update Grading Template** to save your changes and apply the updates

## Delete a Grading Template <a href="#h.p_73av0omrbact" id="h.p_73av0omrbact"></a>

To delete a grading template:

* Hover over the grading template you want to delete, then click the **Trash Bin** icon

<figure><img src="https://lh7-rt.googleusercontent.com/docsz/AD_4nXer-l5JGpw1WB8UTnYrIRBgy8uuS9XDnNS0Q0Td6EpjOPjWMJLPq0Q8fdsofGZKyvlLR2sW7qESrPHHCuOvK7GlHxIwDV41x7Nmar3zaeqXoowrDDMJ2QIzGyKDgayST10PW8vM7fIdHEg45tklFoEGxs34?key=8s5pClNFFKmQ8k6ExJ2D8A" alt=""><figcaption></figcaption></figure>

* A confirmation message will appear asking if you are sure about the deletion. Click **Delete** to proceed

<figure><img src="https://lh7-rt.googleusercontent.com/docsz/AD_4nXex1dEJSMjepJdlFXri7OWDUe9KVYyB9ly0vGQdQTLn5fb0kkqRjYUGW14PWbfHGvBcg5JUr2dIjkYHaq6xX7KIlFOflwIR3b-mcaXwY1frSrYp1RcDyE0SY3Va8QlcT1vbM780j9Jrm_GFBZRFoD-MXSkK?key=8s5pClNFFKmQ8k6ExJ2D8A" alt=""><figcaption></figcaption></figure>


# Courses

Last updated: March 2025

Courses are the subjects offered by your school that students can enroll in.

## Access and Navigation

The **Courses** module can be found under **Planning > Planning Setup**.

<figure><img src="https://lh7-rt.googleusercontent.com/docsz/AD_4nXdMfNWsBtbDADIhXvV1lwPOLTttUcqystz03ne0Sc2Jg4eHjrxG82aC_rYQRE8zmAlP1OC9EHHrGX-nw-RBCMSWzSjsLOWQLoa8TuWcROMdmSUr5Vi_7JwwiCLHwsPZxsK9ZyGtGXjbeauyfCrY4rJjniui?key=8s5pClNFFKmQ8k6ExJ2D8A" alt=""><figcaption></figcaption></figure>

If you cannot view the link from the list, check the privilege assigned to your user account or role.

{% hint style="danger" %}
Contact your school’s system administrator to request view or edit access if you cannot access the rights management screen.
{% endhint %}

## Create a New Course

* Click **+ New Course** in the upper-right corner

<figure><img src="https://lh7-rt.googleusercontent.com/docsz/AD_4nXfpu21LXPbTma45ohGfwQ9KVYvtzmTefRn0BUnoa2apzy8h0yuinJeWX0h-3cDdyaTvhM4_d9RgL_sClbYLZlKCbk3FjeI2ytRhHZUlUKfSKia1rwL5sYgdN__NjzM97V5tiba48Y-JPZ0JwQ_FJlLJyp5_?key=8s5pClNFFKmQ8k6ExJ2D8A" alt=""><figcaption></figcaption></figure>

* Fill out the required details:
  * **Code** – A unique short code for the course (cannot be edited once saved)
  * **Description** – Additional details about the course
  * **Schedule Type** – Defines how the course will be scheduled
  * **Department** – Specifies which department the course belongs to
  * **Units** – The total number of units credited to the student
  * **Grading System** – Defines how the course is graded and which grading template will be used
  * **Included in GPA Computation** (Checkbox) – Determines whether the course is factored into the student's GPA
  * **Composite Course** (Checkbox) – Enable this if lecture and laboratory units are charged separately. The total of lecture and laboratory units must equal the course units
    * **Lecture Units**
    * **Laboratory Units**
  * **Elective** (Checkbox) – Enable this if the course is an elective
  * **Allow students to enroll in all electives in one term** (Checkbox) – Check this if students can enroll in multiple/all electives
  * **Elective Codes** – Select which electives are included in the course

<figure><img src="https://lh7-rt.googleusercontent.com/docsz/AD_4nXcsdfd79zYGG9dj-WKrR-9tVXxrNS0hXyFqMVcm8ubAr1q6ZTP_ABH4qCB-w805ZHVsR5tcv5cIfhn10deEY6G3pG54anEvQVO-PpkKNvMKnO184A8_xOyH_9iA2Z_tP2llGTz1?key=8s5pClNFFKmQ8k6ExJ2D8A" alt=""><figcaption></figcaption></figure>

* Click **Add Course** to save

## Edit a Course

* Select the course you want to edit and click the **Pencil** icon

<figure><img src="https://lh7-rt.googleusercontent.com/docsz/AD_4nXcXMjBo3LYZNe24MVUk6p_gohoR8BcHUmGsgW4CBXfH10-Aip6Ut_J7gJVuFpRv2gYLFJgEmIbww5UDFgGpSf_M8oF3apCd2dgF6Qa5Khe34X4FL0F8LfSyu3zUg6tG4wh0Sa985OD4WGYu41FyOcwcudQ?key=8s5pClNFFKmQ8k6ExJ2D8A" alt=""><figcaption></figcaption></figure>

* The “Update Course Information” form will appear. Modify the necessary fields
* Click **Save** to apply your changes

## Search a Course

Enter a keyword or exact course name in the **search bar** (upper-right corner). Press **Enter** to view results matching your query.

<figure><img src="https://lh7-rt.googleusercontent.com/docsz/AD_4nXfy71zmifG3bmVLvkZaF-OSBYU43pQKjjsM27tH-54Br99ZJYS5JYWyV3nPKJ5SnNe-tY3v_omAzrHCEQdBv1wijZIWGmbLLUQPOksGeCktTvrms26rNdHKVU4a3WpfJaplfFp08yxInf6SqZaOAJgnQuI4?key=8s5pClNFFKmQ8k6ExJ2D8A" alt=""><figcaption></figcaption></figure>

## Import Courses via CSV file

* Click the **Upload button** in the upper-right corner, next to the search bar

<figure><img src="https://lh7-rt.googleusercontent.com/docsz/AD_4nXeMj_4BWJIqadHz3SpvYtsTiaDT7YNP5kUYNL1Gos_JiuRb9p8TOpHZhCJcrKgrf9td6Kaa1FQGQFVkyyrVotM82uiJZyW-KAXZcbv0aCNgvOAIIrIlAFlsI4l9Yg5iEgISgfqrLKBpAiy9O6gN39ScWRyx?key=8s5pClNFFKmQ8k6ExJ2D8A" alt=""><figcaption></figcaption></figure>

* To ensure the upload meets the required format, download the **template file** by clicking the link provided

<figure><img src="https://lh7-rt.googleusercontent.com/docsz/AD_4nXcAw0Ld9TCxhLA2nj6iOGj7WvkEpfixwVXRLgHW6o_hAQH5tEEN64JitWC7wAKAUkLyCQ5UBDbUw6X6xoQ9caKedbofjtsiVFX2HvFepbXmhwb8tx3AQJXLddMT5VcPI67WqhUH85bYaR5OPjrBDV00NAE?key=8s5pClNFFKmQ8k6ExJ2D8A" alt=""><figcaption></figcaption></figure>

* Once ready, click **Choose a File or Drag it Here** to upload your CSV file

<figure><img src="https://lh7-rt.googleusercontent.com/docsz/AD_4nXe6sxWTPd0x-jBZ4Ii9b_Debi-3SdUZp9E9i4lRZ83qJrANfKE-aS5ksgxJxSap1ABuXHIHvAttNAI3fMWMCycT8Tqz69qSDrgCQcmTEQa53KZxGO1JLijt9b73gLiAkpzt6_bG614measiuoqz7qZuoKJg?key=8s5pClNFFKmQ8k6ExJ2D8A" alt=""><figcaption></figcaption></figure>

* Click **Import File** once the upload is complete. The uploaded courses will now appear in the list

## Frequently Asked Questions (FAQs)

**Question:** Why am I getting an error when uploading courses?

**Answer:** Ensure that the uploaded file meets the following requirements:

* **Code** (Required)
* **Description** (Required)
* **Schedule Type** (Enter "NONE" if there is no schedule type)
* **Department Code** (Required)
* **Units** (Must be numeric)
* **Lecture Units** (Must be numeric; leave blank if not a composite course)
* **Laboratory Units** (Must be numeric; leave blank if not a composite course)
* **Grading Type** (Required)
* **Included in GPA Computation** (Enter "YES" or "NO")


# Electives

Last updated: March 2025

The **Electives** module allows you to create, manage, and configure elective courses offered by your school.

## Access and Navigation

The **Electives** module can be found under **Planning > Planning Setup**.

<figure><img src="https://lh7-rt.googleusercontent.com/docsz/AD_4nXd8Nh0GkkhE0c7bWlhJoToqd-STwU-ocxnMdtUPSOrUAvDmjGEnyR8OikwIXEzhNkr4mG3Y3Y2UMILbD96AlMWh8cJ4rVrBDiT9iqmEc2VAB74jNysXNH5GT2jMZwZy95fJqTbu?key=8s5pClNFFKmQ8k6ExJ2D8A" alt=""><figcaption></figcaption></figure>

If you cannot view the link from the list, check the privilege assigned to your user account or role.

{% hint style="danger" %}
Contact your school’s system administrator to request view or edit access if you cannot access the rights management screen.
{% endhint %}

## Create a New Elective

* Click **+ New Elective Course** in the upper-right corner

<figure><img src="https://lh7-rt.googleusercontent.com/docsz/AD_4nXcvtyiXzndde3O2_Ic8fdOjYgRmzdUGa973yE2vxscXOU14hbuFu8y-LCA8-TOw0tk5Nee8D2wHtp_d8fYR0t9QY2aWD9iEqe0T9SUg9MxytaK-E1viE2qmoEc-Nkzs6kH2sIPymQ?key=8s5pClNFFKmQ8k6ExJ2D8A" alt=""><figcaption></figcaption></figure>

* Fill out the required details:
  * **Code** – A unique short code for the elective (cannot be edited once saved)
  * **Description** – Additional details about the elective
  * **Schedule Type** – Defines how the elective will be scheduled
  * **Department** – Specifies which department the elective belongs to
  * **Units** – The total number of units credited to the student
  * **Grading System** – Determines how the elective course is graded
  * **Grading Template** *(Optional)* – Select a grading template for the elective, if applicable

<figure><img src="https://lh7-rt.googleusercontent.com/docsz/AD_4nXda4j_g0xfYCOME1i0MYSkek8_Mv84GVag9f4ot2DNv54ROwgzriXUtJ-oxqpeMT8GvyOIMLGq1Y5wVNP117ZKZXTJ7AHZmAZEMANxQ2RlcFl9QjmKkaIDmbpDUczdfIQ?key=8s5pClNFFKmQ8k6ExJ2D8A" alt=""><figcaption></figcaption></figure>

* Click **Add Elective Course** to save

## Edit an Elective

* Select the elective course you want to edit and click the **Pencil** icon

<figure><img src="https://lh7-rt.googleusercontent.com/docsz/AD_4nXeZgQDL-6kaKrEUilWNAQJ8GDk_PnTn9VTuuKcGjB60UJF-JK9Nrw0EIiYr2EH3_LH5IVvSQE8ts5VsFy03HmLLuNNnLmXcyCgRoLkKRNRMfy171AHg3yUdaZ6YLRlv_IFGlIpS?key=8s5pClNFFKmQ8k6ExJ2D8A" alt=""><figcaption></figcaption></figure>

* The “Update Elective Course” form will appear. Edit the necessary fields

<figure><img src="https://lh7-rt.googleusercontent.com/docsz/AD_4nXchc3zAhhSmPnT8HnGft2bKYVFD09ESi-UvF1L2iZtLr_0WK7hG0LX6p5MO8KnN3Yb6SAFOaBiRA7n-WHSrUA0GT4KFudlk8CyXSDPCci4Ps6EQC4Og15C_3ULZc0z3N7sgapt3?key=8s5pClNFFKmQ8k6ExJ2D8A" alt=""><figcaption></figcaption></figure>

* Click **Save** to apply your changes


# Course Equivalencies

Last updated: March 2025

The **Course Equivalencies** module allows you to tag and group similar courses together.

## Access and Navigation

The **Course Equivalencies** module can be found under **Planning > Planning Setup**.

<figure><img src="https://lh7-rt.googleusercontent.com/docsz/AD_4nXcH5whyooa4x56CDwZm2qlV_vMgsSVu0YJ9iZHe2TgAf2A9mSmC9NjROm2gEgO6VBKYi9jq2DpTGHtC83Jv1v8STs0j0nRFeTzsPybRuCiMFBVPO7OhrMMAvOIJ7gtaIjzo4KU98BPSGXCt2r3JzmEFrtDO?key=8s5pClNFFKmQ8k6ExJ2D8A" alt=""><figcaption></figcaption></figure>

If you cannot view a link from the list, check the privilege assigned to your user account or role.

{% hint style="danger" %}
Contact your school’s system administrator to request view or edit access if you cannot access the rights management screen.
{% endhint %}

## Create a New Course Equivalency

* Click **+ New Course Equivalency** in the upper-right corner

<figure><img src="https://lh7-rt.googleusercontent.com/docsz/AD_4nXfre2jvHF-JwpqaOvOxC-JctwGA0TTJIh5hLBMhPcJ0hGscOMVsTm5CzfrRblVb51IXARSGBv0mh_-4s4icz1NOd4viGLz7VDu0QRY4B0Ki_ZQJDa1mmFt8qKNqcShiOyTsyTvRD49gdNfoXUyoZFYp1-ad?key=8s5pClNFFKmQ8k6ExJ2D8A" alt=""><figcaption></figcaption></figure>

* Select the courses to be tagged as equivalents. Both the **“Course Code”** and **“Course Equivalency Codes”** fields will display all available courses

<figure><img src="https://lh7-rt.googleusercontent.com/docsz/AD_4nXdCu9G9wG2eed4S3CdkaBbEyQYSuv091Hr5pA7Nfv6s57ZhU-dN-GTcpdG1sulv-LRvZH86M6sgwRBD1jY4Uk5S4Jedf1O-KTgQ5Qv7et3PneXQuyFwpekSrMHipjy6jZaTRh-2Wxs7MUr-5XUrR0X-PP1V?key=8s5pClNFFKmQ8k6ExJ2D8A" alt=""><figcaption></figcaption></figure>

* Click **Add** to save the course equivalency

## Edit a Course Equivalency

* Select the course equivalency you want to modify and click the **Pencil** icon

<figure><img src="https://lh7-rt.googleusercontent.com/docsz/AD_4nXeicVZ8zbHK7rhuPErtnc5LLcd7eRhFMlxvsmMyUldvqhJ5sPnyFt1hyeN-9ywiyBk0UZsCreH6mIrI-qpWcPYRu9Dx5a5VkLaodRvNMLRLUQom3bh0vHz5SD5sxQzK6lkB2xPMJH42jB3YqNahXB53VTTh?key=8s5pClNFFKmQ8k6ExJ2D8A" alt=""><figcaption></figcaption></figure>

* In the “Update Course Equivalency” form, update the “Course Equivalency Codes” field *(Note: The “Code” field cannot be edited)*
* To remove a course from the equivalency list, click the course code and press **Backspace** on your keyboard
* Click **Save** to apply the changes

## Delete a Course Equivalency

* Select the course equivalency you want to delete and click the **Trash Bin** icon

<figure><img src="https://lh7-rt.googleusercontent.com/docsz/AD_4nXf4ewQdS8FJQnIXT7D3Lemwh5NWQS-32Y3Tkv_-oasySUQcPUjL7DfexGlGyL5hnObjAL3aLsRE73RP2PANmK3l7_I-RTNVrcRzh_4GRmDWZO6uY8ZNDId_8sY-rTmztLTP7eXELmYM7bGytQ7glPWw_Ek?key=8s5pClNFFKmQ8k6ExJ2D8A" alt=""><figcaption></figcaption></figure>

* A confirmation message will appear. Click **Delete** to finalize the removal

<figure><img src="https://lh7-rt.googleusercontent.com/docsz/AD_4nXfd_7mLcri1u3pi0dtb3j77cq7zN4XeAfPj9GC8cAvCiydqStuq7f5uj5riIpzfoq6k0akYmxHFqclk3Fo-BHgUmLMvkB-AMXdg-fpsV-m8Fy0zoDEUAra25_afJ-SODLQCNt6KQdhpAo827__eb2A0SfZ2?key=8s5pClNFFKmQ8k6ExJ2D8A" alt=""><figcaption></figcaption></figure>

* The course equivalency will be removed from the list

<figure><img src="https://lh7-rt.googleusercontent.com/docsz/AD_4nXfQ8W3vCvLhZrNj7atzCweXa6DRWmEuLoR154w0cN2kVapXUa6Vd9OliLdWR1OgL2coyHk2r5VgK0vWvdVdP2icFpsE4oGHvxYXKnjoHH3yIaRoCBiQhKaULtey11fUckAVFcWMlrbZ3naPJplENGtApvoE?key=8s5pClNFFKmQ8k6ExJ2D8A" alt=""><figcaption></figcaption></figure>

## Search for a Course Equivalency

Enter a keyword or exact course equivalency name in the **search bar** (upper-right corner). Press **Enter** to view matching results.

<figure><img src="https://lh7-rt.googleusercontent.com/docsz/AD_4nXcwoANieQ8Yk-nu2JxdRoy3jn4j_PirRb5rtQL3sPi_uMxRnjKCHrqeBJ9RU76GyDO49oZy2W52O4rgTU1YNYrkuQzsESHeKAW8jUO6Cq7UZUe2DhGB7J8H3FquRY58OL2_W0UiJjlDmaXmxr2DXsrmIGNR?key=8s5pClNFFKmQ8k6ExJ2D8A" alt=""><figcaption></figcaption></figure>


# Programs

Last updated: March 2025

The **Programs** module allows you to create, manage, and revise program curricula.

## Access and Navigation

The **Programs** module can be accessed under **Planning > Planning Setup**.

<figure><img src="https://lh7-rt.googleusercontent.com/docsz/AD_4nXfTO21eeqzDbl8KarAlFohZNJMF4I90LFcixcsExMx0Q5nPeo0zIdPHGTXzWEZtI27LJgPGlENhHguqO96JIg-0aY8vVUG6XrQZhBqshPgPaL86MswLoNpZGMZaf99qO7Bkwdm_mLievLbSgop1s7ueSLqY?key=8s5pClNFFKmQ8k6ExJ2D8A" alt=""><figcaption></figcaption></figure>

If you cannot view a link from the list, check the privilege assigned to your user account or role.

{% hint style="danger" %}
Contact your school’s system administrator to request view or edit access if you cannot access the rights management screen.
{% endhint %}

## Create a New Program

* Click **+New Program** in the upper-right corner

<figure><img src="https://lh7-rt.googleusercontent.com/docsz/AD_4nXcTweFT4ioOTAzZTfyD1F_iQNl33GlIKK8SWcyq5Ax95mh5eXnpkFLG8roc20Du48eDsdVnI9uhXsbLdofcpX_udt5nU1hWRYrkxv0mwApqTzf7Zgs7TawPRXH40TabqQjkZ8PRooLvncyDPupQakQ2GIMH?key=8s5pClNFFKmQ8k6ExJ2D8A" alt=""><figcaption></figcaption></figure>

* Fill out the required details:
  * **Program Code** – A unique short code for the program
  * **Description** – Full name and details of the program
  * **College** – The college under which the program belongs

<figure><img src="https://lh7-rt.googleusercontent.com/docsz/AD_4nXfvzQKhW54CdEg4ruoC6atw8JeyjJbmCLF9UC30Es6NVAv6BFVxQKavmENDHH_GqiLpzWb40sxZ9Q-o8HbgtY839clpxtv0BTzOM9z1vcOFfLFJDbciloKNXrHQKoF7HX1yRr11LZ4ZMF8IZ2gBGizR2DM?key=8s5pClNFFKmQ8k6ExJ2D8A" alt=""><figcaption></figcaption></figure>

* Click **Add Program** to save

## Edit a Program

* Select the program you want to modify and click the **Pencil** icon

<figure><img src="https://lh7-rt.googleusercontent.com/docsz/AD_4nXeyB6kTtO91b2zIjJiLr6axKt_Q7NVZV8hStdvgT7wDBjREqhtmgvvuYyX4X7rkXyO7TFS0aIV-oZZGJq7JZhYfl1TJmj3MRcKlJQDphKljqf_RH4Js2jFPBWLG_48cnAdwFkJtIwjLWGPSRxtnANMg0oJQ?key=8s5pClNFFKmQ8k6ExJ2D8A" alt=""><figcaption></figcaption></figure>

* The “Update Program” form will appear. Edit the necessary fields
* Click **Save** to apply changes

## Discontinuing a Program

* Select the program to discontinue and click the **Storage Box** icon

<figure><img src="https://lh7-rt.googleusercontent.com/docsz/AD_4nXfgGjbocOilu8tw2WCgRJUDIZkLiEqdu3Fu4Ios-L-KiwkGsWuS1NFSzhOMkmAhq8OYq9yNRlOpdndhP02xjFgQ_-iZV66EheyYKunbBePrbR7ITQDBNJcIU6aOQu9c9Ghsx3ivYhnj9_lN0xYTuuN2_0nA?key=8s5pClNFFKmQ8k6ExJ2D8A" alt=""><figcaption></figcaption></figure>

* A confirmation message will appear. Click **Discontinue** to finalize

<figure><img src="https://lh7-rt.googleusercontent.com/docsz/AD_4nXf-92508eZMsD2XBWz_xU1D3cWdeqx2lCIm_cgrHa5ZovvxbVsY6J1zCyrWQP7Sz2JEOFCdGfklR_VsxKMT0uWWr6sUuV_hbBQHx5BXA9YSMhj88605TYutEC0ryUEI3ymO9UL2oV9Q2NsBvFiN0m8AYndj?key=8s5pClNFFKmQ8k6ExJ2D8A" alt=""><figcaption></figcaption></figure>

* The discontinued program will no longer appear in the active list

<figure><img src="https://lh7-rt.googleusercontent.com/docsz/AD_4nXfeio0bwWeXgVmPzSHEa7_pknSu7fG7s8AxficqTt7c3Rt9XDR4WjxwZkpNx4mHckp_zs67wPq0--RVXGgq83qYixjR2bArqrbtruCRw6bBUeFNYP-sUDCS777QbLPHZXLsKXnX_3wkQ69OC3Xwo5nMIMow?key=8s5pClNFFKmQ8k6ExJ2D8A" alt=""><figcaption></figcaption></figure>

## View a Discontinued Program

* Toggle on the **Show discontinued programs** checkbox

<figure><img src="https://lh7-rt.googleusercontent.com/docsz/AD_4nXdpYNjJM2fRp7hiBu6TFxV3fqwmwE-1fk9bJIqaOrGkqPSOHwECoqv13JFxVgs8tHGqKjZYqZOBWVTjLUoXFSOuHUgyFYAQFhLGlia0sz5-3owLJ6pJ5o_2H0qi9hwTO1MHa7qtUY5UfHwIqoxoZtSdsuYR?key=8s5pClNFFKmQ8k6ExJ2D8A" alt=""><figcaption></figcaption></figure>

* The list will now include both active and discontinued programs. Discontinued programs will be labeled **“DISCONTINUED”** in red

## Re-offering a Discontinued Program

* Toggle on **Show discontinued programs** to view all programs
* Click the **re-offer (refresh) icon** next to the discontinued program

<figure><img src="https://lh7-rt.googleusercontent.com/docsz/AD_4nXft3I4pIxw6kgDnQkjXnrrImOeIooVL4a7iev9_9lh6TeAPFitzSIEhbusrMC7gL_lU3_d7nKKg1868za3nNoxq9GKe5puLlcIy7TG3JNOqb36TU4nBTHTLxs4yvXOuz5W1BKwFgwjmrf6V7d9lApuzAjkh?key=8s5pClNFFKmQ8k6ExJ2D8A" alt=""><figcaption></figcaption></figure>

* Confirm the action. The program will now be available again

<figure><img src="https://lh7-rt.googleusercontent.com/docsz/AD_4nXdr2NTYZhr8_zB5YrXtjaqpUbIwSwh5kJblsDzb9m8hGC3K8vV5Mip2YGFQSt5jwhNyKC6LC7ctFiY_vLMFCfEgw8uImEsc4waNtMA-9rdwggK_TxD8qiiyaS7YRaIfZ5-oP9DRWVslqdOSXtxM67eqMGXJ?key=8s5pClNFFKmQ8k6ExJ2D8A" alt=""><figcaption></figcaption></figure>

## Search for a Program

Enter a keyword or exact program name in the **search bar** (upper-right corner). Press **Enter** to view matching results.

<figure><img src="https://lh7-rt.googleusercontent.com/docsz/AD_4nXenCl_-L2vamALABWt8KVCHhZ7jFJEGXq0LKBaOfNyi3WR-Grpgki43XqDznI9PZWo_O10gSDo8S5Yc8tvD4Tga0OOcg-ORNvUjKIcFmEJMutidNW7puw8OTjEORaHPCr11dCKFXi0WIb9n7AGhZKZ_1grE?key=8s5pClNFFKmQ8k6ExJ2D8A" alt=""><figcaption></figcaption></figure>

## View the Curriculum

* Click **View** next to the desired program

<figure><img src="https://lh7-rt.googleusercontent.com/docsz/AD_4nXeyMSKSCr1R20G10rN5tpltCqWV5lTYQSvsUlpVHuQm5shHCDpCQoyTisaKt43feKT5PYVg3V1SesrfyrWkwCgBVWrJRd_X0MvCohSfpvXWUI473fAmek2X-DLsnmibr8lT-_7RfLUXL3o3eEiZymYhyLCI?key=8s5pClNFFKmQ8k6ExJ2D8A" alt=""><figcaption></figcaption></figure>

* The latest version of the curriculum will be displayed, categorized by year level and term

<figure><img src="https://lh7-rt.googleusercontent.com/docsz/AD_4nXekLBE4nam8-Rk9f383IU9WDTHgLoDNDqze7v_1Q0ZIPvgYhmdZVv55FWiptpHnsY7lold5dOTLF84onq2pBEEcS_xu5atbI8gMDe8uaJ0LNwwKi5fG5oWfCMXkY5QeoKVWqB_X5uKw0djRJU2ckAStonQ?key=8s5pClNFFKmQ8k6ExJ2D8A" alt=""><figcaption></figcaption></figure>

## Add a New Curriculum Revision

If no revisions exist, a **“No revisions found”** message will appear. To create a new revision:

* Click **Create a new one** *(visible only when no revisions exist)* or click **New Revision** in the upper-right corner.
* Choose from:
  * **From Scratch** – Create a new revision with no pre-made terms or courses
  * **From Existing** – Copy an existing revision

<figure><img src="https://lh7-rt.googleusercontent.com/docsz/AD_4nXdcqeAC8YDbAflO34hMK_sVXafYFpi1AzlMPIS2o2iauchfFpN8qDbFnSPfc1KuMUBfbag7K0p_BpAhkwthe_IvgYGTuBkp_mUUm6pHgFAHCDyiSJbCnbVKlEwKm1x3xBsL_HOUhuKE6W5L_s6z_pp_npw?key=8s5pClNFFKmQ8k6ExJ2D8A" alt=""><figcaption></figcaption></figure>

* If copying from an existing revision:
  * Select the revision to copy
  * Enter a **unique** Revision ID
* Click **Create** to proceed

## View a Different Revision

* Click the **revision dropdown** next to the program code (upper-left corner)

<figure><img src="https://lh7-rt.googleusercontent.com/docsz/AD_4nXcsz_zPBFdkXoNZbw5nFWJRKYwWqfQNZkfQjR7xUjunsDCnr5ID0DjqhjsSog9pE700a8Bes72SdM-w8H3YUhMdjl4gwWILgoSTzDBWNRKcKW9bDjkTQAyb0nVM15nd2RFJ2HgQjw9WHEHnVJt0UQUcQctu?key=8s5pClNFFKmQ8k6ExJ2D8A" alt=""><figcaption></figcaption></figure>

* Select a revision to view its curriculum

## Update a Revision ID

* While viewing a program, click the P**encil** icon next to the revision name

<figure><img src="https://lh7-rt.googleusercontent.com/docsz/AD_4nXdBlcWEvzJ9xovmn9-rrHhzLXdfoceQX1-NhSsVoy7vsGoJPj62G436UqxMe2H5bzWMELohaaScFw_-gJ4U2r6Db2J5LJvXeN4OmzBT4dmBNTuIT_AR0qGOq-uZXuA9BBLVtuBIkrAX-1NWcdlVnQbt_O2R?key=8s5pClNFFKmQ8k6ExJ2D8A" alt=""><figcaption></figcaption></figure>

* Enter the new Revision ID and click **Update Revision**

<figure><img src="https://lh7-rt.googleusercontent.com/docsz/AD_4nXfPj9uhufPbHzIK2cE3PrFsK2UPdvU3n9QWLqko2XqLBFk7dJC9Hs4URmJ1myY38S8tdMQxlVsSPbK9Hvv5h24ocWybMpAsatyHqUOAGchEqX4OZ1I9reWzRcK9bnE9HtJZvef4v5bTq2i2MURFQBel-_z_?key=8s5pClNFFKmQ8k6ExJ2D8A" alt=""><figcaption></figcaption></figure>

## Add a New Term

* Select the program and revision to edit
* Click **+ New Term** in the upper-right corner

<figure><img src="https://lh7-rt.googleusercontent.com/docsz/AD_4nXdSIEhuANiKfli7zbAs8NiFDw63jlQJ8PNAIzUgFiHdybGJf4K_ODRfuRaW8tj0qwDDwEbSlslRYQ8E3WBAaB-QkR8yfpMNhMFKPnG7rlwukk15307jrAL_Ug2Eo3lQlLLGUSv7SttE_U9vCThy5W3Oeiw?key=8s5pClNFFKmQ8k6ExJ2D8A" alt=""><figcaption></figcaption></figure>

* Enter the required details:
  * **Year and Term** – Must be unique (existing terms cannot be duplicated)
  * **Course Code** – The description and unit count will auto-populate
  * **Prerequisites (Optional)** – Courses that must be completed before taking this course *(1st Year - 1st Term prerequisites are not allowed.)*
  * **Corequisites (Optional)** – Courses that must be taken in the same term *(Can only select from courses within the same term.)*
  * **Required Units (Optional)** – Minimum units a student must pass before enrolling in the course
* Click **+Add Course** as needed. *(Restrictions: No duplicate courses, prerequisites must be in previous terms, no self-referencing prerequisites.)*
* Click **Add Term** to save

<figure><img src="https://lh7-rt.googleusercontent.com/docsz/AD_4nXeOb7CTuLt2ZKSvCv1JD6394GpgtFZ9PP-mSfsUO_Bs8l6KHOJQZxGxaoxH9OqpmEADsy3oFkMRdmrtHAX6gpxSvrP4at92j24vBuLirO0lhLzllf7BT3tBHCarpgAxDDjD-yuQt-4Mbk24awgP_4ui4hbj?key=8s5pClNFFKmQ8k6ExJ2D8A" alt=""><figcaption></figcaption></figure>

## Add Elective Courses

When adding electives, **select one Default Elective** by checking the corresponding box.

<figure><img src="https://lh7-rt.googleusercontent.com/docsz/AD_4nXfafHk_p7aoZM4Fk5owF6sw4kGaWoDWxb0u7G1FnTIraaH3bSTvDEerub18ufwIhmEPWf3KEveL7_qVD2OUAj-akyFHj9uVqG3zpNmh2vzL19DLWM2LbFq30NTF2JhazPrWmzoRuw?key=8s5pClNFFKmQ8k6ExJ2D8A" alt=""><figcaption></figcaption></figure>

<figure><img src="https://lh7-rt.googleusercontent.com/docsz/AD_4nXdmC2-A4Ma4lmrQlLPpc0aH6V4jiGP4tTJUnV1pAx62mzBCSghQo5QPd19DDy0VuxPCMEP9-TKO9r9BfM-smd9Lo-VTg5MK25wMAXsVABZ6tVDXICnWnXdHja1M6kuhuy49zqNbgw?key=8s5pClNFFKmQ8k6ExJ2D8A" alt=""><figcaption></figcaption></figure>

## Edit a Term

* Select the program and revision to edit. Click the **Pencil** icon next to the term

<figure><img src="https://lh7-rt.googleusercontent.com/docsz/AD_4nXeutiwG46vxuKJ7pAG8M9kHIeQsYd8msPjGuicGtVdwSr-klCX7IIi7zdKh1deioXklO6smWzFj68TkpoBruyq1ly5e_3DorBay-ULmVC8cAv1jZBFspZuIY0Vwe-EITTJPFKkVhq0FSxy3592NpU3LAN4?key=8s5pClNFFKmQ8k6ExJ2D8A" alt=""><figcaption></figcaption></figure>

* Modify necessary fields *(Year and term cannot be edited.)*
* Click **Update Term** to save changes

## View Year Levels for a Program

* While viewing a program, select the revision to view. Click the **gear icon** in the upper-right corner

<figure><img src="https://lh7-rt.googleusercontent.com/docsz/AD_4nXfoJo9Tpur7r6OEA_wQ-Ub69yYxsitc9Uqikja2Ue2NMfPOTtAUlLRCvbKkZ5X0uLTYyDKWa11SDUO6qW_6NaH7QrLT_UFS-PmgUmSqB1bj5tcpaNwUe2NQLvFQ1bGj2lb9UStKGDST9a3PRIPf9HIZonQK?key=8s5pClNFFKmQ8k6ExJ2D8A" alt=""><figcaption></figcaption></figure>

* The **Year Level Classification** will be displayed, generated based on the curriculum structure

<figure><img src="https://lh7-rt.googleusercontent.com/docsz/AD_4nXcJPnsxBX4QiRQuaKSL9fi3a0fFA_ds9F8xBiczUALI1eKqQU4iPc1miWFJcW_aiHSwiMYDwq5RaJT3zacUkZBts8-YuK_o5Oy-OaMnw2SiGeEb9FEY93QcZ2MTjZkiXNq49IAxnT91IAG_6rUAAeZiY5E?key=8s5pClNFFKmQ8k6ExJ2D8A" alt=""><figcaption></figcaption></figure>

## Frequently Asked Questions (FAQs)

**Question:** Is there a limit to creating and editing curricula?&#x20;

**Answer:** No, as long as you have access to the **Programs** module

***

**Question:** What happens if a student is enrolled in a discontinued program?&#x20;

**Answer:** The student will not be affected, but the discontinued program will no longer be available in **Registration** or **Student Selection**

***

**Question:** Why is a student’s year level in the system different from their actual year level?

**Answer:** Possible reasons include:

* The student has an **incomplete or failing grade**.
* Year level classification is determined under **Planning > Planning Setup > Programs > View > Tool Icon (upper-right corner)**


# Block Sections

Last updated: March 2025

The **Block Sections** module allows you to group new students within the same program and assign them to preferred rooms for their classes.

## Access and Navigation

You can access the **Block Sections** module under **Planning > Planning Setup**.

<figure><img src="https://lh7-rt.googleusercontent.com/docsz/AD_4nXdLwYFzVDFpwQIU5CUfUtEbYfrtWTfRdbjjZ27_rE7fLJK1NCnyzLnkU1DooQDgbe6D1MSr9ZqsI8p6ZVwdjd8uQlV1Y-5BrhU9EYoiJaM3r0o1PmfaD9QmcnTK07ZyNk2vQsW2p2fVP1TftPKrkTLH_sw?key=8s5pClNFFKmQ8k6ExJ2D8A" alt=""><figcaption></figcaption></figure>

If you cannot view a link from the list, check the privilege assigned to your user account or role.

{% hint style="danger" %}
Contact your school’s system administrator to request view or edit access if you cannot access the rights management screen.
{% endhint %}

## Create a New Block Section

* Click **+New Block Section** in the upper-right corner

<figure><img src="https://lh7-rt.googleusercontent.com/docsz/AD_4nXdCAdHd5KQUmRHyqyBMxLRMiplJAQUQnrlLYv2_zMGTph3JNRfP-gTt302gYuNoetxgj0l_g2slH6LpFyia0hPeLWOEzp98u31dCdqy_snj04uGd-vCTRStyX4Z0s06IFC8EaIK8ZhuSI35AteP5l-huvYQ?key=8s5pClNFFKmQ8k6ExJ2D8A" alt=""><figcaption></figcaption></figure>

* Fill out the required details:
  * **Section Name** – Unique name for the block section
  * **Slots** – Maximum number of students allowed
  * **Program** – The program the block section belongs to
  * **Starting Term** – The first term for students in the block section
  * **Program Revision** – The specific program revision to be used
  * **Preferred Rooms** *(Optional)* – Suggested rooms for scheduling
  * **Preferred Timeslots** *(Optional)* – Suggested class schedules

<figure><img src="https://lh7-rt.googleusercontent.com/docsz/AD_4nXenidDI9mF-dlIXya66J3QgE6rhNhtmmSj31u8obSQ4XmmLZoTL5_TGUMUWozwPhIz-O2l0ml0NGkcLqWsdLMHOuOI8PA2bsR20MV_ZbW2JdeLxZ27WcfRbc9c9gvG737L3dwsApSKwqJTfui90PwvUVaZH?key=8s5pClNFFKmQ8k6ExJ2D8A" alt=""><figcaption></figcaption></figure>

* Click **Add Block Section** to save

## Setting a Block Section as Active or Inactive

Toggle the **Active/Inactive** switch as needed. **Active** block sections will be included in the **forecast/class demand.** Ensure this is updated **before** creating the **Class Demand.**

<figure><img src="https://lh7-rt.googleusercontent.com/docsz/AD_4nXch0P8t8CaTVIC7N2SyFKm4Xi1PPwehQh9xF0NwKXypK3KEaElBLHK2KuIZsZ4hnLdd36lmK01_vmHjNT-j8Hohly_OlbvIh9YNK0gStJY6twOZxAiHDC6BvJu86UKdDGHPNQN1-LlJUxl6RrR0JfUSmGcx?key=8s5pClNFFKmQ8k6ExJ2D8A" alt=""><figcaption></figcaption></figure>

## Edit a Block Section

* Click the **Pencil** icon next to the block section. The Edit Block Section form will appear

<figure><img src="https://lh7-rt.googleusercontent.com/docsz/AD_4nXf5pk8pX8H2idVRyRNtdX1so3Lw4iPOqet5Up1-WDg_Ww6sJRSwpteBIv3E3H-iEJsKxWqtxfxPAga-ZQYCtKj-7oIwMcNepEmXPNPUiUNCtwt4Swjr2bhd-QnTPEk3rlw7y7IRYSxGTgkz-EbpTUJ8MNEb?key=8s5pClNFFKmQ8k6ExJ2D8A" alt=""><figcaption></figcaption></figure>

* Modify necessary details *(Note: You cannot edit the program, starting term, or program revision)*
* Click **Update** to save changes. You will be redirected back to the **Block Sections** page, where updates will be reflected

## Delete a Block Section

* Select the block section you want to delete. Click the **Trash Bin** icon

<figure><img src="https://lh7-rt.googleusercontent.com/docsz/AD_4nXercHzUZbu4xMWbAYvocddl9fvw1diD06pBoYee5S3HWHAEQCxI05_n6sBpN2oq31uCaWATuPi3qejX5-AS-uGk7yvxZl6UxYgyH_kycqdtWgK6KxIHQ1-YH52PCgzVk9WOmUlDTPh95qBh2ZQ6AAaCp53w?key=8s5pClNFFKmQ8k6ExJ2D8A" alt=""><figcaption></figcaption></figure>

* A confirmation message will appear. Click **Delete** to finalize

<figure><img src="https://lh7-rt.googleusercontent.com/docsz/AD_4nXftyoQajqMR3sMe2C0u-vDQ_JOky6Lb2-lO0_fW1jRDBkSjhESzdnwYAjmZj92z9ULRzOfuiezmYgPskb7-kP6Ai51iW8lTxJT0PUXRFRz22DxEvTHu-6Z6nfRdzYek2bCxNAA5QOd2W9CR-AShT7dpZ84?key=8s5pClNFFKmQ8k6ExJ2D8A" alt=""><figcaption></figcaption></figure>

* The block section will be removed from the list

<figure><img src="https://lh7-rt.googleusercontent.com/docsz/AD_4nXdJUga0lmVdX7rlPGGZpBrm6LNGXnWr6arMh2952BwPGaeu0zNggT94wscVvakWldUWJMN1ddQq1R66NqyhszB375_ABXaYop0UZw3HOS-CjNcheCh4CvqW6FC3_hhU1v8xXNrpwv3xkHWSWvc_IjiraT8?key=8s5pClNFFKmQ8k6ExJ2D8A" alt=""><figcaption></figcaption></figure>

## Search for a Block Section

Enter a keyword or exact section name in the **search bar** (upper-right corner). Press **Enter** to display matching results.

<figure><img src="https://lh7-rt.googleusercontent.com/docsz/AD_4nXfHUEDnPpVBf2ZHX8C8AVNHQHCCPv1dwPIUn_ezK_wBws8JRgcn1ykbS4u0XcH_VCstRyHw3Z5lDdJb2bD9kIxm8EOuatrUd-7pJZMsj_rgUkexzvfVK6DAyuA-OAO7dP-NOcokxZ28FPBH95Yx1eGq0SFP?key=8s5pClNFFKmQ8k6ExJ2D8A" alt=""><figcaption></figcaption></figure>

## View Courses in a Block Section

* Select a block section. Click the **Courses** button

<figure><img src="https://lh7-rt.googleusercontent.com/docsz/AD_4nXey6LcFY4UdLbXMYpVHrCXKb6zpZ6JpsL421PVBscRZxvfSoJeYNNSF9yMXGzwNhoKYUEZ8_GvcluDLX6G3YFbLIIFYMoW9WLlmYsZUSNm5OP8g1vFIraHOFUL22-OEe8JWrIh6lQZbLSKHQerLeTpTsHpb?key=8s5pClNFFKmQ8k6ExJ2D8A" alt=""><figcaption></figcaption></figure>

* The list of courses for the current term will be displayed

<figure><img src="https://lh7-rt.googleusercontent.com/docsz/AD_4nXd7HQwiUXxP_t3KiZvOqckONM4OUExcd5mZ8jwf7PN5Vg9whB4Kb6e_cARsdAIdr9GKnkD4wqT4dWRkF57RfuWI1gq2oNWaQ5tNh_s7wmzXI0domGiHaVHidywiuHqhFCPjqLIAIQ13CjoQsbsv459QhP11?key=8s5pClNFFKmQ8k6ExJ2D8A" alt=""><figcaption></figcaption></figure>

## View Students in a Block Section

* Select a block section. Click the **Students** button

<figure><img src="https://lh7-rt.googleusercontent.com/docsz/AD_4nXemVE-Ft8AlvbbfACqcMmNYu0Xgup1X_2xeTx2fMzJvROBXJXwt9ydx00dIUYtswD967Wo9veTdArOqIXaNEc49vCmp1-ohL8FKr3wt2ZSSxPoe1znzamJz6K9UgetrJOvivW3mfCnhMElSxq9TevYJVSGo?key=8s5pClNFFKmQ8k6ExJ2D8A" alt=""><figcaption></figcaption></figure>

* The list of students assigned to the block section will be displayed

<figure><img src="https://lh7-rt.googleusercontent.com/docsz/AD_4nXezQSjCe1VXOnvxPnrRqH1X8oTttLxgMgpnvE0AtlOqKXIins0Y77IHFpvMc0XS0ctfsTt7v9NGQkq5MMjT38uulBCRTzOrYdIajBfM9eZdw0ryJ97y1ueqBzBybPpilsBi9MakQZziJf6PUV4AXgQwrlQM?key=8s5pClNFFKmQ8k6ExJ2D8A" alt=""><figcaption></figcaption></figure>

## Add a Student to the List of a Block Section

* While viewing the **Students** in a block section, click **Add Student** (upper-right corner)

<figure><img src="https://lh7-rt.googleusercontent.com/docsz/AD_4nXdJPyLYi8hF-1hUPA6AFp5NzfDvuPUOG1X7vTw6HzDZfs1QdUqrf32PfML-bdWrwYcAka9mAD7Zx37ngPeuc1KAlBDb0S1W6v2rhXuuyBG2EoP6CuhXtfhAK72tqC6FpnUJpOUd6CFaWnnoCvBtSUYAC-os?key=8s5pClNFFKmQ8k6ExJ2D8A" alt=""><figcaption></figcaption></figure>

* In the Add Student form:
  * Select a student from the drop-down menu
  * You can also search by student name or student number

<figure><img src="https://lh7-rt.googleusercontent.com/docsz/AD_4nXclAcay3v2QlLEU71l4Jc9wASuVBJxPMRa-Hqg4pxinu-y2k9OSHnmNWQHkrxKK6m_ft4MTtyWza4i6-qd2UH9VW5su_xEyzI06UMrBJENE7K-HBM7ANIkrvsv443N0oCAsheBzH6UmkF8hMp_0u4CHbp4C?key=8s5pClNFFKmQ8k6ExJ2D8A" alt=""><figcaption></figcaption></figure>

* Click **Add Student** to confirm. The student will be added to the block section

<figure><img src="https://lh7-rt.googleusercontent.com/docsz/AD_4nXdMluH45pUK-dCfJtIkIfaK7acuBVk-fQenBSOND6EDLj8yIC9iDO425FlveGEXxR94cErQUpN4E3rg1jGoFLPlkxWVwpbsAIJmUYNzc3J7Hl8FYkLoWuhfEItAPUHAKlb5ky4K013XmbmGBeQCT2nWlYj4?key=8s5pClNFFKmQ8k6ExJ2D8A" alt=""><figcaption></figcaption></figure>

* If enrollment is already open, the student will be **automatically enlisted**, and an **enlistment notification** will be sent

{% hint style="info" %}
A student **cannot** be added to a block section if they are already part of another block section.
{% endhint %}

## Remove a Student from a Block Section

* While viewing the **Students** list, click the **Remove** button next to the student

<figure><img src="https://lh7-rt.googleusercontent.com/docsz/AD_4nXda2T7Fg3GgPi70ShEwKT4ZG7cSIEVMe1gQDjQhdWPOCYwCYKHbpdOOjF7XMsUP-LGHvXg6c_AdlqJwB3vZutQFjm1S4sjcQQ2ZEirK4DdT4nM0Rwzvq63nO8qeLzZWAIKDlbABfYBlKjpZanDlJQBTEFAB?key=8s5pClNFFKmQ8k6ExJ2D8A" alt=""><figcaption></figcaption></figure>

* Confirm the action. The student will be removed from the block section

<figure><img src="https://lh7-rt.googleusercontent.com/docsz/AD_4nXcCFocvUwZJ-cAJSiaoLwhZuuoyCnrpoQdRHOV8yFB6kE3WM2yuf9m4mHIHYjoNs0RnJCElOBZK_My08OZ1cycFg6I8yXKWnxwM5mqU5Mb3u2fNvmBRpHCuVC2prdmeNnbqZlvgKa6QGsO7TxyVKl4zm0Un?key=8s5pClNFFKmQ8k6ExJ2D8A" alt=""><figcaption></figcaption></figure>

## Search for a Student in a Block Section

Enter a keyword (student name or number) in the **search bar** (upper-right corner). Press **Enter** to display matching results.

<figure><img src="https://lh7-rt.googleusercontent.com/docsz/AD_4nXcw82Clm6r2jLEdtJcGTaYYH8cNhrB3GXaQAB7o6pe_eTm7Rg-pjb1ZZWgALT3uM3ja8EyqP_tQhxAj6fKyGlJMW_78Og67WMoIPUANLylwsC6RlQIrH2JMaN2vyRgdvntrIIyuKkLPDDyZv5ps7AukrF9I?key=8s5pClNFFKmQ8k6ExJ2D8A" alt=""><figcaption></figcaption></figure>

## Frequently Asked Questions (FAQs)

**Question:** Why can't I add a student to a block section?

**Answer:** Ensure that the student's **Program** and **Starting Term** match the block section's settings.


# Class Demand

Last updated: March 2025

The **Class Demand** module allows schools to plan the number of classes to open for the next term. Edusuite’s **forecasting feature** suggests which courses and how many sections are needed. If a course is not opened, students can be **re-advised** to different classes.

## Access and Navigation

You can access the **Class Demand** module under **Planning**.

<figure><img src="https://lh7-rt.googleusercontent.com/docsz/AD_4nXccbigW18Muvh4VApwg-txSRXbRE3JV5_iqcXEbdZRpmnQLkvpAgvPJQtgKi-vbjPwJ7680GV38dV54bXoAZI78IyY8UY0uYQHrPBUOw0niI24mGgiVMHmJEIDyOOrGi5-ybEYGnuXpjW5CXvhU0w0IZI0?key=Cktma731MOJNAwIjpG9hEg" alt=""><figcaption></figcaption></figure>

If you cannot view a link from the list, check the privilege assigned to your user account or role.

{% hint style="danger" %}
Contact your school’s system administrator to request view or edit access if you cannot access the rights management screen.
{% endhint %}

## Create a New Class Demand

* Click **+New Class Demand** in the upper-right corner

<figure><img src="https://lh7-rt.googleusercontent.com/docsz/AD_4nXf7TUtP3dztz7WmYS_FOKkLZghNMo2ded0e4heSJswHctanimU9fO2JvznOifcYC4jBeVY6jDjJfGAGfxc9UQjDk2n3osfjqfGeGkOMTIvdl9bN4IuU1FnrxqpIVDC4-wOeBD-bAgfGUY7mA87bvhvPZjTR?key=Cktma731MOJNAwIjpG9hEg" alt=""><figcaption></figcaption></figure>

* Enter a **unique description** for the class demand
* Choose whether to enable **forecasting**:
  * **Enabled**: The system forecasts sections and classes based on past enrollment trends
  * **Disabled**: The class demand will only consider active **block sections**, updating automatically if they are added, removed, or modified
* If forecasting is **enabled**, configure the following options:
  * **Algorithm Type**:
    * **Prioritize Regular Offering** – Prioritizes subjects based on the term to be opened *(e.g., for 1st term, 1st-term courses are prioritized)*
    * **Prioritize Earlier Course** – Ideal for schools with a high volume of regular student enrollments
  * **Minimum Students per Section** – The system will only open a section if this number is met.
  * **Maximum Advised Units** – The maximum number of units a student can take
* If forecasting is enabled, the class demand status will be **“Forecasting”** until processing is complete

<figure><img src="https://lh7-rt.googleusercontent.com/docsz/AD_4nXc87SwT6dFRpUSO1EfaSc8qEXvkh1-_RgSYSugY6WAzirnoMm2WeMJcN5WQSljZxrIdKDJ9FwG6ezSKpXTEIfvRH1vdMzXAd_VFEOoO0VIvfbECDRUgnv5-2AS4454lvo16E_KdUkJ3qiaXZ3iArHiEYgJa?key=Cktma731MOJNAwIjpG9hEg" alt=""><figcaption></figcaption></figure>

* Click **Add Class Demand** to save

## Refresh Block Section Counts

* Select a class demand and hover over its menu (upper-right corner)
* Click **Refresh Block Sections**

<figure><img src="https://lh7-rt.googleusercontent.com/docsz/AD_4nXfHdIy3u2W0qL30yP7a8pjIv3V0PLDB8jP_SCDh4JBqcaIZ_k1JsAkkWg69dCFtUQqshEU076bsOwehf6ZvvjC8WmleyYcPJ40F_14lOEmyIqPz90y9ztxWDAw1Xcx0rS2nc3nlwqDJPouu9n33hGpAlHOE?key=Cktma731MOJNAwIjpG9hEg" alt=""><figcaption></figcaption></figure>

* Choose a refresh option:
  * **Refresh All Block Sections** – Checks all sections and students’ grades *(Slowest option)*
  * **Refresh Changed Block Sections Only** – Checks only modified sections *(Faster)*
  * **Refresh All Block Sections but Ignore Passed Grades** – Updates all sections without checking students’ past grades *(Fastest)*

<figure><img src="https://lh7-rt.googleusercontent.com/docsz/AD_4nXc0KZHaCrHuUfuywTD4NkZjTKqayhbqYnfAk1w7HT9rfOvAAf5lVPj_tGMWEb335Xa_5pI379D_uGyW2YP-DVsmMzb2rRKkJNxyMcw14MiAQ56mG-EhCaWI9LiW-uNKM1oiC7C6KWnRTvoZQdiGI3CCtlHo?key=Cktma731MOJNAwIjpG9hEg" alt=""><figcaption></figcaption></figure>

* Click **Refresh Class Demand** to apply changes

## Edit a Class Demand Description

* Select the class demand and hover over its menu. Click **Update**

<figure><img src="https://lh7-rt.googleusercontent.com/docsz/AD_4nXeNF4jiwH07LnzNe-aE9dSJJ-hBjJPEDcMk2i_nyyz6sE9TLciEiXQ4BNliLKQUMEbFs4zz3zumG-76m3zzi4xSn2kCvbbVSZWF8p7qqSPOc6dRG3rBo2JO2IKxku5bxUPOkL19AQltT7WRYIgCi_MnI00?key=Cktma731MOJNAwIjpG9hEg" alt=""><figcaption></figcaption></figure>

* Modify the **description** *(Other fields cannot be edited).* Click **Save Class Demand**

<figure><img src="https://lh7-rt.googleusercontent.com/docsz/AD_4nXdAJsZI_nhfFO0coLnFkrjLepCYjoIwsAEJQGfG3b5kexfgj_agxdgt1NvcgEm2Yw5WEUfyiCLgaet4DqVqApEF_RUBLnqXlE1TDUuokeNs0XXeQpmLXMSHzvdNGgjjKEb3M4fFZVVwLjiWXDgv2aElF-X4?key=Cktma731MOJNAwIjpG9hEg" alt=""><figcaption></figcaption></figure>

## Delete a Class Demand

{% hint style="warning" %}
You cannot delete an **active** class demand.
{% endhint %}

* Select the class demand and hover over its menu, then click **Delete**

<figure><img src="https://lh7-rt.googleusercontent.com/docsz/AD_4nXdP3nrgHJj-EaF-bmqAlxVs1s7BLa-2EgMmZktqv-x7xDpeS6655w4ChFgOarGuOHExa51dScP6UiuYVxkZ5oszHgpTA7sXl8nRVyQlBOrWdAP0qEBFIS-pjL5QQxJNkaPlp_UEiRvyGwLRYNeiQXdWzXI?key=Cktma731MOJNAwIjpG9hEg" alt=""><figcaption></figcaption></figure>

* Confirm the deletion. The class demand will be removed from the list

## Search for a Class Demand

Enter a **keyword** or **exact name** in the search bar (upper-right corner). Press **Enter** to view matching results.

<figure><img src="https://lh7-rt.googleusercontent.com/docsz/AD_4nXedwvf1ruXJYDGrrN4RkcLlcbwYtO2q_Hc2xRRdJbrYHP9Wz5sRgoxG2fzGFg-4G0t2Cgj4-u5CeLU-TbxxfQgbyq_DO_9kFIM_6Kr-h17b-Ac52FDJqxZto--f977V8RskajUFBUB0PzBZ43uEIz4lFazt?key=Cktma731MOJNAwIjpG9hEg" alt=""><figcaption></figcaption></figure>

## View Class Demand Details

* Select a class demand. Click **View Class Demand**

<figure><img src="https://lh7-rt.googleusercontent.com/docsz/AD_4nXf2gpPPia3l1fu5H7JoJhc9a16hdvi057tY85C5pg_szni6iJAbKDkXtyvraBpEVKR7AMgE0c8z5FEcmiAYl2lm50luc71Frf38kaQx-q-pEXPkF4OjNHEjMJlsXSwa97O1LiwFSZSQaVV3DvBs3g8E61Q?key=Cktma731MOJNAwIjpG9hEg" alt=""><figcaption></figcaption></figure>

* The page will display all open **sections and classes** with the following columns:
  * **Code** – Course code
  * **Description** – Course name
  * **Students** – Number of enrolled students
  * **Block** – Number of block sections taking the course
  * **Free Sections** – Number of non-block sections

<figure><img src="https://lh7-rt.googleusercontent.com/docsz/AD_4nXdCngQJxaONgBmFafj8xmSI6C1EzrErdWG5Wsbiae7RXjQc4R6DjKIei18tmGuRKXgBUKFWwWwwqnSRGA8EFCRyeCKWheh_oN56JJbK-hsMfUghWeVup8rnHYe0zwdG9H18e8NJ_4v3PBSWc5aNjhQW93G0?key=Cktma731MOJNAwIjpG9hEg" alt=""><figcaption></figcaption></figure>

## Manage Class Demand

### Add Free Sections

<figure><img src="https://lh7-rt.googleusercontent.com/docsz/AD_4nXfC5OWAGW6cWEZbdobJM67eBRKNB9hhELBh_6bP6wg42b1AhdXeBqNd-EH0JVFFntEJtxQi5B8KIrkl0bCqQsNulPr5wfWTNKrkKkeYtBUP2v5MPArbW7QA8V9DxcnsrCkl9LomzLo6uYTHTVlbM96jVoaK?key=Cktma731MOJNAwIjpG9hEg" alt=""><figcaption></figcaption></figure>

* Click the **Free Sections** column next to a course
* Input the number of free sections to be opened
* Click outside the field to save.

### Search for a Class

Use the search bar to enter a **keyword** or **course name**. Press **Enter** to display matching results.

<figure><img src="https://lh7-rt.googleusercontent.com/docsz/AD_4nXd8mCqrpjdQNJ2PlKosxk4KeegAWkZXRCw4T-aRToICjEuXXT-KUBC-8NQxEmG58xq3NHes01D70b3jDdNxmpiIxJ_H6Q7EIku3wd09aj4hNeq6UOmCZsu8fQwUnYjPDlh0giGYPAd784jh-sUfE0mwGOZf?key=Cktma731MOJNAwIjpG9hEg" alt=""><figcaption></figcaption></figure>

### View Students in a Class

* Click the **“Students”** column for any course

<figure><img src="https://lh7-rt.googleusercontent.com/docsz/AD_4nXcAZKWa7L4vr75ipOZrbJUosyezjMZeXOxwZU9xNLQx0_Bh-Qu9w2SEerRFVPMgqGbf_lk2zZUBovvUF4Dh4IsVoKAh2aag4wH83GdI2KNGMCUFYCA_8bMarR0yNgoH0CJSHuoNl_tFHNYwkAbHZzrFl5E?key=Cktma731MOJNAwIjpG9hEg" alt=""><figcaption></figcaption></figure>

* A list of students enrolled in that course will appear

<figure><img src="https://lh7-rt.googleusercontent.com/docsz/AD_4nXefGnFT8HchUvYg9H3U1zTbuY4eQKHDMCJjOtHiHkBsObq2nFl20k8Cww1L4RNtjvlXxXiMmJlpfuy1MMQsFNYcH_XHF6iPNefX24EQsVcK3b6-8suLvVsJGyGtCk3bojZpvs1qtN4bWwW4_anUwm7isIGN?key=Cktma731MOJNAwIjpG9hEg" alt=""><figcaption></figcaption></figure>

### Search for a Student

Use the search bar within the **Students** list. Press **Enter** to display matching results.

<figure><img src="https://lh7-rt.googleusercontent.com/docsz/AD_4nXfbG6B_3QuTBN0GpKr1HQemP4nLCCwzRfdqQ8mK3N4roofgbqlsl5h_YMhtjL7g0BYZ4rnfGCRNQq2RBOiC4eKbmw9Tm9XcOYMdg3-wy55Ekp4y8JGmTfhUhhBe-lQZ4rnD29vBqN-IYYHb5DQAIml9I2Y?key=Cktma731MOJNAwIjpG9hEg" alt=""><figcaption></figcaption></figure>

## Readvising Students

### Readvising Students in a Class

* Click **Readvise Students** next to the course

<figure><img src="https://lh7-rt.googleusercontent.com/docsz/AD_4nXdrdDlO5Us7-PSwEQ0aCzRwtXywW0mZpQ7MJj39M6OcECgni5oIMiirW_qUSOzNFnPmrW3jKyoG5JbHwIAbeRfXX4sypyyChGi6hOIZ189dO1C6M3lFsjrsrEiQCT6Ol7OANonULwwXqgTq5s8Mbnh_ZccW?key=Cktma731MOJNAwIjpG9hEg" alt=""><figcaption></figcaption></figure>

* Changes will be applied after processing
* Students removed from the class will be **crossed out**

### Readvising All Students in a Class Demand

* Click **Readvise All** (upper-right corner)

<figure><img src="https://lh7-rt.googleusercontent.com/docsz/AD_4nXeYEdM7ujzgwc0xdM1-NnmTkszSCJ1wMe3nwY7ouG1N57Wmr9Ak8i7y5i5eMqvfOyKwDEkG3_HbN7fbJRjCCn9Gqhmpl1H0Y_LLSSfL8ZxoGtGKlEsah-EawdjLzcRcQNKmMjQ4yS9x-6ztgUkJ5k6tzUpb?key=Cktma731MOJNAwIjpG9hEg" alt=""><figcaption></figcaption></figure>

* Changes will be applied to all courses

## Locking Courses and Term Programs

* **Locking a Course**: Click **Lock Course** to set the minimum number of free sections for that term. A **lock icon** will appear next to the course

<figure><img src="https://lh7-rt.googleusercontent.com/docsz/AD_4nXcijp-blJbgQBWSo6R_QHrh-MltQYHoVDUKCr12DWSxEghFr3s_2FXvoFrjp4jTN655VVp-yBvPPs0hN2Ny9l-vIfc0ORJTnG0QOKdpdG9AOL3AFlp1G9fZh5O11dx28lnSZ6PuBSZkbQN7g-pe6x4JkIHj?key=Cktma731MOJNAwIjpG9hEg" alt=""><figcaption></figcaption></figure>

* **Locking Term Programs**: Click **Lock Term Programs** to apply this setting to all courses in the term.

<figure><img src="https://lh7-rt.googleusercontent.com/docsz/AD_4nXeBfTj3dtK7SUtQUUzodWeZ3-wd83yxD1nGXAEfDT4CKupuDgf3qOljuaKYKdmXifLCYViwsrL7k1YQ7VZdLrbszbPH5QxfnuH2O6Qkl8e_s6ytDl8odDY-S_PdZlFIazl1SWFGZciZFgV7CGfzh8ePm54?key=Cktma731MOJNAwIjpG9hEg" alt=""><figcaption></figcaption></figure>

<figure><img src="https://lh7-rt.googleusercontent.com/docsz/AD_4nXd4hGO15NlzzmH9pollfHozReKyIc5rAHjppFXbC1za5_Knc_LGf7S4DCi12f1mtxV92VyDOII9phpOo2uaVw7Gt1pKaz-MEyKW7HyRvwhd1yUZ0hybYQ8ke3mu_zkKZgkSF0jlu2fNQseAhK87qra5_Xg?key=Cktma731MOJNAwIjpG9hEg" alt=""><figcaption></figcaption></figure>

## Download the Forecasting Report

* Click **Download Report** (upper-right corner)

<figure><img src="https://lh7-rt.googleusercontent.com/docsz/AD_4nXfrYcNQek4J5XfI8rFa7RwJ4TF_SpABscJ1TrETn5Z_hu_60X1UsCAUwEUHKdCUf4p5OY2kUqTAiggb83WoXMDqRjp8WJGDda2PfUZfetsYzi6JXATbaTi2I7gSQFyGqM4k19UtGEcYF20ca5rzT825EqE?key=Cktma731MOJNAwIjpG9hEg" alt=""><figcaption></figcaption></figure>

* The report will include:
  * A list of advised students and their forecasted courses
  * An overview of the forecasted class demand

## Frequently Asked Questions (FAQs)

**Question:** Do I need to refresh Class Demand and Schedule Plans after changing a block section’s status?

**Answer:** Yes, refreshing updates the Class Demand and Schedule Plan when a block section is made **active** or **inactive**.

***

**Question:** Do I need to refresh Class Demand if I enable/disable a block section’s enrollment schedule?

**Answer:** No, refreshing is **not** required.

***

**Question:** Will enabling auto-assign for faculty affect the current schedule plan?

**Answer:** No, unless the new schedule plan is **activated**.

***

**Question:** How can I schedule a class with a break in between?

**Answer:** Divide the schedule into two time slots and manually adjust the placement. Example: **Subject A (Monday, 11 AM - 2 PM)** Split into **11:00 AM - 12:00 NN (Monday)** and **1:00 PM - 2:00 PM (Monday)**.

***

**Question:** Can I remove forecasted courses not included in the school's list?

**Answer:** It’s **not advisable** to delete them, but you can set their section count to **0** to prevent student enlistment.


# Schedules

Last updated: March 2025

The **Schedules** module allows you to create schedules based on a **Class Demand** to plan for the next term or modify ongoing enrollment schedules. You can assign faculty, schedules, and rooms to classes.

## Access and Navigation

The **Schedules** module is located under **Planning**.

<figure><img src="https://lh7-rt.googleusercontent.com/docsz/AD_4nXcZpeLpJXPJC0o8AShOXK1OLJ9u2sArEz_kyurWIrEs_To5GcdLjUAdC8rWuWni70KwBgbZOYmQhNH3rKVGF4WjTtNdIel4J9V_tYfSrzvHkG8KXfp4xyxGl7fa0OwXcNme-ZMvWR17AUIdWxAr0rrlB4dd?key=7TTCgzHYRomcrECAe_kXWQ" alt=""><figcaption></figcaption></figure>

If you cannot view a link from the list, check the privilege assigned to your user account or role.

{% hint style="danger" %}
Contact your school’s system administrator to request view or edit access if you cannot access the rights management screen.
{% endhint %}

## Create a New Schedule Plan

{% hint style="info" %}
Only class demands created in the current term are available for scheduling.
{% endhint %}

* Click **+ New Schedule Plan** (upper-right corner)

<figure><img src="https://lh7-rt.googleusercontent.com/docsz/AD_4nXcYwvM3YdoRXz4pcmhPhagDQ38fEKXsbfmgqnz0MJ491S7TA0n5joV47t-Ei8_0sRX1oCPNinV7mJvt7ts9pD_RqTAr3DfSTJ3VDNPhYHdv_8R4pC7Xt9MduriVtsIh9PjFlusWIXD7eRLpS7pIQFgAN8I?key=7TTCgzHYRomcrECAe_kXWQ" alt=""><figcaption></figcaption></figure>

* Fill out the fields:
  * **Description** – Unique identifier for the schedule plan. It is recommended to include the **term and school year** (e.g., *Sched 2nd Sem 2023-2024*)
  * **Class Demand** – Select an existing class demand as the basis for the schedule plan
  * **Auto-Assign Faculty to Sections** – Automatically assigns faculty based on their teaching profiles
  * **Two-Set Calendar Mode** – Enables the **Schedule Cycle workflow**, allowing two schedule sets for a term

<figure><img src="https://lh7-rt.googleusercontent.com/docsz/AD_4nXfxWcqwUj6Wo7OiUpp9qYyh8u5rnJ1ng0eQZIg51j6Dj-27FPyiNWhqbcZbz-BtR3v_xHpdDNqcNX27rUKsuzMusb1sNyLrQ6v1w1P7iIfJvW1dFD9sAG9d3_2oirT9OLAch-nYKPBQ7QgZQIcZtaKAEkQ5?key=7TTCgzHYRomcrECAe_kXWQ" alt=""><figcaption></figcaption></figure>

* Click **Add Schedule Plan** to finalize

## Refreshing Section Count

{% hint style="warning" %}
You cannot refresh a schedule plan if there are student enlistment conflicts. You must first adjust student enrollments.
{% endhint %}

* Select a **Schedule Plan** and hover over the menu (upper-right corner)
* Click **Refresh Sections**

<figure><img src="https://lh7-rt.googleusercontent.com/docsz/AD_4nXcK-4RpXgC6loPwwgpfR2yaVxAYlTD5jNkaYFqj2nTKO6RVW55IDW8qRiI035H8A1LLO_9F7IQ_1kYFD-JfjuQsOmAfgU2zjTLfiueALsLf6z52t3UXjanO-Yl5HdHEFer13el6MochdOEeFgJvSre69lk?key=7TTCgzHYRomcrECAe_kXWQ" alt=""><figcaption></figcaption></figure>

* Select a **Class Demand** to update. Toggle **Auto-Assign Faculty** if needed
* Click **Refresh Schedule Plan** to apply changes

<figure><img src="https://lh7-rt.googleusercontent.com/docsz/AD_4nXd5gdunptjRyPj83hGJp38jSfNhsz1ye9oPprFgNdZdVJJv6YRhx-N6Hib_pzjpDK1pI8LLKAR-AP1Z5zSynxyFUZT5i84wuxdpOK5Capn4HS4m99oKUtAIF1BfqFwlbuVT1U5P-TzFlUz4i_qV9O7ycare?key=7TTCgzHYRomcrECAe_kXWQ" alt=""><figcaption></figcaption></figure>

## Edit a Schedule Plan Description

* Select a **Schedule Plan** and hover over the menu, then click **Update**

<figure><img src="https://lh7-rt.googleusercontent.com/docsz/AD_4nXdvlje3xL1sT3Md3DFjgcG_igy7cIrFuBUU0IIMhT_eJnng0GCr69SVcuruIqNg069QdXp3J_mpAZpm_6YoBdAj_qTeIaUu14jXNHI45qoYbPBWSTu8UMHbFiQRhANEBYQlkaWRHIi4NegBqvHv_VQqaYM?key=7TTCgzHYRomcrECAe_kXWQ" alt=""><figcaption></figcaption></figure>

* Modify the **description** as needed. Click **Update Schedule Plan**

<figure><img src="https://lh7-rt.googleusercontent.com/docsz/AD_4nXclJiFOyHkJFSL1OwWeqvr3a3LOSKzq7ld0AIryazC7BXAhS3FXw9VMqJ8NA2f5HC6ue6UCBGYdsOsl32xIEoZThXbtz_QXl737fgogHRoYtFs-K5qYpBo5LnkBM3t5l-X2dfBEirR56w_caMrQ4n8OWtNS?key=7TTCgzHYRomcrECAe_kXWQ" alt=""><figcaption></figcaption></figure>

## Delete a Schedule Plan

{% hint style="warning" %}
A schedule plan **cannot** be deleted if it is marked **“Open for Enrollment”**.
{% endhint %}

* Select a **Schedule Plan** and hover over the menu, then click **Delete**

<figure><img src="https://lh7-rt.googleusercontent.com/docsz/AD_4nXccEaWg84uZS8wLpa6vBh-dNJ_6mbDPJ22MSailbBD7IhDxIG0CmUn6RLhwRwSn4dgthZx4goYEBx50apPFhGa5u1UsLnc8RGWR6dF9KKwEjIAnp9MeuiXsBOSjPL32gwuQfpVqZ9W8iQowm8mAkKkdntvz?key=7TTCgzHYRomcrECAe_kXWQ" alt=""><figcaption></figcaption></figure>

* Confirm by clicking **Delete** again

<figure><img src="https://lh7-rt.googleusercontent.com/docsz/AD_4nXfdpEoI5cl9Y31G0zmOwzmInYiF4ZPGkhzAuSHxEska7EhNGGKPadL7v-RM1Vki0rcrQl2NgoukKUjkPItj9ANuYQNEC9Nsq3LwHl-pWA1O5OJRUSO7Gt_mFj4LTOh_ecW8JwLpHyade0Cz4uNHdu1GxnY?key=7TTCgzHYRomcrECAe_kXWQ" alt=""><figcaption></figcaption></figure>

## Search for a Schedule Plan

Enter a **keyword** or **exact name** in the search bar (upper-right corner) and press **Enter**.

<figure><img src="https://lh7-rt.googleusercontent.com/docsz/AD_4nXeDZKNI4eR80NjmnzrK6x3-gH9cERaD8Vaj2QGfboZsjdmzgipzs35hCmDYYmd8T96FXnSHYI6Xo4BYttJ70_-W1PyNhzhjOQE0LQ4D1hF5cdOYMj4XVyiOZJnj48Zx0wjeWKEVV9J-MafKO5xCl51j9EZa?key=7TTCgzHYRomcrECAe_kXWQ" alt=""><figcaption></figcaption></figure>


# Plotting Schedule

Last updated: March 2025

The **Schedules Plotting** module displays open sections, a weekly timetable, and available rooms, enabling you to organize class schedules.

## Access and Navigation

Navigate to **Planning > Schedules > View Schedules**.

<figure><img src="https://lh7-rt.googleusercontent.com/docsz/AD_4nXffNuNoHVMrUFNb4h-Q7BL6iNUXLKx3je9NvuejZ6W1qmialvhOhu_A03gDv7jtcHeLEfVa7Sb8v_MNl8FS94Up8JYpDAw9V6DkeXHfrEI7mXeDZrMP213LC5j9-9PJPo4qCno24ifh_2LzZf81jDiGuvAl?key=7TTCgzHYRomcrECAe_kXWQ" alt=""><figcaption></figcaption></figure>

If you cannot view a link from the list, check the privilege assigned to your user account or role.

{% hint style="danger" %}
Contact your school’s system administrator to request view or edit access if you cannot access the rights management screen.
{% endhint %}

## Schedules View&#x20;

### Features

* **Room List** – Displays rooms from the Planning Setup Module, sorted alphabetically by type

<figure><img src="https://lh7-rt.googleusercontent.com/docsz/AD_4nXcpT9zeEV9_s-KNjF_nlGtae8lMorsqp2HLBP5hWDGwwz8JPJC1r1W_TkXOBGsl4GOXYoSNRD6bQMFW78kYMSiCq2O8QwfswwVUXN6kJVqxCoQ7BLMtax10hQgpf4QhLu0S99I7U9MkwOsCacgvw4gAXV5g?key=7TTCgzHYRomcrECAe_kXWQ" alt=""><figcaption></figcaption></figure>

* **Timetable** – Show available time slots (7 AM - 9 PM, Monday - Sunday). Unavailable slots appear **greyed out**

<figure><img src="https://lh7-rt.googleusercontent.com/docsz/AD_4nXc1tkWFMkanr5PuL_7ywMGbzNMs9ku6B2555uQsPnJ5cgicL9t6kaZvKhLCpar11EbLCF89a_EvPbstCVuizW7AiA7fSrRIIkCHzhcJL0ObSNegyChJtPUqGhJz8Y6Qo2BZbHCiE0hDWIUECjVtKOcHv6Zs?key=7TTCgzHYRomcrECAe_kXWQ" alt=""><figcaption></figcaption></figure>

* **Filters & Tools** – Filter schedules by **faculty, room, or block section**

<figure><img src="https://lh7-rt.googleusercontent.com/docsz/AD_4nXd3JL-eNZBfK10MgF5UXOlj9klty2AOfitwZLaVsBHThnnPTHbqPyHMU0R74zevGicJ48OJ6DVAWxK-DBiQqq3V9u262csUC0LJ73gZ9slvC_pYFkpkYa3Agp5Vnv24DVOdivSJydHzpP-UyIQorW2sS78R?key=7TTCgzHYRomcrECAe_kXWQ" alt=""><figcaption></figcaption></figure>

* **Unscheduled Sections List** – Displays sections yet to be scheduled

<figure><img src="https://lh7-rt.googleusercontent.com/docsz/AD_4nXchiMwau_LwHpJW6zNiTiS6mt_8GwfW470tJwsr1WL78GcDnIKUQrOYUz_C67VnXxg8LGwwCDtgQh5mFXGfUYz-EnPX0EewrLAomCF-WCojSxfyA-FGsJK_xpcZIeh1YRuQj0QzwkmUpNtV3lMDkKasB5wa?key=7TTCgzHYRomcrECAe_kXWQ" alt=""><figcaption></figcaption></figure>

### Viewing Section Details

<figure><img src="https://lh7-rt.googleusercontent.com/docsz/AD_4nXcecajJoZgkxYXwHD2AO2goKMKRyfziciGqAujOCCvP6FKLGLCCptiRCDEhmnONZYfiC8e73U3bE9MSwUTfhus9H5g0PLvt_5PZVZzoB4to55OiiD9PYHedXnij8axsa0IfzL75BPELTg-keKf7ZtxtPJE?key=7TTCgzHYRomcrECAe_kXWQ" alt=""><figcaption></figcaption></figure>

* Select a **section** from the right panel
* A side panel will appear showing:
  * Course details
  * Assigned faculty (editable via **Teacher dropdown**)
  * Schedule type and section type
  * Actions:
    * **Lock Faculty** – Prevents faculty changes
    * **Dissolve Section** – Removes the section
  * Faculty availability & preferred rooms
  * Student list breakdown

### Search for an Unscheduled Class

Enter a **keyword** or **exact name** in the search bar and press **Enter**

<figure><img src="https://lh7-rt.googleusercontent.com/docsz/AD_4nXcK1j6krgC2KPa5FDug8ZqHH60D4xG8xathPB_Fs6Pe_O39ClE-fRgR0NwH8zaPgtmaEOkW2x9FMc0YkEM9yaJqEmxZblbGJuqkRx0XXTiuA4iPfX5St0tDnUU0-I5mCtIEY5JxpdRfqBAunBIz-C06hcoG?key=7TTCgzHYRomcrECAe_kXWQ" alt=""><figcaption></figcaption></figure>

## Auto-Scheduling Sections

{% hint style="info" %}
Classes may remain unscheduled if there are **no available time slots**, **faculty preferences do not match**, or **preferred rooms are full**.
{% endhint %}

* Click the **Auto-Schedule** (wand icon) button

<figure><img src="https://lh7-rt.googleusercontent.com/docsz/AD_4nXfJB1TCkMgqaIk3CPVaoiauxTZEC6s_5_OW4saaoZAlZBW_pYXZo0GlvgyRE07X2aoi7gu_ki1nGLOftnylbmAXvdR1y_L9ksJ2E5WMIIuUKSIjl0innKmzS81goOYOpjFheXOILnTo-IYsAhszGGNyTbko?key=7TTCgzHYRomcrECAe_kXWQ" alt=""><figcaption></figcaption></figure>

* Choose an auto-schedule option:
  * **All Sections**
  * **Block Sections Only**
  * **Free Sections Only**

<figure><img src="https://lh7-rt.googleusercontent.com/docsz/AD_4nXejaJm1Yee_MKAYvQnxrxjfkoj5JXKLLkPxQV4nVNIDepR0dHPdE3-W0TLMW2phwNMcEk1gxRlkdKIaCZ_4UFcldlicBDndO-3IJ2Eqs5GylL0zK_sLMAuaheeQzY7T4qsGZRublvxvtanUFW9GM6trCBXj?key=7TTCgzHYRomcrECAe_kXWQ" alt=""><figcaption></figcaption></figure>

* Click **Auto-Schedule.** The system will process scheduling in the background

## Manual Scheduling Sections

* Select an **unscheduled section** from the right panel
* **Drag and drop** it onto the timetable

<figure><img src="https://lh7-rt.googleusercontent.com/docsz/AD_4nXfGQaWk96qUGoutt_yJHdBB1Hdm48dz5r26AyteAHHuNU6NhSYAQaUIDim5toM05io1Q7GO2QwYaJkM2qoxADxqKVOyhjz1dov4ajD_OoHSSAAnOjw98u3U66DpmT5qaPbr2YFHFt9IbKCnEG7CpzuYq6G8?key=7TTCgzHYRomcrECAe_kXWQ" alt=""><figcaption></figcaption></figure>

* Select days and **split durations** if needed

<figure><img src="https://lh7-rt.googleusercontent.com/docsz/AD_4nXdFyTaU8gDnP4mi8oOVnCuToUXkVF3P2CO5STmpN48zBR3Hyp7DlegDk6KYWc97dTHs7KoNmMgUXBi0wXsxoI219JKkmpOPtnOKK0RTawafxHglESJSeDuJbf5-tTtBuZ-ylEUSfncGWuMO5Rw6NdqxOK7h?key=7TTCgzHYRomcrECAe_kXWQ" alt=""><figcaption></figcaption></figure>

* Click **Plot Schedule**

{% hint style="info" %}
Classes cannot be scheduled in **unavailable time slots**, but they can be scheduled in **faculty non-preferred slots** (with a warning icon).
{% endhint %}

## Unscheduling a Section

Select a **plotted class** from the timetable. In the side panel, click **Unschedule**.

<figure><img src="https://lh7-rt.googleusercontent.com/docsz/AD_4nXdFz1Uk2N75Y5ugmLS-sSbEaY4aql6KGfoZD7_AOe9lQ-qrhteDGBZpjs3yg27h-DnPpq7QdQq_by9CAND5b5v3FiklX3Eps6eIhWYc0TDsaUZ6qjDzgDI0BSv0ou6UpZ1aBUhe_Hox0Xh8_zCuBfi9N3et?key=7TTCgzHYRomcrECAe_kXWQ" alt=""><figcaption></figcaption></figure>

## Schedule Summary View

* Click **Summary View** (upper-left corner)

<figure><img src="https://lh7-rt.googleusercontent.com/docsz/AD_4nXcwqe0gj7WPc-ERjx99e2bWwqWQYyhs89CoDakTpzYq-VrbIHo7GhwXrIx3E6VUsqKVtmvJE6KLApW27vyOqqwkU7s4RTFyHVspjD1bxUP_ZjAAVsOg0nlBdS3dRIGqRjzVOOAqPwlTjJXV5OV26-RfU4Y?key=7TTCgzHYRomcrECAe_kXWQ" alt=""><figcaption></figcaption></figure>

* Displays:
  * Course and section name
  * Room & schedule
  * Taken/offered slots (editable)
  * Block section status

<figure><img src="https://lh7-rt.googleusercontent.com/docsz/AD_4nXe5-lXwtIIVRx3xXAQtvKbkprHyqdmNx2TnN9JSMT63i4Guj4S5kogoxX5IWF_wFBhTZCOI4kKEzZqNPM12KypAGR4nG6dZy7Ho7yP0SVJGR2l2UtAs8nOQb-RIDdil2omhDJHzGgZtwL02p67Dcu7H2V6c?key=7TTCgzHYRomcrECAe_kXWQ" alt=""><figcaption></figcaption></figure>


# Section Offerings Management

Last updated: March 2025

## Add a New Section

* In **Summary View**, click **+ New Section**

<figure><img src="https://lh7-rt.googleusercontent.com/docsz/AD_4nXdN5qviUz-pU1W54QN5ZupPBrw5jM6mNOBw4slQRH2zIuUVZCIb4NPNI8kNwESF6k5xWJaCpcBobV8Jh8ilgUs1cCot-sl_2KlU6R2b-V0T13aG1Tzkh6jSccuHSXmTzaV9OJoegQyqMKBRFOww4A1MA9A?key=7TTCgzHYRomcrECAe_kXWQ" alt=""><figcaption></figcaption></figure>

* Select a **course,** then click **Add Section**

<figure><img src="https://lh7-rt.googleusercontent.com/docsz/AD_4nXf7cnr6NRH2wN4sS28obiAj0F-GOPC32qJ5zOxSfS3yFRKlsE_n-PK22zNznKxN_g9xgt1ceNB1-sCBPpGwbfPrUituJlSEq0RUVorf0tzkSpU63w7SYS600TEy3DX2Y-AgFzyi1Lot5H3yXvGnNakS0yg?key=7TTCgzHYRomcrECAe_kXWQ" alt=""><figcaption></figcaption></figure>

## Change a Faculty Assigned

* In **Summary View**, hover over the section menu, then click **Change Faculty**

<figure><img src="https://lh7-rt.googleusercontent.com/docsz/AD_4nXdaMUIXdk8tH4xRIfZ3-mlil6mcXb0hXA4SFd_KERhoOu3oSYuQAINsU6rLUvyqYHHXH7FEWG8ZJ3yHNJNX94gXR9mZfv8f1Wf6bfLTDYsG4asDgbxjb-7PJbkLCvcV5N2BzyS_t32slP0rVtWp6UQ1rY1D?key=7TTCgzHYRomcrECAe_kXWQ" alt=""><figcaption></figcaption></figure>

* Select a new faculty member, then click **Change Faculty**

<figure><img src="https://lh7-rt.googleusercontent.com/docsz/AD_4nXe2ZK-ZqN1L6Ygy3ZgSeAgnjYg00Wuw4IWE0gyVNDpeUwID4AjIjOhoeciAywsfvpGV54zNB-jJQsVnG6YKX1iSnTeIDbxWUB7xSFvGNqv8x-FIDmq52XS9EXstigEc2rU1qlpF2POM2UFO3lpix-ezaW18?key=7TTCgzHYRomcrECAe_kXWQ" alt=""><figcaption></figcaption></figure>

## Tag Free Sections to Colleges/Programs

{% hint style="info" %}
Restricts **student enlistment** based on **assigned programs**.
{% endhint %}

* In the **Summary View**, hover over the section menu, then click **Tag College or Program**

<figure><img src="https://lh7-rt.googleusercontent.com/docsz/AD_4nXclcAYOW4_MNCRPS2ZwGMWHvbv-J-miUFwwgm-RhalPVP9acyuQhUpvoVegZja3LpBQOrgWvbNKDsz5vgV-8OaNGF8adbF7v-qkAuPRImFw5CYe3yuOhOU6EuS9tyUCDHVximv9uY85ZR16rM-eS7dEjxik?key=7TTCgzHYRomcrECAe_kXWQ" alt=""><figcaption></figcaption></figure>

* Select **College** (course-level) or **Program** (program-level)

<figure><img src="https://lh7-rt.googleusercontent.com/docsz/AD_4nXedzrpWXLuwEc5cwfMFMBUuhSEwlNBgfCPGL42sCRrPL6uNKgcg-X-zbiJfgvszqctioITVzcx0Lem-fPHWvuDMvl77mFdeqLPmtuLz-QYVR3MYtkDqhO8CNCQr_UVVz7mZEAP_4WMn93T6FnNJJYJjQ8iz?key=7TTCgzHYRomcrECAe_kXWQ" alt=""><figcaption></figcaption></figure>

## Merge Sections

{% hint style="info" %}
**Merged sections** will appear under the **main course**.
{% endhint %}

* Select a **main section,** then click **Merge with...**

<figure><img src="https://lh7-rt.googleusercontent.com/docsz/AD_4nXfq8ZIhGu3dIXEskB0iIkA4ZEiV2yIUcY5vnH_LvG1f6Di-iuCWwNg53NCgv7lJiF5yM0vsQrq-krBmnM625o_b-zJv3uZ8AYVO4wV7tBx8AP_Tc4An0_3EAPUyiukb8QwsC9xw3MJjBh7dCf0LuCVuPdPJ?key=7TTCgzHYRomcrECAe_kXWQ" alt=""><figcaption></figcaption></figure>

* Select the section to merge, then click **Merge Sections**

<figure><img src="https://lh7-rt.googleusercontent.com/docsz/AD_4nXfbuzP2wEl00D-nH4vW2WV7JsluGoyl9U9Vc9vKLBE-les9lEYCLWOigXFOqHXpuOcxuDNUEYuhW_PYSyxrFEyBXnkzd154S8EzsMZRqsdwUiPpmN_CF9-DCSnpCuF4OlJYYJE6N5AUvR8SYu__wTDBlith?key=7TTCgzHYRomcrECAe_kXWQ" alt=""><figcaption></figcaption></figure>

## Dissolve a Section

* Hover over the section menu, then click **Dissolve section**

<figure><img src="https://lh7-rt.googleusercontent.com/docsz/AD_4nXchf12pXCKNm9Yz_W58gyVLX19S2po4bn1Kn0fR4UwRho-SCC5ia74EaCjceZF8y1zEQ6yO9YkZubXEnOHWYByt994dBmg_FUubNu3wwhCb2wJX_WtXguWY-siDm2PvaNW9a9z_gxKIBpRrtMB2Xj8Zxc0q?key=7TTCgzHYRomcrECAe_kXWQ" alt=""><figcaption></figcaption></figure>

* Confirm dissolution

<figure><img src="https://lh7-rt.googleusercontent.com/docsz/AD_4nXdj4FDqXCpM2-po5Pyt58T_Bm7HCSupujkJsqPSjlWDnTWmja2GAHtHbTXs2WMJrKBmBK8bOqVkHkIOiiznPS12RxmSVwr9fIFTzfYs6MWHyDcKF4BiK6niMFaZ1eo3jvgtupwvmtzzm6hFP6ASSmtWh2ca?key=7TTCgzHYRomcrECAe_kXWQ" alt=""><figcaption></figcaption></figure>

## Search a Section in Summary View

Enter a **keyword** or **exact name** in the search bar and press **Enter**.

<figure><img src="https://lh7-rt.googleusercontent.com/docsz/AD_4nXegkA0LQtRBTCzWuSJ320RRkmqdc2ow7LJ-i5dooC2rvvwaQZ4n7RiQ0SG1YJ45VTzd6OHy4VE0C14aT_mROmyPpuviWP_MG13WS5qm6zqRAZr6vE75SrmnCHSBKrt1iQuVj1X07VR3VVYzasxKaNVVuG8?key=7TTCgzHYRomcrECAe_kXWQ" alt=""><figcaption></figcaption></figure>

## Two-Set Calendar Mode

### Enabling Two-Set Calendar Mode

Toggle **“Two-Set Calendar Mode”** when **creating a new Schedule Plan**.

<figure><img src="https://lh7-rt.googleusercontent.com/docsz/AD_4nXcsxKDodx50Pnex3LsZYfFkPWecetERI8-PaZ2wuvorJ-EwxxwJje7V3UvPu0Zu74qes6B2m_Jt3ixDN-SMgOt9a7sffudy5Wexwg4e7CJg5qP8cM0LwRH4pYVE67cYUwxT-UUPX9IRgLNHBUn5I7a9_ViY?key=7TTCgzHYRomcrECAe_kXWQ" alt=""><figcaption></figcaption></figure>

### Assigning Sections to Sets

* In **Summary View**, select sections, then click **Assign to Set**

<figure><img src="https://lh7-rt.googleusercontent.com/docsz/AD_4nXcsal7BGRp-T7vHUC_hkdAA7e1QLHxgojRmbZX3yP0rfiXGmQa8K-Oz8CtcBZ81TxD2Nnk1cF2gbnNHh_WI_e5faJbfLY0Kzbspjn3zmGaOy6O6zq2bs3u8vkO7RsjLtuP58VA3kZ6I4UYFNF8XIxPGpuwD?key=7TTCgzHYRomcrECAe_kXWQ" alt=""><figcaption></figcaption></figure>

* Choose **Set A, Set B, or No Set Assigned,** then **c**lick **Update Set Assignment**

<figure><img src="https://lh7-rt.googleusercontent.com/docsz/AD_4nXevSBTkMjP0OsV-zqlbZTYOpsyaOqIIUZY6nVtAZQ-86KFXboVCBYxYENUvtpBeHnwNNXD_5r2GL_bZYDOhkFyHM8LcuhlaZ9w7205akWnYv30mWaxwMj5VV_oNsCz0Hm3y_l6suBSOkHa0qMuzbsUT8UmN?key=7TTCgzHYRomcrECAe_kXWQ" alt=""><figcaption></figcaption></figure>


# Opening Enrollment

Last updated: March 2025

## Offering a Section to Faculty

* In **Summary View**, click **Show to Faculty**

<figure><img src="https://lh7-rt.googleusercontent.com/docsz/AD_4nXcOirhC_d8R5iaT5S-SaQgLvXv7kIEMM0vJfQjDyU54OWr2bFnenr_Vgreamqq0GEjb2hp7PntlCNIG8CE8l8vGP99CYEwJotzwAc5tOM0U3fQf_35GGoG56qRzVKX4YSrnH3yX5DFW-edgCXSHAMrvow0I?key=7TTCgzHYRomcrECAe_kXWQ" alt=""><figcaption></figcaption></figure>

* Choose whether to notify faculty, then click **Show to Teachers**

<figure><img src="https://lh7-rt.googleusercontent.com/docsz/AD_4nXc8FMAfOy-pJmyH4RFevbZqkLNlAP6eVzhFzHeDr1J725Nad3tWoMSY4BGfQLF_Jj9k9oSqH-SPrgaz_D9_NdWmrFr3rhnqRvH7NsDz70P_aLFQR06AQ0qfkpp2SzNO9SxKEUz6IlA3PjnZh3fgMQ44k_A?key=7TTCgzHYRomcrECAe_kXWQ" alt=""><figcaption></figcaption></figure>

## Opening Enrollment

<figure><img src="https://lh7-rt.googleusercontent.com/docsz/AD_4nXeptmGvvV7GKrKkEkLSTAomkqEqsMo6Ae7S9208pwTXGLPRXSec9xUYdyl0hwdH2ypQnLgXPyFPCA9NmNH9CqLOrz8BdfsyIbZUf4XAHb_-_Sf4jEfsXt8sweRvmOeT7Rpap104kTGxxO1lkjQUhkviu9VI?key=7TTCgzHYRomcrECAe_kXWQ" alt=""><figcaption></figcaption></figure>

* Go to **Planning > Schedules**
* Find the **schedule plan** with the “Offered to Teachers” banner
* Click **Open Enrollment**

## Frequently Asked Questions (FAQs)

**Question:** I have already offered a schedule plan to the teachers, but the 'Open Enrollment' button is not visible

**Answer:** Ensure that the 'Late Enrollment' setting is turned off by navigating to **Enrollment > Enrollment Setup > General Enrollment Settings > Late Enrollment**.


# Registrations

The **Edusuite UNI Student Registrations Features** simplify the application process for prospective students, enabling a smooth and efficient registration experience. This system allows students to apply to the school, submit necessary documentation, and complete their registration all in one place.

{% content-ref url="/pages/-MHnXHRiDkuv8H-lR2RU" %}
[Registration Setup](/product-guide-uni/admin-home/registrations/registration-setup)
{% endcontent-ref %}

{% content-ref url="/pages/-M5dtIv6rrQkNG51zptw" %}
[Student Registrations](/product-guide-uni/admin-home/registrations/student-registrations)
{% endcontent-ref %}


# Registration Setup

Last updated: March 2025

The Registration Setup module defines the necessary information students must provide when registering.

## Access and Navigation

You can find the **Registration Setup** module under **Registrations**.

<figure><img src="https://lh7-rt.googleusercontent.com/docsz/AD_4nXfDbykMDKNSbt-ZOeUeUBw8tPqrTTgDMJFTweoxCGy_9nIffq-BnilsZyemitopShjPcYv5dJCW9WDBmteNRp4ahsUvKQnr4D_p9asZ_zGmtqCU48jo47ats5bxL-0saiMrbkAwa5wdR4e_DicZIGTmojAJ?key=LJyB3V7fVn4kerk-5detQQ" alt=""><figcaption></figcaption></figure>

Check the privilege assigned to your user account or role if you cannot view a link from the list.

{% hint style="danger" %}
Contact your school’s system administrator to request view or edit access if you cannot access the rights management screen.
{% endhint %}

## Term Offerings

This setting allows you to enable or disable specific terms for student registration.

<figure><img src="https://lh7-rt.googleusercontent.com/docsz/AD_4nXcqLf18ig8rUTJaDIXENfE2ZrfaPReOQlCLfu6iXoGnIJvgBIZ6_EVS9tobPIPtCaCDQ5UihO3lLchLvnHU3G0so_P1arlfWFNUCwTpjFrrAiLsYbyIZotgN55bmu5SqBl_3BhIXwLfB4ZYdAJRA7Nt9rWi?key=LJyB3V7fVn4kerk-5detQQ" alt=""><figcaption></figcaption></figure>

* The section displays four terms: the current term and the next three terms
* Toggle each term **on** or **off** to allow or restrict registration
* Enabled terms will be available in the registration form

<figure><img src="https://lh7-rt.googleusercontent.com/docsz/AD_4nXfNwM5AJU1rRdpInD4DNvYSVPXkl8i-6U8GBqMSaX9i2uVMY23byy8gAdEH_KSbNZsOa-OeSJPXqGD82uDftQHp5N4PMHnTQ7IAlb0y774shTF1nxIThbEfq3BmOI7YFEo24aJ9pGpj4t_rfQi413hTISp3?key=LJyB3V7fVn4kerk-5detQQ" alt=""><figcaption></figcaption></figure>

## Program Offerings

This setting allows you to enable or disable specific programs for student registration.

<figure><img src="https://lh7-rt.googleusercontent.com/docsz/AD_4nXd2YJbEZvUASM3pnI1-SSrq0vkAEXOevOgHtzCAhT8uV8sEHQEc_WhawvZTbUHntfp5ZUF0qkGaNFEBKR6fpNJWvccDLmsBMAl6i6Fvvr35chjkkaYF_trPelkUOhMyipqlcgxsYcyvc_H5xYXlEr1rIWBH?key=LJyB3V7fVn4kerk-5detQQ" alt=""><figcaption></figcaption></figure>

* The section displays all offered programs
* Toggle each program **on** or **off** to allow or restrict registration
* Enabled programs will be available in the registration form

<figure><img src="https://lh7-rt.googleusercontent.com/docsz/AD_4nXeE0UfOZkWu1TK0AqGw53KXCnjIdoTRGwDdRpDQDB54aJDHA-hIVgnzRDPZqQvVlw0TWGE5tqCUe6-i3q5NZwv92Xzcx_zJugt34Onnh2K7T7S-thZV-Y3w_tQNApeiJDR4fBdcmJyFrwNgoBEyKnKPWNuh?key=LJyB3V7fVn4kerk-5detQQ" alt=""><figcaption></figcaption></figure>

## SIS Requirements

This page allows you to customize the registration fields students must complete.

<figure><img src="https://lh7-rt.googleusercontent.com/docsz/AD_4nXeaphUWtrulgTu5djhHMzruslhKnqd-CW_EzLvl70JgZ8rWUSoE-rzHEPFqOmkvlX7viRHVdbM_W9WQKRhC6kxWxEponMBvthfy5LxZEM1NzqKnKaQE7A_PHfTsc49tndtwUcs4OvHJEKW7XbwQHG2tyLI?key=LJyB3V7fVn4kerk-5detQQ" alt=""><figcaption></figcaption></figure>

* Check or uncheck field groups as needed
* Checked field groups will appear in the registration form
* Use the **Preview** button to review the fields
* Click **Save Changes** to apply updates

### Adding Fields to the Registration Form

To add new fields, configure the user information fields first:

* Navigate to **Users > User Setup > User Information Fields**
* Click **+ New Group** in the upper-right corner

<figure><img src="https://lh7-rt.googleusercontent.com/docsz/AD_4nXf7Jtj0ztzlbTYR6JkMM-0cR1fWcxvPj4xDnZKNiDM_eU0bMO_kzTg4eqqOji_7QeTlXpdBQ7MAqKVjcjYrhZiUFHVIliZjEVzOUmwRoWanC0W2KLnTgdJltjJBuxSp89NgVN9XrmbH5fR5bai_0O4Ln-yw?key=LJyB3V7fVn4kerk-5detQQ" alt=""><figcaption></figcaption></figure>

* Configure the group's access:
  * **Per Field Access** – Set permissions for each field individually
  * **Field Group Access** – Set permissions for the entire group
* Under **Editable By**, ensure **Public** is selected

<figure><img src="https://lh7-rt.googleusercontent.com/docsz/AD_4nXf9CkY5HQ9SlJGG_8-OmruqXGEAMpIEu9p9_BRrrCFWHuzwcd9TnGJvBRNYUJKnZY_BLWpkRhIVPyPzX_nmY9MjIa9NtI4_KJmcYUHk96u_6W_Wks1jDlHgbNWmrv3pi05FryvfEg7zxVy54bzBtLGipd4Y?key=LJyB3V7fVn4kerk-5detQQ" alt=""><figcaption></figcaption></figure>

* Save your settings
* The new field group will now be available under **SIS Requirements** in the Registration Setup module

## Terms and Conditions Editor

The **Terms and Conditions Editor** allows you to define policies and instructions for students before they finalize their registration.

<figure><img src="https://lh7-rt.googleusercontent.com/docsz/AD_4nXfwhWDU2Pvcd8L3WS4x7YYK25hTKWr-LHPbsgIvkT8YmZvmB0DvXaGMOY6CQasQ3IbuHTSeYwdOuqnUYbujW_9vq5I0ZG8603O_GP1_YzLlzEw5CL5AwRQ-BYGDB2x26B_PVjnj9bIx0WO_vVlMq8IPYLE?key=LJyB3V7fVn4kerk-5detQQ" alt=""><figcaption></figcaption></figure>

* Enter and format text in the provided text box
* Click **Preview** (upper-right corner) to see how the terms appear on the registration form
* Click **Save Changes** when done

## Frequently Asked Questions (FAQs)

**Question:** What is the maximum file size a student can upload during registration or in their profile?

**Answer:** 10MB per user field (No restrictions on file types at this time)


# Student Registrations

Last updated: March 2025

The **Student Registrations** module allows you to manage finalized, pending, and ongoing student registrations efficiently.

## Access and Navigation

You can find the **Student Registrations** module under **Registrations**.

<figure><img src="https://lh7-rt.googleusercontent.com/docsz/AD_4nXdYWDbCLbK5G8dIky0vg9kujqPX9tHz1t7kkIIicycJYLLAQwGaEr9LA7PPPSquvfYphEzMJrfcRDtS--8WQgVrRtGO4le5HbA567vvtVLuOTfIB72RNVYgMViR1j5Jbx-KL4x3oeIv-RVSn7KagTv-Mb7j?key=WBGYegKWk_-r5cy5Jjnrvg" alt=""><figcaption></figcaption></figure>

Check the privilege assigned to your user account or role if you cannot view a link from the list.

{% hint style="danger" %}
Contact your school’s system administrator to request view or edit access if you cannot access the rights management screen.
{% endhint %}

## Admin Registration

In **Admin Registration**, administrators can fill out registration forms that will be sent to students via email.

<figure><img src="https://lh7-rt.googleusercontent.com/docsz/AD_4nXd6Sdc1sRt7lJokhzagoIG9nN9fbgo07_1XlCauUZPYTcNU1GMdOas6qv2MaAv0okO-iRRwxM_6oD5gZpD52_b-GlKO-_BcACVsXbwoQN4sYh8e0vMjHA90t4v1biTiyuwBlwKd9Sh0exHBt_4TtklZaew-?key=WBGYegKWk_-r5cy5Jjnrvg" alt=""><figcaption></figcaption></figure>

#### Steps to Send a Registration Form:

* Fill out the required fields.
* Check the relevant checkboxes at the bottom of the page:
  * **Allow applicant to edit the pre-filled registration form** – Enable if the applicant should be allowed to modify any fields
  * **I have reviewed and verified the information and processing**. It must be checked to activate the **Send Registration Link** button
* Click **Send Registration Link** to complete the process

## Pre-Registration Links

{% hint style="warning" %}
Registration links expire **two weeks** after being sent if not accessed
{% endhint %}

<figure><img src="https://lh7-rt.googleusercontent.com/docsz/AD_4nXfs0noJeG4bMAJvuS3wqLQT8ApCIS62o-4-m5O6DeBx2GGhV2yokyeahZPpkwS0kFvPn-KvUoKE1TgClMApiF92GkLH66b-1_-71KH3ftI1NktiZ-9ZkCU3tg4Eu1giagjVUgx8k7ij542QLEszhgEWkJRh?key=WBGYegKWk_-r5cy5Jjnrvg" alt=""><figcaption></figcaption></figure>

* All links sent via **Admin Registration** are listed here.
* Available actions:
  * **Resend** – Sends the registration link again
  * **Delete** – Removes the pre-registration link

## Pending Registrations

The **Pending Registrations** section displays all students who have manually registered.

<figure><img src="https://lh7-rt.googleusercontent.com/docsz/AD_4nXdl4ZWhJ1qsqj6SQ0cDjdWV4DmkQQZURkG7hgJ99zHR3ZvH5PxktN4fxwH-qXxNeY-kJE7kL51uj7Eb4hSLXv1lBJJmXEuByDlTI0ZJD9IFZRCHVO1glFFPpS_IdQrtk1PrSFNHXwVCHVMaOW6mdbUxlas?key=WBGYegKWk_-r5cy5Jjnrvg" alt=""><figcaption></figcaption></figure>

* A red notification number indicates the count of pending registrations
* Click **Show Details** next to a pending registration to view applicant details
* From this section, you can **accept** or **reject** registrations

### Accepting Registrations

* Review the applicant's details
* Click **Accept** to proceed

<figure><img src="https://lh7-rt.googleusercontent.com/docsz/AD_4nXfUcregh3Ya4ThpYdVcG8OsqQnnVgc7_fKpdnm_eZ_ylR4Hy12F7pW4P35sib5gVqd6k_MSJfmVH-JQy7pkBYqL1-vyfam29hT4QlkKFgrTcaXuvF-7qBztnQ5XjNErdmC_FwWJFXMWPX7ZhcxCl9RXQpk-?key=WBGYegKWk_-r5cy5Jjnrvg" alt=""><figcaption></figcaption></figure>

* The **Accept Student Registration** pop-up will appear, allowing you to modify student details
* Double-check the information and click **Approve**

<figure><img src="https://lh7-rt.googleusercontent.com/docsz/AD_4nXfzXfcJXqTQiBpaxMvdPjT_sdmhtC2wuW76qzg-Uhvu2xrEMgt2XDKuqeQzYAntutRXqWxx8Xlk7XZ_QRtAbjXLnLLkj0Xr2tXicVGjD_SdYkmteJDF4pSfH0QV-_UBhilKRyr_EooZW2s_P61kaIHna4Um?key=WBGYegKWk_-r5cy5Jjnrvg" alt=""><figcaption></figcaption></figure>

* Once approved, the student will appear in the **Students List** and can be enlisted or assigned to block sections

### Rejecting Registrations

{% hint style="warning" %}
Rejected registrations cannot be recovered. This action cannot be undone
{% endhint %}

* Review the applicant’s details
* Click **Reject** to remove the registration
* A confirmation pop-up will appear
* Click **Yes** to confirm
* The registration will be permanently deleted and cannot be accessed again

## For Payment and Verification

* The SIS fields and field groups displayed for each student are based on the configuration at the time of manual or pre-registration
* Accepted student registrations move to the **For Payment and Verification** section
* Click **Show Details** on a student’s registration to review their information

<figure><img src="https://lh7-rt.googleusercontent.com/docsz/AD_4nXe3YlBKV-7MIEIstVKOuCezs9-X4KCL2De7m4cSGHWqqwyOFyOmE56CWaR-KKGHnBPE7oZqjQzIw-qDwrsDsDy1IP3EjLt2juc8sJxYfwDTsVPigHML3NepikbN6SOqTN0_DUHZBkskmybmq7dju0F0fbw?key=WBGYegKWk_-r5cy5Jjnrvg" alt=""><figcaption></figcaption></figure>

#### Key Fields in This Section:

<figure><img src="https://lh7-rt.googleusercontent.com/docsz/AD_4nXc8_oehz7e8nUOY_Oxq_9GpsyBDDjdYae6LfFydI62bweAxRhL2ie_SmJ59kCt_D4J5ule1iGIqSZFhTVJKh8igwwOViq1cH5kgtVHQANfZpe95XEpPi8btV3YsIBcBG9RGMy_Xacv3XN4XvxzNzqveENU?key=WBGYegKWk_-r5cy5Jjnrvg" alt=""><figcaption></figcaption></figure>

* **Reserved** – Checked once a deposit is made, showing the total amount paid.
* **Submitted Documents** – Automatically set to **true** once the student's application is accepted from **Pending Registrations**.
* **Assigned to Block** – Set to **true** when the student is assigned to a block in **Planning Setup**.

### Making Reservation Payments

* Open the student’s registration, click **Deposit** (upper-right corner of the screen)

<figure><img src="https://lh7-rt.googleusercontent.com/docsz/AD_4nXdDqQVciui_pL99LjOm3BeL3uPeZSpIIsFnRJKSUwO3qRvj1zwz7ghzSM7M07jns-VyBhd_YHBmbrILOHW2yfVLLd1TpQ-TsxWwsf7C_xsFDuIX2zFuX98J06ZfNokzYmaZQp7gqxJp0ohLW0PteQpim_MU?key=WBGYegKWk_-r5cy5Jjnrvg" alt=""><figcaption></figcaption></figure>

* In the **New Payment** pop-up, enter the payment details

<figure><img src="https://lh7-rt.googleusercontent.com/docsz/AD_4nXcw3eNMAV6Y2EXT1HCY9x6MB3vGNoF8ZbYxBsS-MwdBMzrCJBboW_dzGwK_qGQGG8vq629_Iw557XEKVQ9Weiqvaub8Mt-6WqnfHVtTJS4hes5ywIT-xtMhb28UoKapPgp8E4TBR25IoQrbXX_nIbVt6twl?key=WBGYegKWk_-r5cy5Jjnrvg" alt=""><figcaption></figcaption></figure>

* Click **Record Payment** to save the transaction

### Verifying Registration

* Review the student’s information, and click **Verify** to proceed

<figure><img src="https://lh7-rt.googleusercontent.com/docsz/AD_4nXdzP8o6IyBFzFC6r_gtcjD-7PSUR6bqLXRQE1cQYSAtGDz-b0uRAQ7C0eK23mn05PJOpOeI-E_fCNbIed-lhIVoMDIq4TG9A_YPuXdRRXP9qnNbyRIditQCsBSFmZe607nrFR80v-3WPVlUUL6qB0KsJp__?key=WBGYegKWk_-r5cy5Jjnrvg" alt=""><figcaption></figcaption></figure>

* A **Verify Student** pop-up will appear for final review. Ensure all details are correct, then click **Verify**

<figure><img src="https://lh7-rt.googleusercontent.com/docsz/AD_4nXcgM3Yj2m3DVdr5tmBHxjs1T-fAO7UnxlLDT7lMyoYsIN7iImP3p00b3neQbCcNzgBqVhww_MEItIGaFhXR7yCb1p4zrxj2RdhJLTV6WcBE7w1rEi92iti9Fv01ynf7Ilj49qIubCbt1NnlejjNtrc-ujE?key=WBGYegKWk_-r5cy5Jjnrvg" alt=""><figcaption></figcaption></figure>

* The student will receive an **account activation email**. Ensure that the **Notification Template Settings** are enabled

### Rejecting a Registration During Verification

* Open the student's registration, click **Reject**

<figure><img src="https://lh7-rt.googleusercontent.com/docsz/AD_4nXfvCg5eTIE5nOZupJRgfv1ndM0-qc4GOXi7Oh050CffMWHKE8uS0QhgaGkpnh9fl5M8SGxem0VzBsXX5QAQWAgNamJTghZQ3W63d6H0YD2nnmo4jk88PZJGQTlOCQY-WDHmW9NmJZHUUPvRigM35MIPC8q2?key=WBGYegKWk_-r5cy5Jjnrvg" alt=""><figcaption></figcaption></figure>

* A confirmation pop-up will appear; click **Yes** to confirm. The student’s registration will be permanently deleted

<figure><img src="https://lh7-rt.googleusercontent.com/docsz/AD_4nXdXyAt-6iY3CqQ3OYGzP6InA7rvDfgeG62MoRMniaG5yx8oDzZy972-xbpxx-7mcoIOXhg9MaMPjwE9_1Vk0zaY7BaSKhsR4UIA1xITe9ENRWjWjhn9o2yuauhoZfKQD2qo99M0tXesAYRFAnnUTrVsTgIs?key=WBGYegKWk_-r5cy5Jjnrvg" alt=""><figcaption></figcaption></figure>

## Frequently Asked Questions (FAQs)

**Question:** How can a student edit their submitted registration?

**Answer:** Once submitted, a student **cannot** edit their registration. They must contact the school directly for any modifications.


# Enrollment

With the **Edusuite UNI Enrollment Features**, educational institutions can streamline the enrollment process for higher education students, making it more efficient for administrators while providing an intuitive and reliable experience for the students.

{% content-ref url="/pages/-M5dqKtuogBCQICKg4Nb" %}
[Enrollment Setup](/product-guide-uni/admin-home/enrollment/enrollment-setup)
{% endcontent-ref %}

{% content-ref url="/pages/-M5e2Ej8Wc\_Uovv26eyz" %}
[Enlistments](/product-guide-uni/admin-home/enrollment/enlistments)
{% endcontent-ref %}

{% content-ref url="/pages/-M5e3ZITDhlF6WxeQVyy" %}
[Enrollment Status](/product-guide-uni/admin-home/enrollment/enrollment-status)
{% endcontent-ref %}


# Enrollment Setup

Last updated: March 2025

{% content-ref url="/pages/-MS\_evTsf4qEzbq8HZUa" %}
[General Enrollment Settings](/product-guide-uni/admin-home/enrollment/enrollment-setup/general-enrollment-settings)
{% endcontent-ref %}

{% content-ref url="/pages/-MS\_f1dBDbp4xWBlv5oR" %}
[Block Enrollment Settings](/product-guide-uni/admin-home/enrollment/enrollment-setup/block-enrollment-settings)
{% endcontent-ref %}

{% content-ref url="/pages/-MS\_fHu2htpWRkWgZZBU" %}
[Enrollment Schedule](/product-guide-uni/admin-home/enrollment/enrollment-setup/enrollment-schedule)
{% endcontent-ref %}

{% content-ref url="/pages/-MS\_fN7d9NWxrYco\_BRl" %}
[Enrollment Policy](/product-guide-uni/admin-home/enrollment/enrollment-setup/enrollment-policy)
{% endcontent-ref %}


# General Enrollment Settings

Last updated: April 2026

## Access and Navigation

You can access the **General Enrollment Settings** under **Enrollment > Enrollment Setup**

<figure><img src="https://lh7-rt.googleusercontent.com/docsz/AD_4nXdJM_RthbC08YNhWKIpU0QvlSRRzdJ-xnrC-LnAET__XIALopjlMQErmR29BMxHoUFNfzXuQmW-p5LrFJWw-6U6lThQmn6WqDDgaR7s6FSzEgHfAiZcYNjNCMH9P2kFgVOCJENm?key=zxDVjGKU3sKKtfTF2741DQ" alt=""><figcaption></figcaption></figure>

Check the privilege assigned to your user account or role if you cannot view a link from the list.

{% hint style="danger" %}
Contact your school’s system administrator to request view or edit access if you cannot access the rights management screen
{% endhint %}

## Auto-Enlist in Student Portal

This feature allows admins to enable or disable automatic enrollment for students.

<figure><img src="https://lh7-rt.googleusercontent.com/docsz/AD_4nXd3SglbQSy5eQ-C9U1fEZub9EdD5J7S7ydfnAzkDaK1ZnOEgO5S9OENms3fEcZBr4ObmcU66Nqdayly-pO-ueP_tB8aymzjIdi8Bf8AfmTx-u1YyLkbCzitvx8togvvu8O8gp4x?key=zxDVjGKU3sKKtfTF2741DQ" alt=""><figcaption></figcaption></figure>

**When enabled**, subjects advised by Edusuite will automatically be enlisted for all students as soon as the enlistment screen loads in their portal.

## Student Enlistment Units

This setting allows admins to define the minimum and maximum units students can enroll in during the term:

<figure><img src="https://lh7-rt.googleusercontent.com/docsz/AD_4nXdfzh8qfIf9oh5_PT3begqjWc2dHhI98DPmeswz4MhW_INkqJ47EbZG_ICL-mQYgscm0e9nuYSGvrfX8wFaz_IfFil4Eeq2AIJE73GGLiGNCZEgjQEnSxSt3O2lXPcimzVptuMbzw?key=zxDVjGKU3sKKtfTF2741DQ" alt=""><figcaption></figcaption></figure>

* **Minimum Allowed Units**: Students who enroll in fewer than the minimum required units will not be able to proceed with payment
* **Maximum Allowed Units**: Students will not be allowed to enroll in more units than the maximum set here

## Maximum Class Size for Free Sections

This setting defines the maximum number of students allowed in a free section. The number of students set here will also determine the default number of available slots for sections.

<figure><img src="https://lh7-rt.googleusercontent.com/docsz/AD_4nXcgt7LK50VfFZZYt91KdvrZCnC-wBEuuoEp0cBG72gvFCLGR12L0O_LCQyjSgEZ6kliw-rkkXuAQZ-_lmvTUdZbK3g0qiv_bomSkRplNUO-ZWnC0rnArQMRw285z-6DK_pxTc1GCw?key=zxDVjGKU3sKKtfTF2741DQ" alt=""><figcaption></figcaption></figure>

## Enlistment Verification

This setting enables admins to verify student enlistments before they can proceed with payment. Students who are already marked as **officially enrolled** will not need to be verified again.

<figure><img src="https://lh7-rt.googleusercontent.com/docsz/AD_4nXcZtFEY2Oa9EFKE20KYqlGcgQ3mTxqi3GAiG5u4W373h5F_8gWOZvWT7mrj5Fs2exz_FzMMEmJ9_T_hjajyTjVY3IY2xt4Jo8kOU2Sodqbe-cKowQA1eWmNUaJJbomTEETyXx_9Iw?key=zxDVjGKU3sKKtfTF2741DQ" alt=""><figcaption></figcaption></figure>

## Student Enrollment

This setting allows admins to control what activities students can access on their portal based on their enrollment status:

<figure><img src="https://lh7-rt.googleusercontent.com/docsz/AD_4nXd6VchueHnAhVsc1nCqFsupbCzW4wBCfWkUPBGynp5XBD8fwocseZxedkDFRtotD3Us5jX8JlfB5qdLXJoGDrMJFt2go8Y0JGIsTyAF4VkzmPbQEepeGRn585gBnSgXiHRWq-JRxA?key=zxDVjGKU3sKKtfTF2741DQ" alt=""><figcaption></figcaption></figure>

* **Not Enlisted**: Students who have not started the enrollment process
* **Enlisted**: Students who have selected their subjects but have not yet paid
* **Enrolled**: Students who have selected subjects and completed payment

## Late Enrollment and Dropping

This setting allows admins to manage late enrollment and course drops:

<figure><img src="https://lh7-rt.googleusercontent.com/docsz/AD_4nXc-QJUFU10761ccmkYS-nXdiSa_I-w_EFCbPPBwD0btyESAM80XSRXLP3wWT_tCCMq8I4gy1So31XA0j9Yc_0e6jGjyJSx4iuHByWuV5b6x7fr06_t4WvJcd-reSxppzceOQlwZxQ?key=zxDVjGKU3sKKtfTF2741DQ" alt=""><figcaption></figcaption></figure>

* **First Toggle**: Re-open enrollment for the current term.
* **Second Toggle**: Allow students who are already officially enrolled to drop any or all courses.

## Dropping and Cancellation Reasons

This setting requires students to provide a reason when dropping a course:

<figure><img src="https://lh7-rt.googleusercontent.com/docsz/AD_4nXeVH2a6305Bg_WrE23oj50yk8cEnDsoDGcJvzOAKh42L5AH2KXNbbNCYgIcy-AV2eZyopJiA7HnWrmiqHj42tmxDPYMTIYve1gNUCR2C2ZSB8J_nrN5uRI71bpJF3ynxBJjX39xAQ?key=zxDVjGKU3sKKtfTF2741DQ" alt=""><figcaption></figcaption></figure>

* **First Toggle**: Require students to select a reason from a predefined list
* **Second Toggle**: Allow students to select “Other” and enter a custom reason

### Create the List of Reasons

<figure><img src="https://lh7-rt.googleusercontent.com/docsz/AD_4nXddPZHQRlxWCm_qSz4PZOxoqY2waHRblX7Wvyu2VMppT-Sbo4OqFHu_CQsZJzVkrKbOjlR1NuMD22VMv5_qfjPop-f7Ris6WPrPSI9554vVrkjEvHGqKzsZ2HJtQqyUpgsqc0D4?key=zxDVjGKU3sKKtfTF2741DQ" alt=""><figcaption></figcaption></figure>

* Click the **+ Add Reasons** button
* A pop-up window will appear, fill in the required fields
* Click **Add Value** to add a new item to the dropdown
* Save the list by clicking **Update Reasons**

## Student Promotion

You can configure enlistment rules based on a student’s promotion status for the current school year.

<figure><img src="https://3973081029-files.gitbook.io/~/files/v0/b/gitbook-x-prod.appspot.com/o/spaces%2F-M1SysIMhMO_ls3VlZcw%2Fuploads%2FXI5yBSVh6OtDDikzzQqS%2Funknown.png?alt=media&amp;token=ab76c478-b098-43c3-b583-5d5046fa5c61" alt=""><figcaption></figcaption></figure>

Available options:

* **Disallow students without an assigned promotion status** from enlisting
* **Restrict students with a “Retained” status** from enrolling in courses above their current year level
* **Disallow students with “Removals” or “Dropped from the rolls” status** from enlisting

## Student Assessment

This setting determines whether students are allowed to download their assessment forms.

<figure><img src="https://lh7-rt.googleusercontent.com/docsz/AD_4nXcdokSw1NPBRwnzu7dlmzYduOEYPSptz3kAypcBQqwMFcLSZ9nIqyo2Xysfc3UzhnUhqesgIT6fsXRlyuytXEMy49mAnosb7tMojOTylEAjk2gqTfetbnoP_bE1DD02NNeVcFRilQ?key=zxDVjGKU3sKKtfTF2741DQ" alt=""><figcaption></figcaption></figure>

## Enlistment Expiration

This setting specifies the number of hours after enlistment by which students must complete their payment. If payment is not completed within this time, the student will be removed from all enlisted courses.

<figure><img src="https://lh7-rt.googleusercontent.com/docsz/AD_4nXcqjNhfgw2U2BqKLLEWdspqfsXxUA4FC3_r6vw_BXWM92KtZgPDbTqaDlIhHJ-ZzmjtFedlGLg4T8Te9ut_6ywI2ID0yDFomvjgibKYHYbJ8ArhI-Lvx9wWbIaC8GMWFJznahKE3A?key=zxDVjGKU3sKKtfTF2741DQ" alt=""><figcaption></figcaption></figure>

## Manual Slot Expiration

This setting allows admins to manually remove students from their enlisted classes.

<figure><img src="https://lh7-rt.googleusercontent.com/docsz/AD_4nXdpxTj4xGb7T4bSaatj5gunhf-bGjP-sb_xc05xG-XzpLrTlFW15zhF5QydmWqULi132iOLDMT_3WpIht6txVkEpH9qoNoJzi5jCZIzwNsykbMLZ9FJzXodnAQH0BxtE7BuAYmF5w?key=zxDVjGKU3sKKtfTF2741DQ" alt=""><figcaption></figcaption></figure>

* To proceed with manual slot expiration, click **Perform Manual Slot Expiration**
* A pop-up will appear, offering the option to download a report of students who are enlisted but not yet officially enrolled

<figure><img src="https://lh7-rt.googleusercontent.com/docsz/AD_4nXccMSG_Gu9iOAuJye5qfwZyYKAsdYeKV5c1ojEx6k1kSlNYLWRcixfMdGWLywIG0tdwOE8P1BZaWtZtIICetQbCJGfZspH3Pk4RovXhFi-QpKQ_bgr1A9ngE_zofCAv3ij_1cn5JA?key=zxDVjGKU3sKKtfTF2741DQ" alt=""><figcaption></figcaption></figure>

* Review the confirmation message, then click **Proceed** to expire slots for all affected students

## Block Enrollment

This setting enables block enrollment, allowing students to be automatically enrolled in all classes within a block section. Students will also be included in the block section by default.

<figure><img src="https://lh7-rt.googleusercontent.com/docsz/AD_4nXd64Zg5Ggx2m1jCHENObzzLVNzzxWYjBVoyc7GHYgpz2uMwfMyovaXhpcW1DYRoE0OUsUHBqANpFMwxT5rsWZPrb_RZyRDQZDJ8OQa9oy-FnhGSHLit4wl50EfBqLPxsngkM98JrA?key=zxDVjGKU3sKKtfTF2741DQ" alt=""><figcaption></figcaption></figure>


# Block Enrollment Settings

Last updated: March 2025

This feature allows you to:

* View block sections included in the enrollment for the upcoming term
* Modify student access to block sections

Only block sections assigned to the enrollment term will be displayed. If any sections are missing, refresh the schedule plan and class demand.

## Access and Navigation

The **Block Enrollment Settings** module can be found under **Enrollment** > **Enrollment Setup**.

<figure><img src="https://lh7-rt.googleusercontent.com/docsz/AD_4nXeG5JDqHKi7sEYa2-w6xSmNteBJjBpIvTSttVTZexDxyq8Jy_m-5JwIyy2okABjjii1gjJdlKVX-MBj-OPwMygho4bCv7hab5pjqoZ-xQGajiOacJRJWOX69uMUGDnbZ6HwF_pLTqVaLSKF9xl7HHtKcjU?key=zxDVjGKU3sKKtfTF2741DQ" alt=""><figcaption></figcaption></figure>

Check the privilege assigned to your user account or role if you cannot view a link from the list.

{% hint style="danger" %}
Contact your school’s system administrator to request view or edit access if you cannot access the rights management screen.
{% endhint %}

## Settings

**Allow Students to Enlist by Block**

The first toggle (on the right side of the screen) controls whether regular students can enlist in all classes within a block at once. You can enable or disable this setting anytime.

<figure><img src="https://lh7-rt.googleusercontent.com/docsz/AD_4nXe2xbMSKK4Hzn7AyltLxK4N_JIu3IA9xjmxLeFrXklax8qvn9uIHMwqo_xGxQPAXr5weziHqScR0X7c90z0Cx20umS0VXFuUk7r8lhukMe57-mIHi5ZdILKvortBipinInRJcHzYKELJvcOL9mOB--pYhMF?key=zxDVjGKU3sKKtfTF2741DQ" alt=""><figcaption></figcaption></figure>

**Allow Students to Enlist in Individual Block Courses**

The rightmost toggle allows students to enlist in individual slots within a block. Enable this setting if you want to allow **irregular students** to enlist in specific block subjects.

<figure><img src="https://lh7-rt.googleusercontent.com/docsz/AD_4nXcFlZqBNbNlmONJGd3XRVAJPJK2mP-AIngcRH2F6iLeY1OOMK7sWpfq6DGEq7swmnjlLP_06x9ykfPEH3ssG7jurNqopf5tDVvJ0VvdlVuxklkhgaXlR4zW8M30eLEi6T_GGzAjMjL-OVlbJzeJtsI9oXAR?key=zxDVjGKU3sKKtfTF2741DQ" alt=""><figcaption></figcaption></figure>


# Enrollment Schedule

Last updated: March 2025

This feature enables students to enroll based on:

* **Block Section**
* **Programs**
* **Student Status**
* **Student Starting Year**

## Access and Navigation

The **Enrollment Schedule** module is found under **Enrollment > Enrollment Setup**.

<figure><img src="https://3973081029-files.gitbook.io/~/files/v0/b/gitbook-x-prod.appspot.com/o/spaces%2F-M1SysIMhMO_ls3VlZcw%2Fuploads%2FHqadIIY9KK2ad2zLVm3m%2Fimage.png?alt=media&amp;token=f49a4547-4d39-49d1-b6ed-6361c1187a4c" alt=""><figcaption></figcaption></figure>

Check the privilege assigned to your user account or role if you cannot view a link from the list.

{% hint style="danger" %}
Contact your school’s system administrator to request view or edit access if you cannot access the rights management screen.
{% endhint %}

## Add Students

* Click the **Add Students** button in the **upper right corner**

<figure><img src="https://3973081029-files.gitbook.io/~/files/v0/b/gitbook-x-prod.appspot.com/o/spaces%2F-M1SysIMhMO_ls3VlZcw%2Fuploads%2F9dY8lYJmoRFowQqFg3d2%2Fimage.png?alt=media&amp;token=463d90e6-7f20-4eef-b62b-739fde184eac" alt=""><figcaption></figcaption></figure>

* A window will appear, displaying student group categories:
  * **Block Sections**
  * **Programs**
  * **Student Status**
  * **Student Starting Year**

<figure><img src="https://3973081029-files.gitbook.io/~/files/v0/b/gitbook-x-prod.appspot.com/o/spaces%2F-M1SysIMhMO_ls3VlZcw%2Fuploads%2FOzSELqNG7UgOBkkXwUbX%2Fimage.png?alt=media&amp;token=2ecc3be0-44c5-4c5d-8e08-290701ffd72c" alt=""><figcaption></figcaption></figure>

* Select any number of student groups, then click **Allow Enrollment**
* The selected groups will now be listed, and students can start enlisting

<figure><img src="https://3973081029-files.gitbook.io/~/files/v0/b/gitbook-x-prod.appspot.com/o/spaces%2F-M1SysIMhMO_ls3VlZcw%2Fuploads%2Fg4SUHtFOqiOmUqfWUytr%2Fimage.png?alt=media&amp;token=1bdec061-ece6-4da8-8ed4-d6b6a24554bf" alt=""><figcaption></figcaption></figure>


# Enrollment Policy

Last updated: March 2025

This feature allows you to add important reminders or additional information for students during enrollment.

## Access and Navigation

The **Enrollment Policy** module is located under **Enrollment > Enrollment Setup**.

<figure><img src="https://lh7-rt.googleusercontent.com/docsz/AD_4nXdgjCrodHPpiwzQG7AtcqdeVP972ZVm2_QCIh56IlRPVJHjVWgHH9dmlz8XhMbmkk5_rJHubU1O0MOoO_sQXjH-wWHyhq6d6E1I9s3B1fn_fyCxWv7hoj3-Owhg2hDcwyNcaivX15IGzggZ7ViUJrA2xTM?key=zxDVjGKU3sKKtfTF2741DQ" alt=""><figcaption></figcaption></figure>

Check the privilege assigned to your user account or role if you cannot view a link from the list.

{% hint style="danger" %}
Contact your school’s system administrator to request view or edit access if you cannot access the rights management screen.
{% endhint %}

## Set up the Enrollment Policy

* Enter the **Enrollment Policy Header** and **Content**

<figure><img src="https://lh7-rt.googleusercontent.com/docsz/AD_4nXfD7_u4daqhgmQq_C7lKye7mnryrpeWJ9PrDbPFyfhIj6NCl5OipP4-Qvqa9vCUE0DnZ3lC_LbtVfcNYIwii0Yd97Gp-EzUE7436qz2pij7C6w-nUVz0S1hWi5ElHLbk-K55OOwNoHSTnAfuO84FEm443mD?key=zxDVjGKU3sKKtfTF2741DQ" alt=""><figcaption></figcaption></figure>

* Use formatting tools such as lists, font customization, and image insertion
* Click **Save Changes**, then **Preview** to see how students will view the policy

<figure><img src="https://lh7-rt.googleusercontent.com/docsz/AD_4nXdliGQtjF3w3YR5DPcFuOi9WKOTCdnIi4Tm99kJhHHgQMgBmFboi4KZex8_EiOJITi1pUvF9xjA6EoGGaDxpQLlMLk27EfXjiymckMoNuMzsurvQLqlgGyO1vWZiuj20YsoRC1F0vLpBaq7g6swlg_5nEQ?key=zxDVjGKU3sKKtfTF2741DQ" alt=""><figcaption></figcaption></figure>

<figure><img src="https://lh7-rt.googleusercontent.com/docsz/AD_4nXcZdlZVPVcYLmC24beW8Kcekgdfb7PGS0TNFxgrnIr4ZNPyuqMtYtuJnJoAcSPutnvSWLOP7RR7RGbN4Qu5HbGEsJAq-AvgT0Z1hRkF92RToM0JOklV_9-i6y3JGov5DEdPvoL9OvHL2-slMDu7SrGIeoOz?key=zxDVjGKU3sKKtfTF2741DQ" alt=""><figcaption></figcaption></figure>

A preview window will pop up, allowing you to verify the content before finalizing.

<figure><img src="https://lh7-rt.googleusercontent.com/docsz/AD_4nXdC7j36kwBdN06O4Ud2dhWc9v49_IlDP3StS0Qk35O3NAs7_y50ZItCocn6ZTE7xnTBjQ2GpoLIQB6SnAEd-_s9WmmBlc_r8L827bvwBirEh2DFxg0jMoquoZ1Y-UH96K_YE3gyjfiTCa3z1xTsh0NJh6HC?key=zxDVjGKU3sKKtfTF2741DQ" alt=""><figcaption></figcaption></figure>


# Enlistments

Last updated: March 2025

This feature allows you to:

* Enlist classes for students
* View student assessments
* Verify enlistments
* Use auto-scheduling to automatically match students with available subjects based on their curriculum

## Access and Navigation

The **Enlistment** module is found under **Enrollment > Enlistment**.

<figure><img src="https://lh7-rt.googleusercontent.com/docsz/AD_4nXcu4APeHVZ32l4pOQ0OHgV-6KjIPuXMVDzw9ohoQimfP6opIlkb4MsBNTj2_bhkofe58WTESshCQe0IICU2ats1zR9LYwMr_l9_O72QWopI3RZI-1XqkC48LC0A-Z6yie4TRMIf59HxQutlhDt5agmXX-8?key=zxDVjGKU3sKKtfTF2741DQ" alt=""><figcaption></figcaption></figure>

Check the privilege assigned to your user account or role if you cannot view a link from the list.

{% hint style="danger" %}
Contact your school’s system administrator to request view or edit access if you cannot access the rights management screen.
{% endhint %}

## Search for a Student

Use the **search bar** in the top right corner to find students by name or ID.

<figure><img src="https://lh7-rt.googleusercontent.com/docsz/AD_4nXdHMkT-a1G7wgGBcjVlj3wKoWdE23RwO4C23w49LehekN-bDtjSN-pAxXI3V_3pZZKgtyBOYZWF8W2dUDDZLLtUTbQ0luiJ-NZMY6gBUblRIHBErbLsYouMebJU4Ik5K1Ai4XHwu_UE9YefjB3a78hDiaOA?key=zxDVjGKU3sKKtfTF2741DQ" alt=""><figcaption></figcaption></figure>

<figure><img src="https://lh7-rt.googleusercontent.com/docsz/AD_4nXdMl6X5ZzZIMXsEuO7E15vng-9e_0rgYP6EhBPoZFR8EAAxEji2kbNwVF-pemW8B-hZtjt4ljEwNsDRkkoOfLnvMmEpyQ0L6YkHcJA7_2mPIb1Mlb8tt6SjBFMFOADYbyBNCmRA3gVFbcPs4BX5hR3Ji80?key=zxDVjGKU3sKKtfTF2741DQ" alt=""><figcaption></figcaption></figure>

## Enlist Classes

### Auto-Scheduling

* Click the **wand/auto-enlist icon** in the upper right corner

<figure><img src="https://lh7-rt.googleusercontent.com/docsz/AD_4nXfyDsedop40RU_LUbsuednVwtGX6vIo-yuGWGRkH4hX2NdI0xSJNMbm6q14_4dyyyDpcmsfCX1gUyaNATNFas0sfKI9YMQ2IQ2DuNLZFivoUmCwUk_K7XzJrT-J-KgS5klkbm1UMwsoezZtPUw-KRrlL3jP?key=zxDVjGKU3sKKtfTF2741DQ" alt=""><figcaption></figcaption></figure>

* Wait for the system to process

<figure><img src="https://lh7-rt.googleusercontent.com/docsz/AD_4nXdWRS1MaS4AJY2cpxuZV_61R2QG9lep5GOpwfAoNXlSvauRHu8jo0qChiyZWcSl5WNCM3YWbcL_K88zCWVc7Vv0dZqwV6LJdE2xgGCWGCK-jklGdDfBhfFDBL7D0DDEIf_9f04cn6F8ov3VxcLyK-r7o7Vc?key=zxDVjGKU3sKKtfTF2741DQ" alt=""><figcaption></figcaption></figure>

* The auto-enlisted subjects will be displayed on the timetable.

### Manual Enlistment

* Click **Add Class**

<figure><img src="https://lh7-rt.googleusercontent.com/docsz/AD_4nXe1q6_T7CJrEASX0tG3LneW7jJBHBPHgCUgN3L9Rsqx8ZviXjqqTD9WTW71C03Bw4lq26rV0Wb6ESP40VwNXV1ANA0uvyE-3GhGyCrM4yTt6Ld4SZmyTC5iadw0Iwj93T0Sbd5zdHsZTsxoDzVcfYKQ96F3?key=zxDVjGKU3sKKtfTF2741DQ" alt=""><figcaption></figcaption></figure>

* Select a **course** and **schedule** from the dropdown menus

<figure><img src="https://lh7-rt.googleusercontent.com/docsz/AD_4nXdmY2g5DgqyVNb3SafTWCcLtsSt8yv9KVueS4wN-fvHuYrDokK2W7gR8sukqlb1cjDv5AV-1MFxw2Ldsu9Q7p6pYzbGmSA3Rbl4u19TgFUzYG8dNej40FKOro4rXxanTJEXuMxAHg0GtmGffFJBjtEktEk?key=zxDVjGKU3sKKtfTF2741DQ" alt=""><figcaption></figcaption></figure>

* Click **Add** to finalize

<figure><img src="https://lh7-rt.googleusercontent.com/docsz/AD_4nXebRkfRjj6JaTByFK2zjlSCW4s4mi_P9VlpR11UzGUtpSRFVCH949SfeSLrdSOX46kOW3KcmvccEdzK203dZDGAUgfvhCxV6rcpEFLrX6pmClUE8XvfclTadbDz-FwC_Wa4HvpHECTIBVXFbvkeSdYiltlw?key=zxDVjGKU3sKKtfTF2741DQ" alt=""><figcaption></figcaption></figure>

{% hint style="info" %}

* **Advised Subjects**: Recommended based on class demand
* **Takeable Subjects**: Subjects available based on the student's curriculum
  {% endhint %}

<figure><img src="https://lh7-rt.googleusercontent.com/docsz/AD_4nXddbnf8YXGWmfMRMMUU9ZITeFdwELRnyXkWFpLfeXmYAtaHQcqcpZGkvYIIG6RLca_txZdAGMjUJkZ7KDTLwb1N-Sj7JF7jFIv6r06BC7sTqgA2___uY0Bq6y0uA2aDYIKCAsXq_B6MpuCfilbLAYCTAqss?key=zxDVjGKU3sKKtfTF2741DQ" alt=""><figcaption></figcaption></figure>

If a subject doesn’t match the student’s program, an **alert message** will appear.

<figure><img src="https://lh7-rt.googleusercontent.com/docsz/AD_4nXf4UfG60Jvjic7JngRpkCg78C82nuPUD2HPk42MyY_y9fa-mlOrgwgaKta5uNKN0kCZBF7P-OILBXxI94mbzqCqJsq6QqM2Agl9jQBjPbFfPDOJgCC0xthPp475mOp1A9C2LPBUoaqE4iUQu3NHeqE2G_9F?key=zxDVjGKU3sKKtfTF2741DQ" alt=""><figcaption></figcaption></figure>

### Enlist Electives

* Electives are marked with a **violet identifier**

<figure><img src="https://lh7-rt.googleusercontent.com/docsz/AD_4nXcv5l0NjvAzWOpc3J_NngjAF6QBNQsFMuTkfglP6iKFht9svmInkIhU0DBXSo_CE6Oo3-E2KcZkxvlSAEpn3IPBWlzkXoTq2DwVUmWPyyhUldFcwypNK6jJseGNrgewKjXk-cKi?key=zxDVjGKU3sKKtfTF2741DQ" alt=""><figcaption></figcaption></figure>

* Click **Elective Course**, select an option, and click **Add**
* After enlistment, the elective, its parent course, and schedule will appear

<figure><img src="https://lh7-rt.googleusercontent.com/docsz/AD_4nXeb4M6nosn1nSMYpQsK_Kt1poHcYhSO4rbQU-FD9n1kn0yWOZPm_B2tpPXyFfx05u3iG-6acpoua8AJCZPTXIBKD0Dpu7LjNV4ftRRUD4vwrx5P7FtkvXG4FQq4Yh5d1s0OufztCQ?key=zxDVjGKU3sKKtfTF2741DQ" alt=""><figcaption></figcaption></figure>

## Remove a Class

* Hover over the enlisted class, then click the **Trash Bin** icon in the upper right corner

<figure><img src="https://lh7-rt.googleusercontent.com/docsz/AD_4nXfr9eSJn54rpt8cOmp3HJIpYXTkFkw8dhKalTeb6oZbgM9jzlcqsyCFkIIKi-MplgACLwhM3CyjnOvybTDmyvwVdZFhvsg93ulQCY2bhXSVUFO5SSGn0zjLAPkXo6i6qoQHp8HDyheKdcmIHbWkX5qHUsy4?key=zxDVjGKU3sKKtfTF2741DQ" alt=""><figcaption></figcaption></figure>

* After removing a class, the student must be re-enlisted

<figure><img src="https://lh7-rt.googleusercontent.com/docsz/AD_4nXeRb8LJjWlGg6zwkELDTDjq65q9oOHa_4T8EDXg3e76miGO6uaFS_eDUeARTJ1-fjujyxMg9NAVNIgfkRCh9xOk28TEtXxZ6ZWOoeNX5qJDYnR50FrUL-6Jkba_Fnu4gRzy7ckVET28tV5c2sPKHZlStZY?key=zxDVjGKU3sKKtfTF2741DQ" alt=""><figcaption></figcaption></figure>

## Verify an Enlistment

* Click **Verify** located at the top right of the page

<figure><img src="https://lh7-rt.googleusercontent.com/docsz/AD_4nXd9ZUndAjqw2-lsUPmRgzH7ob7xLytnJ29x_TKi7_hy40TymFUw0UZH5dHFFghPN9STw87zaA9Gk7glIj4fwEpoDJdo9H3bXK5Rp2VU-7aAlniquJy6ORdhzMMk5P5_hnqOYlZrzhOZJwBM6USfE-CFsDsw?key=zxDVjGKU3sKKtfTF2741DQ" alt=""><figcaption></figcaption></figure>

* A window will appear for comments. If all is okay, click **Verify Enlistment**

<figure><img src="https://lh7-rt.googleusercontent.com/docsz/AD_4nXceoFhzvKeOJj2DNCAuNBRHQ1dyrZ7dn40raYfGvkP5s9ha_U4Sct5BFz_AEIy_U6zr0CmH5Xx6aP5p1NJtjHPsGyU86jAmz8VB5deahZfGbWPj7U5sOyQKlHC0izw2V-YVy9tVQkEnvqIw8EhOlKxFEsE?key=zxDVjGKU3sKKtfTF2741DQ" alt=""><figcaption></figcaption></figure>

* Once verified, the **Verify button will be disabled (grayed out)**

<figure><img src="https://lh7-rt.googleusercontent.com/docsz/AD_4nXdmXd2wwPHneW-7PTqz7jD6jl1HeqO6z3YOq6JtNqmsgN7NqkHgMuXhv4R8d5hzYy2OuuuCMSZ7QRrpxCejjDf4AJEDb5huTA8pMslCDdS6a9dOLLPTyS2B5lpvW64XxX3k4DrsY1dmfrNnGKUA2kB8Sc4?key=zxDVjGKU3sKKtfTF2741DQ" alt=""><figcaption></figcaption></figure>

## Download an Assessment

Click the **Download** button located at the top right corner to get an enrollment assessment.

<figure><img src="https://lh7-rt.googleusercontent.com/docsz/AD_4nXezUF7FQ0ndBLwFtg24Tjs70tWUSj5ohbquTBcisEY8IVznPz7dsv8DMSMRdCV2AYo9zCMg5DbuFbZCV403VznxLSlcoNzoh0uDvoYP_-upH8HPuKPq5IFPt6_TQulwEFZexoHaSqjZ6epn8Qup9FbCjIu0?key=zxDVjGKU3sKKtfTF2741DQ" alt=""><figcaption></figcaption></figure>

## Manage Assessment

### View Assessment

* Click **View Assessment**

<figure><img src="https://lh7-rt.googleusercontent.com/docsz/AD_4nXdhcpfM_DNccuftJhI36zHRuj5fDtuyOkQszQfqkYAMgigP0MY8k5oZUErHiDluOK3NjlCZgdEAG7FqQDuBb9NIPYIIdsh08o353O0iZCYtgW8msY6kC-UmSjOtXOiglgyX-rKqJUcDjYcXkbguF-0OcZPO?key=zxDVjGKU3sKKtfTF2741DQ" alt=""><figcaption></figcaption></figure>

* You will be able to see the breakdown of payments in this window by clicking on the downward arrows on the left of each category title.

<figure><img src="https://lh7-rt.googleusercontent.com/docsz/AD_4nXf1anRSRyuRh9ZA1sQCTvKV5bArAFVF9XtPqk6lE2Mt2CQbZTONnZkWgrOk6ydbFCNGFyrJiuIuUpH1SVXinYoDlGs894PFkbnykl_GQCeLmA0rFcF1BTPrrSSpvAKUpfpOCrJXRcNE0d1veXUj2G6qVfg?key=zxDVjGKU3sKKtfTF2741DQ" alt=""><figcaption></figcaption></figure>

### Update Payment Scheme

To update payment:

* Choose a payment option from the dropdown

<figure><img src="https://lh7-rt.googleusercontent.com/docsz/AD_4nXegQM0GVqFNud3leLoYBFDkZGS1ZEerHdVye_8iYoYh3VB1CWwjlPnlxnA0AUf1qbRHNkNZAeitFD1dIjtvZ13nTdBZtF12aEc9kryiEJVeBujlbxBTfpRay8pOZ_3EdyoSrqvdBNgsWJeXXLUh?key=zxDVjGKU3sKKtfTF2741DQ" alt=""><figcaption></figcaption></figure>

* Click **Update Payment Scheme**

<figure><img src="https://lh7-rt.googleusercontent.com/docsz/AD_4nXeSz6TsgSM2MWBn9gK5SOvMNrFCWdq7JJ8m9GPIm7QFXzV8YVwre5O74nApMCJZsnuq1yk8jumtSSsMsAOvKCC5ToNot0WZcwdFOCICe1ktfuip2jgqdaLFIiblHqksNDK80rxrNyWKQAqvE3dXJGd3Lpw?key=zxDVjGKU3sKKtfTF2741DQ" alt=""><figcaption></figcaption></figure>

* A confirmation pop-up will appear. Click **OK**

<figure><img src="https://lh7-rt.googleusercontent.com/docsz/AD_4nXf2afB3UPkU6CNOZ4Wg-s0zzjehQKNIQnW4_qoFlC2nfFZWqI9v73GCTto4NKikJo0SAHL-4s3Fz4qjDTGM6OW_2qyVaIjYWaaTIGza8FHZKUadIbeEUpyKPtfWG7XarmcqQF4zR-5ggJU8AgwAX4AF8caX?key=zxDVjGKU3sKKtfTF2741DQ" alt=""><figcaption></figcaption></figure>

## Frequently Asked Questions (FAQs)

**Question:** Can I edit my enlistment?

**Answer:** Yes, enlistments can be edited for the **current or upcoming term**.

***

**Question:** What is the difference between Advised and Takeable subjects?

**Answer:**&#x20;

* **Advised Subjects**: Recommended based on class demand
* **Takeable Subjects**: Eligible subjects based on the curriculum

***

**Question:** Why doesn’t the auto-enlist button work?

**Answer:** Ensure the **Block Enrollment Feature** is turned **off**. You can disable it under **Enrollment > Enrollment Setup > General Enrollment Settings > Block Section**.


# Enrollment Status

Last updated: March 2025

This feature allows users to view students and their enrollment statuses.

## Access and Navigation

The **Enrollment Status** module is found under **Enrollment > Enrollment Status**.

<figure><img src="https://lh7-rt.googleusercontent.com/docsz/AD_4nXe-ltGw616lcn2I3ArbYQ8UI-b2DGiO_iBzqVYLTQ1ZQw3pgHHqPYWs_EVcuex96hbiAIs1Fr2TSP2_ncee7vR18MokFs-eraTJqNzQViOtAiH4TC1zwObKhRQPffFhxKAhUTyc4oHnayWbPpOlnWJ85rFx?key=zxDVjGKU3sKKtfTF2741DQ" alt=""><figcaption></figcaption></figure>

Check the privilege assigned to your user account or role if you cannot view a link from the list.

{% hint style="danger" %}
Contact your school’s system administrator to request view or edit access if you cannot access the rights management screen.
{% endhint %}

## Filters

* **Select School Year**: Use the dropdown at the top

<figure><img src="https://lh7-rt.googleusercontent.com/docsz/AD_4nXeq_AzmxIvalXqcMQL_HXNY26UCzhdOxLO89hOhZKwIwggaKDt_Qml5WvnQ126s0mj_O6wgb_9AC6H6eHjsUsyiEsU44MO_yWOsHbFIxMhwjlTelSzEgpR7mwED01ADEud1_BWu_tS7ErJl1pF8hr-9kOdw?key=zxDVjGKU3sKKtfTF2741DQ" alt=""><figcaption></figcaption></figure>

<figure><img src="https://lh7-rt.googleusercontent.com/docsz/AD_4nXftpjxmIRjI0JFcloKF5iNV4QjS3i0Tieded5o-Mu6Ar7jeFFL1jRbZD9KVHHeSV_-JhypzRYPEwIep2lzmkRbp2DzHu0h_b8IJ3otW--GGyYx2Vhg5xt3dorFSPXsWcVelf_iFUEWIguYu-pCpMw9Nyr8?key=zxDVjGKU3sKKtfTF2741DQ" alt=""><figcaption></figcaption></figure>

* **Filter by Status**: Options are available in the **top left corner**

<figure><img src="https://lh7-rt.googleusercontent.com/docsz/AD_4nXe7H3fvEFZr6v28j8qeWDM4jNr6989QjiSim51HlN6usUdn64CkKW8emfZEXf4bixWH9VENGlGTmcaqFayzmLGD4h8Xgu4FNg64LsEYCUu_CHmWx4l1Jmm-YWb4aPM5k5lpHQi2iXlQ7p7aZ8A2DmbCP5N9?key=zxDVjGKU3sKKtfTF2741DQ" alt=""><figcaption></figcaption></figure>

<figure><img src="https://lh7-rt.googleusercontent.com/docsz/AD_4nXdk0suhrEQ88B0uY0hdmf0zS-FIja-RMzc4cxU9VOzBcfEvasUx38ofUvlMvwcPSqZkt4o6n-sOcWem6sgBP9dtkJQsSgEtpxL6Ng1CHSTt7jJPUl6ZbnFPNVcAQJszFCvanD0VUjPx121sQPWJdreVGMs?key=zxDVjGKU3sKKtfTF2741DQ" alt=""><figcaption></figcaption></figure>

* **Advanced Filtering**: Click the **Filter** button located at the top right corner, choose Settings, and click **Filter**

<figure><img src="https://lh7-rt.googleusercontent.com/docsz/AD_4nXe3w0sHA0-M_ugqR6xi4OGsWKKzSxTvqw8QGzlTDXKyWuuotQQ8-6Aws6j6VsDec7fSQAi-mqUVL2P5QnBEeF7fR7GnD4h5y8ed1jyDhMDhFQahF8f4wRm9-oaUm3RS3SbnmJQ6PRN2EaZgKDBiJISzXbVM?key=zxDVjGKU3sKKtfTF2741DQ" alt=""><figcaption></figcaption></figure>

<figure><img src="https://lh7-rt.googleusercontent.com/docsz/AD_4nXeAtI3JzFUBskBOApNB4moib_Sa4rQGQ3tH-oPDU10-Dqnd7ekZpxC5wfT_6kdlSpKcxlX-XiQCJp2tyS2wxvo6OfUeJwebOQ9iDhk7G_UkikihLkqI_Gid_CFDIZU-aPMwIGxrHqQh5Hg_qQ_9Bn20nNQm?key=zxDVjGKU3sKKtfTF2741DQ" alt=""><figcaption></figcaption></figure>

## Search Bar

Use the **search bar** in the upper right corner for quick student lookup.

<figure><img src="https://lh7-rt.googleusercontent.com/docsz/AD_4nXc66hTEv5AE79wtPfimV-d95ObjqwB2BmL-PWwYK1_6PKGmD7p-tzLPTeBHVLVtVngAyvqT6HVvM1MYyHCDl2fnr5i3h5xq9dSP4zNVZ7HzOFEL6Zhafa5tdphl-6jaWXQ8KeAA9OYmSO3r3_abrnFvsXkj?key=zxDVjGKU3sKKtfTF2741DQ" alt=""><figcaption></figcaption></figure>


# Finance

The **Edusuite UNI Finance Features** empower schools to manage their finances efficiently, reducing manual effort while enhancing the experience for students and administrators. The system is designed to adapt to the unique requirements of each institution, ensuring seamless financial operations.

{% content-ref url="/pages/-M5e3p6ms6s2CUigXgig" %}
[Finance Setup](/product-guide-uni/admin-home/finance/finance-setup)
{% endcontent-ref %}

{% content-ref url="/pages/-MS\_bvnPOTz7kbKpt-GT" %}
[Online Payments Dashboard](/product-guide-uni/admin-home/finance/online-payments-dashboard)
{% endcontent-ref %}

{% content-ref url="/pages/-M5e49n7dzqex9jc\_D5t" %}
[Payments](/product-guide-uni/admin-home/finance/payments)
{% endcontent-ref %}

{% content-ref url="/pages/-M630z4yD0pFulJ2yTEL" %}
[SOA Manager](/product-guide-uni/admin-home/finance/soa-manager)
{% endcontent-ref %}

{% content-ref url="/pages/-MS\_c49jejMvGBAVYlCN" %}
[SOA Preview Manager](/product-guide-uni/admin-home/finance/soa-preview-manager)
{% endcontent-ref %}

{% content-ref url="/pages/-M5e4D9ZLOeeIIzaMsxD" %}
[Reconciliation](/product-guide-uni/admin-home/finance/reconciliation)
{% endcontent-ref %}


# Finance Setup

Last updated: March 2025

{% content-ref url="/pages/-MHjnSloQQ7B9ZGD2XHx" %}
[Payment Mode Settings](/product-guide-uni/admin-home/finance/finance-setup/payment-mode-settings)
{% endcontent-ref %}

{% content-ref url="/pages/-M5eCsb09hksJUgEk9Wc" %}
[Payment Schemes](/product-guide-uni/admin-home/finance/finance-setup/payment-schemes)
{% endcontent-ref %}

{% content-ref url="/pages/-MBIwI58AgPKskRyHucx" %}
[Account Codes Setup](/product-guide-uni/admin-home/finance/finance-setup/account-codes)
{% endcontent-ref %}

{% content-ref url="/pages/-M5eCwW7q1u7NF8f1KSi" %}
[Tuition Plans](/product-guide-uni/admin-home/finance/finance-setup/tuition-plans)
{% endcontent-ref %}

{% content-ref url="/pages/-M5eCzm48Cp3WqujdVRO" %}
[Discounts](/product-guide-uni/admin-home/finance/finance-setup/discounts)
{% endcontent-ref %}

{% content-ref url="/pages/-M5eD1ar2OK-tr24Z-HN" %}
[Penalties](/product-guide-uni/admin-home/finance/finance-setup/penalties)
{% endcontent-ref %}

{% content-ref url="/pages/-M5eD5MxAoBENP5LvSNp" %}
[Other Fees](/product-guide-uni/admin-home/finance/finance-setup/other-fees)
{% endcontent-ref %}

{% content-ref url="/pages/-M5eD8wp5XnoUoM2sa-2" %}
[Payment Settings](/product-guide-uni/admin-home/finance/finance-setup/payment-settings)
{% endcontent-ref %}

{% content-ref url="/pages/-MQh9QFVhWZ0Dd6LB\_8b" %}
[Refund Settings](/product-guide-uni/admin-home/finance/finance-setup/or-formatting)
{% endcontent-ref %}

{% content-ref url="/pages/5G2r1tuOmPYn9yRWx0KD" %}
[Adjustment Charges](/product-guide-uni/admin-home/finance/finance-setup/or-formatting-1)
{% endcontent-ref %}

{% content-ref url="/pages/-MSRWdJ7cxthnBWPPPpE" %}
[Preview SOA Instructions](/product-guide-uni/admin-home/finance/finance-setup/preview-soa-instructions)
{% endcontent-ref %}

{% content-ref url="/pages/-MSRWj-D7HSvXmPs\_l6M" %}
[Enrollment Payment Instructions](/product-guide-uni/admin-home/finance/finance-setup/enrollment-payment-instructions)
{% endcontent-ref %}

{% content-ref url="/pages/-MSRWm4H4yQlCzE4twp1" %}
[Receipt Number Settings](/product-guide-uni/admin-home/finance/finance-setup/receipt-number-format)
{% endcontent-ref %}

{% content-ref url="/pages/-MSRWoxvtpBwRucnbJW5" %}
[Payment Channels Manager](/product-guide-uni/admin-home/finance/finance-setup/payment-channels)
{% endcontent-ref %}


# Payment Mode Settings

Last updated: March 2025

The **Payment Mode Settings** allow schools to configure which payment modes will be available for cashiers when recording payments.

## Access and Navigation

The **Payment Mode Settings** can be accessed under **Finance > Finance Setup**.

<figure><img src="https://lh7-rt.googleusercontent.com/docsz/AD_4nXfw3Ow0VdD-t3fkfKuYhTYQssavTaDDh8uxREIhTkNKNIPY41YBqKCnAq6xUVha2Z7FQmN26A5IobMmp0kH24oKC1H9SyekM9C017pn8FWEwjkxTPYqMXsNZNdg73WidogrRdRSNA?key=Y3tSvPSx9fa3RP07_JmwXA" alt=""><figcaption></figcaption></figure>

Check the privilege assigned to your user account or role if you cannot view a link from the list.

{% hint style="danger" %}
Contact your school’s system administrator to request view or edit access if you cannot access the rights management screen.
{% endhint %}

## Update Payment Mode Settings

To enable or disable payment modes, check or uncheck the corresponding checkbox.

<figure><img src="https://lh7-rt.googleusercontent.com/docsz/AD_4nXdVzGc_JqvvYWXRddTgtjOkOVPg0RWpaa3O1KhxyMZIRdA1bv6MgbKzo6lJhRepe_KQxi2gOAbciOJQCW38xj-0OdlwnZi5xXwGv4fOeLReTsARFuHs-GXnL6mSJllJ04aNdeE0?key=Y3tSvPSx9fa3RP07_JmwXA" alt=""><figcaption></figcaption></figure>

## Verify Payment Mode Options

* Navigate to **Payments**
* Select a student and click on **+ New Payment**
* The selected payment modes will appear in the **Payment Mode** field.

## Frequently Asked Questions (FAQs)

**Question:** Can we add other payment modes?

**Answer:** Currently, additional payment modes cannot be added through the user interface. However, you can create a **GCASH** bank account instead. When recording a payment, select **GCASH** under **Reconciliation**. For more details, refer to the **Finance > Reconciliation** guide.


# Payment Schemes

Last updated: March 2025

This feature allows schools to define payment schemes and set payment due dates for student tuition.

## Access and Navigation

The **Payment Schemes** module can be accessed under **Finance > Finance Setup**.

<figure><img src="https://lh7-rt.googleusercontent.com/docsz/AD_4nXdDq5-7CisCCERb9cm60wpcCVlHn5QURo2JSrHZjQW0B3JcyhCaT1Laqq1uqEUbUpWtb_pGVdUt5xK3K_bMCKpiqDdarKyuMmj6-xmcrv8G-UQId5PF0-0yguWuTYSNhCAKpmxMzmi8Oh_C3GGWP4hHVWw?key=Y3tSvPSx9fa3RP07_JmwXA" alt=""><figcaption></figcaption></figure>

Check the privilege assigned to your user account or role if you cannot view a link from the list.

{% hint style="danger" %}
Contact your school’s system administrator to request view or edit access if you cannot access the rights management screen.
{% endhint %}

## Create a New Payment Scheme

* Click the **+ New Payment Scheme** button in the **upper right corner**

<figure><img src="https://lh7-rt.googleusercontent.com/docsz/AD_4nXcCFziMvC4HJCBviET35UTGqAqkxWoVGGPO0DaqFMDN1yVg9sEkFNEiKlJplBsakUlpuCmwrTp7JORmzkYLT3S7rL-37iUD_Th4PLpJjH3EnNhl4S5rHQsOe3Z12NwVzRS0oy48Q3W0nhmzmlEeoGyY3XY?key=Y3tSvPSx9fa3RP07_JmwXA" alt=""><figcaption></figcaption></figure>

* Fill out the required details:
  * **Name** – Description of the payment scheme
  * **Discount** – Discount applied when selecting this scheme (nominal or percentage-based)
  * **Additional Charge** – Any extra charges applicable to the payment scheme
  * **Account Code** – Codes used for tagging payments
  * **Payment Due Dates:**
    * **Description** – Name of the due date (e.g., down payment, prelims, etc.)
    * **Date** – Due date for the payment
    * **Paid %** – Percentage of the total amount that must be paid (totals must equal 100%)
    * **Penalty** – Additional charge applied if payment is not made by the due date

<figure><img src="https://lh7-rt.googleusercontent.com/docsz/AD_4nXfUOhyWh1GSreCCHjc4fhQxflrwWN0vacM_TjhE1QE5ORBOYpJRd50Kxgx7yRuGlzcT0FfJEiKfNR37om5K-ZEGkEQ50bz0cwe3rDcKgZEF0v7h3972GEVe887uSN1C83cJGUYxUGYxjW8VcycFh4vdkLI?key=Y3tSvPSx9fa3RP07_JmwXA" alt=""><figcaption></figcaption></figure>

* Click **Add Payment Scheme** to save

## Edit a Payment Scheme

* Select the payment scheme you want to edit and click the **Pencil** icon

<figure><img src="https://lh7-rt.googleusercontent.com/docsz/AD_4nXd8CLw23QqsZQk04K1Ia91_sXxpyCxiJH5nkyosNsm0-2FBxe7AFqCUr7700fq5hHN8SXXxT1im9L1c_EhXCd158iPS4n5EcMlfbUoM6Fsay4S4ExMA1dpiYqZG_HszdiBc9KQQ01zPCEUBKaofk26wc-CU?key=Y3tSvPSx9fa3RP07_JmwXA" alt=""><figcaption></figcaption></figure>

* Update the necessary fields in the Update Payment Scheme form
* Click **Save Changes.** The updated details will now be reflected on the **Payment Schemes** page

## Delete a Payment Scheme

{% hint style="warning" %}
**Note:** Payment schemes that are already in use cannot be deleted
{% endhint %}

* Select the scheme you want to delete and click the **Trash Bin** icon

<figure><img src="https://lh7-rt.googleusercontent.com/docsz/AD_4nXePP3tm9odw1zmjzsHEi6abNVZeAa5lM3EghXmNuyyt3qK5LNDC8yE1X4wCE1rDwcvjgMb-xOt7ro6gPqN7R-SiOlNLCR_SiSWwNvEbfEKhtoTxF_nYtvzb6POJeaGyqK39t2yfGBnsixvvQ6Mt_EDLPd39?key=Y3tSvPSx9fa3RP07_JmwXA" alt=""><figcaption></figcaption></figure>

* A confirmation message will appear. Click **Delete** to proceed

<figure><img src="https://lh7-rt.googleusercontent.com/docsz/AD_4nXcSlsIvTzOqBqYVn229az9d5J3uJ88hfABBOCltnaoPvUzRiezKPWYxszAEnYuAvLP4T98dPfYkCB8A9je9zhqOKY0ax2g9nAf8IL85qntLQzacwT7sd3QlIjG8n3Uu0jjAEbaxRLqohP15zv2lo14VdSM?key=Y3tSvPSx9fa3RP07_JmwXA" alt=""><figcaption></figcaption></figure>

* The payment scheme will be removed from the list

## Frequently Asked Questions (FAQs)

**Question:** If we enable a penalty for missed payment due dates, when will the penalty be applied?&#x20;

**Answer:** The system will automatically apply penalties at 12:00 AM after the due date.


# Account Codes Setup

Last updated: March 2025

The **Account Codes Setup** feature assigns debit or credit codes to facilitate accounting processes. By using unique numeric codes for different types of payables or receivables, this feature helps organize financial data efficiently and generates accurate reports.

## Access and Navigation

The **Account Codes Setup** can be accessed under **Finance > Finance Setup**.

<figure><img src="https://lh7-rt.googleusercontent.com/docsz/AD_4nXfX_1zdWZXZDieWLCJ239wXCv6mTHj_QrTPe5sNPaXaOZzcptVVw8SIrFml9MNPWC8cAXrgc1CVhLrvWP8Y09SQdDysKqCAwLai3GfaaDKc4LHBu00iWLc9U6yeFDaaYcT0TDTvW-o_EU0-P4nyWYgam9_Z?key=Y3tSvPSx9fa3RP07_JmwXA" alt=""><figcaption></figcaption></figure>

Check the privilege assigned to your user account or role if you cannot view a link from the list.

{% hint style="danger" %}
Contact your school’s system administrator to request view or edit access if you cannot access the rights management screen.
{% endhint %}

## Create a New Account Code

* Click the **+ New Account Code** button in the **upper right corner**

<figure><img src="https://lh7-rt.googleusercontent.com/docsz/AD_4nXcx8lJV2fQ1fsuwCgqe-69JRcvoC6gju1jrZv2lqXp1bPD-2IzIagRIY5b0RmFZLVRUHzyun5EvF-7ZgsnR9y4Rl3goaeT8Drtl-plrPyt1QXcWCt_bfEbn4Mp6Umqhg-0e0uF1STb4CfmmuPkwRuDsV7vB?key=Y3tSvPSx9fa3RP07_JmwXA" alt=""><figcaption></figcaption></figure>

* Fill out the required details:
  * **Code** – Must follow the format **000-000-000**
  * **Name** – A descriptive name for the account code
  * **Description** – Additional details about the code

<figure><img src="https://lh7-rt.googleusercontent.com/docsz/AD_4nXcksc93k0MAL6JHakfYpBSE0U8NBJp4Aog2BU0uPYfq-slqlGDsjgaCob_IOrKqtrZu9O-HeiLa7YbBGMST5mGMYBpe0pnvry9K9QWqhkYpGunJN5YLUvB8HIzY9-DX4lIo-Wk7AtvClAhlRSH_KV3cEpaQ?key=Y3tSvPSx9fa3RP07_JmwXA" alt=""><figcaption></figcaption></figure>

* Click **Add Account Code** to save

## Edit an Account Code

* Select the account code you want to edit and click the **Pencil** icon

<figure><img src="https://lh7-rt.googleusercontent.com/docsz/AD_4nXcUWadpOHkFyW5aMW5xYB9dInkgQOAs-0JsBBvUth_qJ_rM6kqorfKAY0fbjKSUgYceffLB6TPgWoctjXnkHMcd9m6zOuyrYaGNQNxJ0ITQOij1v8ff6vIgOZBq6cIIPYonqASVS0gYjmRj_MCsvpw-Hms?key=Y3tSvPSx9fa3RP07_JmwXA" alt=""><figcaption></figcaption></figure>

* Modify the necessary fields in the **“Update Account Code”** form
* Click **Save Changes**. The updated details will now be reflected on the Account Codes Setup page

## Delete an Account Code

* Select the account code you want to delete and click the **Trash Bin** icon

<figure><img src="https://lh7-rt.googleusercontent.com/docsz/AD_4nXezL8AsswbkzfnaGPPZ74DSjCsg7L3x5Qy5zP0pcwbx1G-VgqGUpwdl2tPgTVXxvXAAU55xJYrxh4aLEdfBevFwUcyDA7xmnxExNDB3I91-kttdZIml_-ec9ubuJCBLYofofahjWYObYJ0a2ibCmh-AHfg?key=Y3tSvPSx9fa3RP07_JmwXA" alt=""><figcaption></figcaption></figure>

* A confirmation message will appear. Click **Delete** to proceed. The account code will be removed from the list

<figure><img src="https://lh7-rt.googleusercontent.com/docsz/AD_4nXfimXAhwjYgn1ZAk32L_ngejibH8KGfU5v36pNwS6SEi24OuaFW2pX6DjswJ9xrsXsbNJb4H0-mazLm9oGXyzKjKjccz8vhHsad5wDvdrUgEwJPjrugIZq5Ic84AY8OiIPWds5wwWhCBhx_ey4cVqRbLqGm?key=Y3tSvPSx9fa3RP07_JmwXA" alt=""><figcaption></figcaption></figure>

## Search an Account Code

Use the **search bar** in the **upper-right corner**. Enter a keyword or the full account code, then press **Enter**. The system will display matching results.

<figure><img src="https://lh7-rt.googleusercontent.com/docsz/AD_4nXcy8SKa0DYV3eNYcfN9U9U5NKPnHNabl6VqNP1ucq6hnG4t4eW73Ulf2DfQBbK9CWBZPJFbecr9NvZQL5UFhh0MKVzV884AfsU6A8z4UF_JWGOz_mVdy47y6zXotopWzaNlddV5RvkpUkbhoZpv-0FBcDU?key=Y3tSvPSx9fa3RP07_JmwXA" alt=""><figcaption></figcaption></figure>

## Import Account Codes via CSV file

* Click the **upload button** in the **upper-right corner**, next to the search bar

<figure><img src="https://lh7-rt.googleusercontent.com/docsz/AD_4nXdrPXhXetAKrzjGkhGAHdxww93ie4Wu8a92q1hr4tP94dRkf09zL9JyDSAKdcFeiJVu5e4Cy0NlyRUNK9xJFKE0Id1T_B9POGpqzx_Waks-mocfnvWg00eX7Dy6Lk2Lqbo9ODivJ8W4o2gcRV_Z42r5FT9M?key=Y3tSvPSx9fa3RP07_JmwXA" alt=""><figcaption></figcaption></figure>

* Download the **template file** to ensure correct formatting

<figure><img src="https://lh7-rt.googleusercontent.com/docsz/AD_4nXfrIqAMBapjqj2UjFnMjL8JtmxQ8X4HwJhJuaYf_BIZia83eoo7b4cUEG0m08RnEJw2G3BCEGNwIhAO2D0X_vpnA0_jcFZ1rFKTpzSw-kH2Q-jmvQ-4zn_fLC6Zlc7hAj2P0PTzzD1_Cdv67YpLuV7wvVL-?key=Y3tSvPSx9fa3RP07_JmwXA" alt=""><figcaption></figcaption></figure>

* Click **Choose a File or Drag it Here** to select the CSV file

<figure><img src="https://lh7-rt.googleusercontent.com/docsz/AD_4nXeTwyu2az-HBUGYc6mtW1T0LA83l3-isSJkjVWkz7COcU3aWR7friyx75Lnz6qt9eO2v2Ybb4DrbEh7qq8E1qXh5MHrlgw5wBOnXyjP5qyxKX2t3DwaFWn5BxdguTQ0QkoAwbSe5iQJXrMhRsr0l1kYSb4?key=Y3tSvPSx9fa3RP07_JmwXA" alt=""><figcaption></figcaption></figure>

* Click **Import File** to upload. The uploaded account codes will now be listed

## Frequently Asked Questions (FAQs)

**Question:** Our account code format consists of only 6 digits. How can we set it up if the system requires 9 digits?&#x20;

**Answer:** You can add **000** at the beginning or end of the code. For example:

* **123-456** can be entered as **000-123-456** or **123-456-000**

***

**Question:** We do not use account codes. Is it necessary to set them up?&#x20;

**Answer:** No, account codes are optional.


# Tuition Plans

Last updated: March 2025

The Tuition Plans feature allows schools to create and manage tuition plans for a specific term. It also enables students to customize the fee breakdown.

## Access and Navigation

Navigate to **Finance > Finance Setup** to access the **Tuition Plans** module.

<figure><img src="https://lh7-rt.googleusercontent.com/docsz/AD_4nXdw_tOtCYyAP_nGwPb7RCYRI8NaivFcBga_V6XvrKCtEeaLmCUugBSFRLDZR8JMUgOYbaBhYTxxbxBCx4un70457I2X5OXRlrIJVNHxm1BWFM6gpCPvIWcl3WG9CASelLhEmfb2CecxzpiysI4KrRDPJnkf?key=Y3tSvPSx9fa3RP07_JmwXA" alt=""><figcaption></figcaption></figure>

Check the privilege assigned to your user account or role if you cannot view a link from the list.

{% hint style="danger" %}
Contact your school’s system administrator to request view or edit access if you cannot access the rights management screen.
{% endhint %}

## Create a New Tuition Plan

### From Scratch

* Click the **+New Plan** button on the upper-right corner

<figure><img src="https://lh7-rt.googleusercontent.com/docsz/AD_4nXdh5btO7FJPb3Xypnj18i8xu3r__nXOQkdzxHV9lTNQkxqRDPQ9ejp8KZ1qkiCLVhg8nlJASE6kuvoVI8fD5QbLcKgiGsd8Vn-I4hxL83aCZnNgrnsYz8U3Z6d8NMSf4Nh-DW7VfE8lgT7CJicdtDd01zsY?key=Y3tSvPSx9fa3RP07_JmwXA" alt=""><figcaption></figcaption></figure>

* Select “From Scratc&#x68;**”** from the submenu
* Enter the required Label detail

<figure><img src="https://lh7-rt.googleusercontent.com/docsz/AD_4nXeAziI7ChiZ2ou-FWM9ZUDlgPT8suqhCqnP1Ob1VdAoxXgvmwfiO3nmBmq2eywbsohx6oSutNcG367rZSyTTstcrMXHIl6VHLytcbggp9ap8bsycNjduuiZjMBPxaneH6AwROY1Y6m-2gUOUalupsi9dIM?key=Y3tSvPSx9fa3RP07_JmwXA" alt=""><figcaption></figcaption></figure>

* Click **Add Payment Plan** to save

### From an Existing Plan

* Click the **+New Plan** button on the upper-right corner
* Select "From Existing Plan" from the submenu

<figure><img src="https://lh7-rt.googleusercontent.com/docsz/AD_4nXcJw6HcWd8NLRKVz9k102ykcyw9RPSOz6O3dHHI0eHbwXcjESsrn5c7Y2xPabGbbhA2uNoL29-gIE5fIqSJVI7flBsN5z1tXHKLXYgUmWg8gqqIa6zebWhYKGsvvhv_X5Py-yVfIA1DDwj5lHZ43HdwXCBJ?key=Y3tSvPSx9fa3RP07_JmwXA" alt=""><figcaption></figcaption></figure>

* Enter the required Label details
* Choose an existing tuition plan to duplicate

<figure><img src="https://lh7-rt.googleusercontent.com/docsz/AD_4nXcTFt2vJpIgnsaTLXudSGFQB-4f5kOYv_zeDzUzXvQb35Q1OXSZBI0lMjcd0WH6j1cwPUvaeqGhsdrv67b3ZgLEyCfC3CeIvg0CD_4f_o9KkrPlPqbmDfw7gBqNX4nWzc6ThhWZqVsNdzqNFJpBtJFQLnMa?key=Y3tSvPSx9fa3RP07_JmwXA" alt=""><figcaption></figcaption></figure>

* Click **Add Payment Plan** to save

## Edit a Tuition Plan

* Select the tuition plan you want to edit and click the **Pencil** icon

<figure><img src="https://lh7-rt.googleusercontent.com/docsz/AD_4nXdFoQb2uiskTBEor6BNIPtKRaboTDdjipH9hkCGDkO2Mx4zc2XyWjrtxWeI5cgYH5ERvhprus0oROn9aPNacRyzh6ct2rfBOx3pgXozIKkn624C9XCHqd1UW5vs9vXqTIlLBAYXlIgpMdIXXlUyVix77w0?key=Y3tSvPSx9fa3RP07_JmwXA" alt=""><figcaption></figcaption></figure>

* Modify the Label as needed
* Click **Update Payment Plan** to save changes

## View Fees Setup

* Click **View Plan** on the desired tuition plan

<figure><img src="https://lh7-rt.googleusercontent.com/docsz/AD_4nXddHacXxhjbY2VyV1sT_VnfY_aha0n1fZ5dHDKEnKcv3-yjLXLmsSb8bSQZuJxhc-hv5ahOQiOcqKXzcjJwmzDP3O0zgfRZZtnvL1cBbJ6rTs0Bm81C4OTDfGVUf5sZ1yFPWdfVQzkN8RTegtfLwPOF9aA9?key=Y3tSvPSx9fa3RP07_JmwXA" alt=""><figcaption></figcaption></figure>

* The latest revision of the tuition plan will be displayed with fees classified alphabetically by type

<figure><img src="https://lh7-rt.googleusercontent.com/docsz/AD_4nXcuTikRFDIy1W30Ije7dWHaPhudUHLVWoagtoze3IKGPnsel_urp7_y4diNGb-35LQS1Os_cv17jATaxCj_3LGPdST4kdwgkv19zPwBtlXdC9lCztiJ15D-AD04JMCkK0yJrI07-9CHZX3AuUvGlcw_YJDC?key=Y3tSvPSx9fa3RP07_JmwXA" alt=""><figcaption></figcaption></figure>

## View a Different Tuition Plan Revision

{% hint style="info" %}
Tuition Plan Revisions are automatically created when a new school term begins.
{% endhint %}

* While viewing a tuition plan, click the **revision dropdown** next to the plan name located in the upper-left corner

<figure><img src="https://lh7-rt.googleusercontent.com/docsz/AD_4nXdP6gDmUx7MSeCPrBp2q67V1siHNCiBSLejbEi-IEnxySnh4zQ57128pND0xsMws_xRYFsRbl8xGFqS0IfPyNOFkYc4TxS4piMS1unrhMlJ6NvU_3XETNfzivKTTH-KTX1I4goi1YIazAhh6qtzvW9IzXeA?key=Y3tSvPSx9fa3RP07_JmwXA" alt=""><figcaption></figcaption></figure>

* Select a revision to display the corresponding fee setup

## Add a New Fee

* Select the tuition plan revision to edit
* Click **+New Fee** in the upper-right corner

<figure><img src="https://lh7-rt.googleusercontent.com/docsz/AD_4nXcWVtYrYNaTHhFvaQgPRlrKpsDHa5Mc3SvT6vQp879p7_sK0UxlFyQ_2KNIxaCSnyJFieGs-7aD9ZOWf39cCc0GFnAa4bwWPp0k83TqePJKwzabgUKg-XC1KHzvcY0Jq3j6bEnRCOGphwIzR7w4LfMzl0fo?key=Y3tSvPSx9fa3RP07_JmwXA" alt=""><figcaption></figcaption></figure>

* Enter the required details:
  * **Label** - Name of the fee
  * **Account Code** - Tag to an existing account code (if applicable)
  * **Fee Type** - Select the type of fee
  * **Price** -  Set the amount
  * **Applies To** - Define conditions for affected students

<figure><img src="https://lh7-rt.googleusercontent.com/docsz/AD_4nXeJcVBfMADL_ZCQDh5VgVDebr1UvH4dVBlM3hjAZ2yEBru8dO7ZRjAWNo1PDgWtGW0ODLHToGTboqhw3pw_r3zHVjpGk0JSxvSrIs95ZjTV2cVh0pKSzAOcnkikGpc__ETU_lErMfnrID_zI0HtJQLr42KP?key=Y3tSvPSx9fa3RP07_JmwXA" alt=""><figcaption></figcaption></figure>

* Click **Add Fee** to save

## Edit a Fee

* Select the tuition plan revision to edit then click the **Pencil** icon next to the fee

<figure><img src="https://lh7-rt.googleusercontent.com/docsz/AD_4nXefZezQBfzOacWuIBItW4P5kwyb5Wv8nJh1z88XFONFJC0wG6-vlkTMmOBR9iTWF4aLSMjZ_c0LiaBSahLSd3dOx_qdsYmDkY4ma_jDKW-C2bX4czcd7JBb-OnCIavakqhpOa4njFZ264__l4ScNMDYxOrK?key=Y3tSvPSx9fa3RP07_JmwXA" alt=""><figcaption></figcaption></figure>

* Modify the necessary fields
* Click **Update Fee** to save changes

## Delete a Fee

* Select the tuition plan revision to edit
* Click the **Trash Bin** icon next to the fee

<figure><img src="https://lh7-rt.googleusercontent.com/docsz/AD_4nXd5wf1VzQs_FL-_mIkpVRia4kN-HRNZOgduVkiWNtB8M8NDrvLO3pZrIUqU-EtoUYjRZ1y9Rr6lHUjFKVWMWBc6II86UnE4xDi-iOocmfJGQvUjRDwvgmNZCJauDeSWtSTNGXzaJ9b34q7PcVOPWvS2Vqg?key=Y3tSvPSx9fa3RP07_JmwXA" alt=""><figcaption></figcaption></figure>

* Confirm the deletion by clicking **Delete**

<figure><img src="https://lh7-rt.googleusercontent.com/docsz/AD_4nXeKhPjN_6fRtZ_zxSE86UJ_4XSeI4iBo9NlVWp19i4SKGSQa2rQByikjRxmwcFZFyRY3hGuUvAfbFD69AFOk-v5IJekCdLcVhDimBVhpwgxq-x9pXkFerEIK0yZLw2I3BIinRKlMAaKlTinvt4eV7-uX-3q?key=Y3tSvPSx9fa3RP07_JmwXA" alt=""><figcaption></figcaption></figure>

## Delete a Tuition Plan

* Select the tuition plan to delete
* Click the **Trash Bin** icon

<figure><img src="https://lh7-rt.googleusercontent.com/docsz/AD_4nXcBWXMpL5M-CLic-L-flH4xPIn2kWj2YPH3KmAEXRvyrEp9OsT3Chbab9xL47LE3EMflvOWhCXyaBTMZysrqAGVpittPI3uvuYB-rf_c8zxdgl_bmz74oxj7ccITeCihQPhRQcXQHrZUo32mmah_Hil3RM?key=Y3tSvPSx9fa3RP07_JmwXA" alt=""><figcaption></figcaption></figure>

* Confirm the deletion by clicking **Delete Tuition Plan**

<figure><img src="https://lh7-rt.googleusercontent.com/docsz/AD_4nXeqoZCl8xZr1eovhcFlD9y19MiLqbOCSyoFGEItT7GVY2cBBizovoilUUllfIKFtjH42Sbdod0K7q7auu-DA3HP82IgEfoPC70PFsKwkTkDV1H2LnayQFZ7_JhRp5_rPGcmVBTsZOYgviO6PghnJNE88Vk?key=Y3tSvPSx9fa3RP07_JmwXA" alt=""><figcaption></figcaption></figure>

## Search for a Tuition Plan

Enter a keyword or exact text in the **search bar** located in the upper-right corner. Press **Enter** to find matching results.

<figure><img src="https://lh7-rt.googleusercontent.com/docsz/AD_4nXfsXZWsArQWC0ZHrIo0S_TUH12j7zKsy3isQT_NcJuxONu0kXZ34WNnt-VgcX0IG-mO6LIOxdYMM0D3r4md8NVZFgR77k-A4XAjxfrqIc2rEuEtWHiy1c8iuXwmx_oyf-GxlXw4Tg4xeKbAi6Bn5LfO2UUn?key=Y3tSvPSx9fa3RP07_JmwXA" alt=""><figcaption></figcaption></figure>


# Discounts

Last updated: March 2025

The Discounts feature allows you to set up discounts applicable to students based on defined conditions.

## Access and Navigation

**Discounts** can be accessed under **Finance** > **Finance Setup**.

<figure><img src="https://lh7-rt.googleusercontent.com/docsz/AD_4nXcouLytCvZXYUmwxJnmwCehUaD6fyFdIHLaYz6aKt6d7UhxAZxQphm7IeNcArTgULiEAmRCEZlb329HHFotYmnN8jCzoaFHPLmmlyO6z38han8ZC31fmv6eirOTVP9_YQHeFhBkcK5IZUhiZhY4N_WmcZor?key=Y3tSvPSx9fa3RP07_JmwXA" alt=""><figcaption></figcaption></figure>

Check the privilege assigned to your user account or role if you cannot view a link from the list.

{% hint style="danger" %}
Contact your school’s system administrator to request view or edit access if you cannot access the rights management screen.
{% endhint %}

## Create a New Discount

* Click **+New Discount** in the upper-right corner

<figure><img src="https://lh7-rt.googleusercontent.com/docsz/AD_4nXdUel427XRJWocGylZHm7tqV1puWbSY6XM0sEOpaFGMgC2oP9EroLoT5EDHlP7sjAbiumP2ygyb49nmenQCaQPg7GTfFHRSUVU-qiSkPTE9wHrCwniCddHvvJZQjIRHKtVNpS7TAoYACJLqFpGK4DJZFWWs?key=Y3tSvPSx9fa3RP07_JmwXA" alt=""><figcaption></figcaption></figure>

* Enter the required details:
  * **Label** -  Discount name
  * **Account Code -** Link to an existing account code
  * **Applies To -** Specify the fees affected by the discount
  * **Amount -** Enter the nominal amount or percentage
  * **Ranking -** Set the priority (lower-ranked discounts apply first)

<figure><img src="https://lh7-rt.googleusercontent.com/docsz/AD_4nXdRjhs7SFH3-3u9s0RSlRAF9XGlmrxhcr_VlopkDTDKWvRz5QBXW-NQJZEwUxoZQ78omX5oPcShTdxv8fmNpGXxmznyIYMGfYaWahOzroZks_Ol-ihe0sa0AVLhIfFL3rziiK-c_a_KX4DZ8kleLQ611Vo?key=Y3tSvPSx9fa3RP07_JmwXA" alt=""><figcaption></figcaption></figure>

* Click **Add Discount** to save

## Edit a Discount

* Select the discount to edit and click the **Pencil** icon

<figure><img src="https://lh7-rt.googleusercontent.com/docsz/AD_4nXeYfdmU_Z8bRGKd0YS2jSAoW-wG4GOJUZtuM1mU5fIKm6_N5cN4OTfssBqjeUStMGfFdH6UqCP4P-nsh3gmyX5k3GF7R1OqCajOo4pVI7TVqQX2E_Rukp5Ph_0WH2MNOoy5QyaQdUPsaCq_R0b4VTFiGF7W?key=Y3tSvPSx9fa3RP07_JmwXA" alt=""><figcaption></figcaption></figure>

* Modify the necessary fields
* Click **Save** to update the discount

## Delete a Discount

* Select the discount to delete then click the **Trash Bin** icon

<figure><img src="https://lh7-rt.googleusercontent.com/docsz/AD_4nXeHBMTxtunoxu9UFLieBD_mFsSAvMwTmXOuqZuLzs2nXpBscNKd-HvK-hWGU3rfv242cAhLCwWyY8Isev7N-zhz4AeE17beMlYzyWyiaDFwYg6EdENWwO34pmlSPvTJUjnXm2ODdDsHx9RhUM8KZ3Q5P0DT?key=Y3tSvPSx9fa3RP07_JmwXA" alt=""><figcaption></figcaption></figure>

* Confirm the deletion by clicking **Delete**

<figure><img src="https://lh7-rt.googleusercontent.com/docsz/AD_4nXd94Egih7K2O2rMLSfBa3v5C6gI2SSTjIgNIA0g5DHMd74LbGLm8uCW4wS487bSQqT37CkHNb5Zg3RjxcrOqPEai5U0qnC7Gk5ksKhEljb1P7gFlq1sRiNv4Z3vDG5NXPWUos0gxkD_oazMf-36_n3RusOb?key=Y3tSvPSx9fa3RP07_JmwXA" alt=""><figcaption></figcaption></figure>

## Search for a Discount

Enter a keyword or exact text in the **search bar** located in the upper-right corner. Press **Enter** to find matching results.

<figure><img src="https://lh7-rt.googleusercontent.com/docsz/AD_4nXfBi2ilOQTrSNPiUhl6PULHprN3AmDT2Co3M9s0lLy67pPaIGpqweEXaRWVxluw6Lw2Any2gLzSwxeDFRrSLIDC6CrvFkLCXwnKBStXbgQBwvaALr8_NXwHLm-6gWvat2R8Ojsf1MVPAcaVJx9TxZwjutvk?key=Y3tSvPSx9fa3RP07_JmwXA" alt=""><figcaption></figcaption></figure>


# Penalties

Last updated: March 2025

The Penalties feature allows you to set up penalties that may be applied to students based on defined conditions.

## Access and Navigation

**Penalties** can be accessed under **Finance** > **Finance Setup**.

<figure><img src="https://lh7-rt.googleusercontent.com/docsz/AD_4nXfC4ouLC2CGmNBpd7X_t3fC6igpQ4zLB_eCh3FWNgwc-buvAoT02FsWiT59H0XaPlDv42H9Euv0Jpm-gv-N6Rd_9MCVQJyuth6rBVFnJkTPP9jaj5p9tse_uJ7cr6MWw1lyJFHQklRYOIpja1esISl4rRA?key=Y3tSvPSx9fa3RP07_JmwXA" alt=""><figcaption></figcaption></figure>

Check the privilege assigned to your user account or role if you cannot view a link from the list.

{% hint style="danger" %}
Contact your school’s system administrator to request view or edit access if you cannot access the rights management screen.
{% endhint %}

## Create a New Penalty

* Click **+ New Penalty** in the upper-right corner

<figure><img src="https://lh7-rt.googleusercontent.com/docsz/AD_4nXcvc8jqP8CPiQxy6ChqL4QlOai7Mh4KmBX-AGMW9jLEM77LiOelJtmWA9-9MSSExCXaWqNdajVWalvMn5Vcpu0tpm3OqKCS7GU2mSf6YRBU9UjXurislHeEdkdc0opr-o4ApGXiMCpZvaghdNuOvZ1Vys_6?key=Y3tSvPSx9fa3RP07_JmwXA" alt=""><figcaption></figcaption></figure>

* Enter the required details:
  * **Label** - Penalty name
  * **Account Code** - Link to an existing account code
  * **Amount** - Enter the nominal amount or percentage
  * **Ranking** - Set the priority of the penalty

<figure><img src="https://lh7-rt.googleusercontent.com/docsz/AD_4nXe11vDUamYs5TtwwuosvDuu973YoKXC-KicBO1rlGekOwEZob75do79bEcxUsFwt5-fRCM-mpok47fQeVeqwGh2Tjqzgqj9K4Z2FY4uWL6h55XorkEvTBuZzoDeSXB_tTwo6oZdBuUYYaU4lSvasS-3mONt?key=Y3tSvPSx9fa3RP07_JmwXA" alt=""><figcaption></figcaption></figure>

* Click **Add Penalty** to save

## Edit a Penalty

* Select the penalty to edit and click the **Pencil** icon

<figure><img src="https://lh7-rt.googleusercontent.com/docsz/AD_4nXciM_lEdqFF9D6-gTajlUFz-2umrsVlbX8EMvUXWH4i_IjSetTaAy9Zo2xP2ND0ZNw0JAHaCWcRkE-st6pmrDz10p8N0mJXeA0PyLevaUJPcjFb1jXI39v2FVzFRsma1aTcxUB8mzhVykTMq1izrJfMRMRb?key=Y3tSvPSx9fa3RP07_JmwXA" alt=""><figcaption></figcaption></figure>

* Modify the necessary fields in the Edit Penalty form
* Click **Save** to update the penalty

## Delete a Penalty

* Select the penalty to delete and click the **Trash Bin** icon

<figure><img src="https://lh7-rt.googleusercontent.com/docsz/AD_4nXc1jbQyIcsVbjtFgBAK1Y6vYtCvtctZXc--5--KchG8xjhG8SCxPpG4ZV06RI30YUcvskFviHKPJE1RFWh3nGCu317_SE-2u6WlyS5RpIMhHmulp1y41zhoAzUbU4jW_6F9LJO_PUqkdtbvjyvOeXS-Q3D3?key=Y3tSvPSx9fa3RP07_JmwXA" alt=""><figcaption></figcaption></figure>

* Confirm the deletion by clicking **Delete**

<figure><img src="https://lh7-rt.googleusercontent.com/docsz/AD_4nXfSNkRSV2VY_VfimUtQmbjvRfBlRJbnLzfv1wPkc0QNCnwXlZ2J9WvaMOzJYzcrX0R1zg36W6OV3nA9WPOK49r_2B-W02zU5ljHU3YkwSUrs0tHE_PSspP0uNHaISgZCIg_wIo1PhcrWyerzRnjG4wOPagW?key=Y3tSvPSx9fa3RP07_JmwXA" alt=""><figcaption></figcaption></figure>

## Search for a Penalty

Enter a keyword or exact text in the **search bar** located in the upper-right corner. Press **Enter** to find matching results.

<figure><img src="https://lh7-rt.googleusercontent.com/docsz/AD_4nXdQRBPwBSphxIZtjp5-7lboz1ZxrM80qDWzYJXdOSwXO5n_ipIbT9i5SWQuzW6wf35pGWoE9kqCTsON47sLRdwPrWKHr7OdxC27P2bWDBXxFUdWbut_6Exv4E1YZ4WAq0YVekkwnd6x82xS3JQ5U4qrIeWj?key=Y3tSvPSx9fa3RP07_JmwXA" alt=""><figcaption></figcaption></figure>


# Other Fees

Last updated: March 2025

This feature allows you to create and customize additional fees. You can also define rules that determine which types of students these fees apply to.

## Access and Navigation

**Other Fees** can be accessed under **Finance** > **Finance Setup**.

<figure><img src="https://lh7-rt.googleusercontent.com/docsz/AD_4nXcHuJt1zM_53AG-SoQqbHN_ogv2iyrC-LU2RvsdOn-wI2rdYefpvCLA2SG-ty-q2-GADHnpx7hBngNbgl1NXkrwSYiywnzsuEMYZI2yoT-yk7DzE9HXTSM6-bywWF8vExqQY7pKbWQQUAGUa3kz92iaJRrr?key=Y3tSvPSx9fa3RP07_JmwXA" alt=""><figcaption></figcaption></figure>

Check the privilege assigned to your user account or role if you cannot view a link from the list.

{% hint style="danger" %}
Contact your school’s system administrator to request view or edit access if you cannot access the rights management screen.
{% endhint %}

## View Other Fees per Tern

Click the **term dropdown** in the upper-left corner then select a term to display the associated fees.

<figure><img src="https://lh7-rt.googleusercontent.com/docsz/AD_4nXcqQCE3NTC36533ZI0f_BY3IdxRKh-VvB2AH_I2ikVuDmDTlLvKEi4v3pollT81sLsB8Vl1GiPwuLyPYscpJonwKoLhQSZ9DtvmlIec89ajkhNvTF1bYl7yykWLkutxmGBQNgdzMeSsyUGSeQ4ZzDBjsSda?key=Y3tSvPSx9fa3RP07_JmwXA" alt=""><figcaption></figcaption></figure>

## Create a New Other Fee

* Click **+New Other Fee** in the upper-right corner

<figure><img src="https://lh7-rt.googleusercontent.com/docsz/AD_4nXdUSRy53ST_NXuwsvGsopnKWZxE761JNgLKc0Aly7wro5hANw2S52742c7GylodTozny2PRSXsrHeakdKt226HWmg0qKXRzuCxoAKNnl7YiWi3uw8A5BwnMXrbYEvR8j7b88nU35G12MEjua6V94k-wlBZ8?key=Y3tSvPSx9fa3RP07_JmwXA" alt=""><figcaption></figcaption></figure>

* Enter the required details:
  * **Description** - Name of the Other Fee
  * **Term Applicable** - Term where the fee applies
  * **Account Code** - Link to an existing account code
  * **Applies To** - Specify conditions for affected students
  * **Tag** - Assign a category to the fee
  * **Pricing Type** - Choose fixed or variable
  * **Price** - Fee amount

<figure><img src="https://lh7-rt.googleusercontent.com/docsz/AD_4nXf89X-hL0egtIekd41Dag8yjU-QWxWVN8Cb-Vcm41L7zgofs-GOS2wmWissTx1FN4c85umsaUrKSvBnb01fduM5jKSd67hEzmoU5DuA4q7NodVE2Lf_r0YpOTgV3bs4e5nilpv-QlMu6284JIAI6_SPdH4v?key=Y3tSvPSx9fa3RP07_JmwXA" alt=""><figcaption></figcaption></figure>

* Click **Add Other Fee** to save

## Edit an Other Fee

* Select the fee to edit and click the **Pencil** icon

<figure><img src="https://lh7-rt.googleusercontent.com/docsz/AD_4nXf7jU7l-UroG3Dcuh3tRQz7cUbLN1yb0h9RInqQ2_7tcEGnMEggfeEICIRcZUOHyhUld45x6tqP4ni1sZ1-KeKLtHoGtHEfsILlgoEAz9t5TCX4AObWQSDwR_6X0JH6Z7F6LaAMpI_jTXJ_bn04E3kytfzk?key=Y3tSvPSx9fa3RP07_JmwXA" alt=""><figcaption></figcaption></figure>

* Modify the necessary fields in the Update Other Fee form (Note: The Term Applicable field cannot be edited.)
* Click **Update Other Fee** to save changes

## Delete an Other Fee

* Select the fee to delete and click the **Trash Bin** icon

<figure><img src="https://lh7-rt.googleusercontent.com/docsz/AD_4nXdmwFk_hg3c76rdGlj0mWgmW7oBubFEr-b7s1X-rWUzp0KH1fJM9iL_NQryhN3QYIyZXe0Lgg2pCPlt9Brolysxw2gajPR7w_iwnmPATiU9MSD-PdpJDYXckPvs_6wJwxhPTsErmmJYilZEbj_t_6yz6d7r?key=Y3tSvPSx9fa3RP07_JmwXA" alt=""><figcaption></figcaption></figure>

* Confirm the deletion by clicking **Delete**

<figure><img src="https://lh7-rt.googleusercontent.com/docsz/AD_4nXexqd6GBz08iDAkSvalgVu6WLeW3CwPegJ-I-LQBioH5VGThrZ4uaijeCHmLLC8wlK5VHG1FjiBsMvNtqIuoDGcrEaIDeeSo_UHZqVj3Fuw6QmTRhbYcVE5SXJgIiwiWIp1MxUCakORvipX4fHK6h8MX4qF?key=Y3tSvPSx9fa3RP07_JmwXA" alt=""><figcaption></figcaption></figure>

## View Students Tagged to an Other Fee

* Click **View Students** on your selected fee&#x20;

<figure><img src="https://lh7-rt.googleusercontent.com/docsz/AD_4nXekm-8SsqSKUt161okcxcJ5Xo221k8ofgYHRhK3cW8PleNtWxOR752iP6XnPvYRyLS1ZmZ1lswg4PUOJEWIJADnt7-_18up701sGFoZSk2sDqUMRpst2F7X3xk6dXfJN7bVU-uYdjUCu_ycxUtbvV8rcpXE?key=Y3tSvPSx9fa3RP07_JmwXA" alt=""><figcaption></figcaption></figure>

* A list of students assigned to the fee will be displayed.

<figure><img src="https://lh7-rt.googleusercontent.com/docsz/AD_4nXfms1pa4JeT-XKClsii4w1IppEXU8IrSB_mfFPNM7o-b_p6J5uhDSA2AWkic4uMpOFcATohhaugSk6Z-krogPkbHt1NrFifY2fyiprqz-8CPiMKQQMbHnuW2zC2Ets8QyLDj8RqVnoEG_1_gxxpX4n7tIYA?key=Y3tSvPSx9fa3RP07_JmwXA" alt=""><figcaption></figcaption></figure>

## Add Students to a Fee

* While viewing an Other Fee, click **+ Add Student** located in the upper-right corner

<figure><img src="https://lh7-rt.googleusercontent.com/docsz/AD_4nXfRVfdOL37ZxNlAmauAu0crt7mcxMyzvplmvOsLZdD-EHJog-QbxklY9zATtTe77cl1pf59NrTAtGUiqrv9j2skiEaJUXNgYtTen47mzqPHqJ851XdEScMeABFKFTS37uV5ZBvBjITFKP9g-gFAnWDWmC8?key=Y3tSvPSx9fa3RP07_JmwXA" alt=""><figcaption></figcaption></figure>

* Enter the student’s name

<figure><img src="https://lh7-rt.googleusercontent.com/docsz/AD_4nXdpRcs3ZPUnKxx8g1NuWH0jLPT0VCSrdvI08a1rj-3JyfMJQi1azaEvCkh0FIH3w6-9uv_A5-etadrhHVjX64FCnnpEdETBC_usJylGhRvyxw7rZL_mWca1fdDLhi5QC0XTd2n9EZvr0Wuju3EKVoCz2jNV?key=Y3tSvPSx9fa3RP07_JmwXA" alt=""><figcaption></figcaption></figure>

* Click **Add Student** to save

## Search for Students Tagged to a Fee

While viewing an Other Fee, type a keyword or exact text into the **search bar** located in the upper-right corner. Press **Enter** to find matching results.

<figure><img src="https://lh7-rt.googleusercontent.com/docsz/AD_4nXfpyxDXecOc3N4L2DGSBY7Y6Rv31XnC-SxehwCAJukJCNh1xne5j9N7lbd4oDkf1cRyZkPGo984dLnB2MXtfcy6P6-nOgUxtDtaAL0vRK2RD8Y-QeNrOnjSELM3vjJZhEGwwdo7Au2xkGhXvMlvD_D3Am0O?key=Y3tSvPSx9fa3RP07_JmwXA" alt=""><figcaption></figcaption></figure>


# Payment Settings

Last updated: March 2025

This page allows you to manage different payment settings.

## Access and Navigation

**Payment Settings** can be accessed under **Finance** > **Finance Setup**.

<figure><img src="https://lh7-rt.googleusercontent.com/docsz/AD_4nXf33YpOsItRo-TAkvsA4qty_iKJk2z9ASWLaTF2yHbd5knJwceMX7PzRjxtPEEaLQ8HeCzzDJ6M0jPJ14gdV9FZyA_lJDD7g5Cstp7ZW9aJk9y1hc2I1YfqCovylVwFEEmAwebzf456bcBcpMCEg6oJDAGa?key=Y3tSvPSx9fa3RP07_JmwXA" alt=""><figcaption></figcaption></figure>

Check the privilege assigned to your user account or role if you cannot view a link from the list.

{% hint style="danger" %}
Contact your school’s system administrator to request view or edit access if you cannot access the rights management screen.
{% endhint %}

## Late Penalty Exemption

* Double-click the Amount in Pesos field

<figure><img src="https://3973081029-files.gitbook.io/~/files/v0/b/gitbook-x-prod.appspot.com/o/spaces%2F-M1SysIMhMO_ls3VlZcw%2Fuploads%2F7QKLLHlPJisOGXrEjzTH%2Fimage.png?alt=media&amp;token=771740c1-48f3-4476-9a0e-27024f674634" alt=""><figcaption></figcaption></figure>

* Enter the amount
* Click outside the field to auto-save
* A confirmation message will appear

## Payment Cancellation Remarks

* Click the **Pencil** icon next to Payment Cancellation Remarks

<figure><img src="https://3973081029-files.gitbook.io/~/files/v0/b/gitbook-x-prod.appspot.com/o/spaces%2F-M1SysIMhMO_ls3VlZcw%2Fuploads%2FhDXqpS7SERt04ZUcJxh3%2Fimage.png?alt=media&amp;token=777bb8f9-69d5-4a08-a9bc-51b726d130e0" alt=""><figcaption></figcaption></figure>

* A pop-up will appear where you can:
  * Add, edit, or delete remarks
  * Click **+Add Value** to add a new option
  * Edit existing remarks by clicking on them
  * Remove a remark using the **X** button

<figure><img src="https://lh7-rt.googleusercontent.com/docsz/AD_4nXcw6ca1C7WrKO1xWvDXBgQ0b1X6WsXXF3BQr_DUaY1xESWnYeLtZ6CzMI7_RzGMAneb2uNxuCXmYSRJiJhbTFnlcekHJoAVcI4bDgrI57lrawMnXANE8M0wQSQeQ6kj4GplRsGRT_Q1j0pcPrwtx43vl8Jt?key=Y3tSvPSx9fa3RP07_JmwXA" alt=""><figcaption></figcaption></figure>

* Click **Update Remarks** to save changes

## Withholding Tax Amount

{% hint style="info" %}
This setting applies to all transactions and can be viewed in the Sales Report (currently under enhancement).
{% endhint %}

<figure><img src="https://3973081029-files.gitbook.io/~/files/v0/b/gitbook-x-prod.appspot.com/o/spaces%2F-M1SysIMhMO_ls3VlZcw%2Fuploads%2FIx0h6jGXypGb1gASjEwJ%2Fimage.png?alt=media&amp;token=adf3af4a-87dc-45a1-9025-bb31ef15c4f5" alt=""><figcaption></figcaption></figure>

* Double-click the Percentage Amount field
* Enter the percentage
* Click outside the field to auto-save
* A confirmation message will appear

## Merchant Discount Rate

<figure><img src="https://3973081029-files.gitbook.io/~/files/v0/b/gitbook-x-prod.appspot.com/o/spaces%2F-M1SysIMhMO_ls3VlZcw%2Fuploads%2FenUzollBhhArMZEM37Fj%2Fimage.png?alt=media&amp;token=d570931e-1610-44dc-a27e-62646e6b4339" alt=""><figcaption></figcaption></figure>

* Double-click the Percentage Amount field
* Enter the percentage
* Click outside the field to auto-save
* A confirmation message will appear

## Auto Enrollment

<figure><img src="https://3973081029-files.gitbook.io/~/files/v0/b/gitbook-x-prod.appspot.com/o/spaces%2F-M1SysIMhMO_ls3VlZcw%2Fuploads%2FagRATN8TnW0CQIxi4OMw%2Fimage.png?alt=media&amp;token=c5814596-fcc3-47de-bdcb-958783808da3" alt=""><figcaption></figcaption></figure>

* When enabled, students with a 0.00 assessment during enrollment are automatically marked as officially enrolled
* A Php 0.00 transaction is recorded under the Scholarship payment mode

#### To enable Auto Enrollment

* Toggle **ON** the Auto Enrollment setting
* Enter Payment Remarks for automatic tagging
* Select the default reconciliation bank for 0.00 payments

## Apply Online Payments to Previous Term Balances

<figure><img src="https://3973081029-files.gitbook.io/~/files/v0/b/gitbook-x-prod.appspot.com/o/spaces%2F-M1SysIMhMO_ls3VlZcw%2Fuploads%2F7fKCOGMjp7tlQ3NF2A5B%2Fimage.png?alt=media&amp;token=bf10b57a-c6c9-4a2b-8676-a17874707478" alt=""><figcaption></figcaption></figure>

* When enabled, payments are split across multiple terms with the same transaction details
* To enable, toggle **ON** the setting.


# Refund Settings

Last updated: June 2025

This page allows you to configure refund rates for students based on specific terms, programs, and conditions.

## Access and Navigation

You can access **Refund Settings** by navigating to **Finance > Finance Setup > Refund Settings**

<figure><img src="https://lh7-rt.googleusercontent.com/docsz/AD_4nXdkjHjHbpPTIMWz_h7dLJAJlm30LkrPR5qjUC1HGH6oyvLi4pExkpc7ksJCrPXTtLCkIKBJODV7-vMANFJV5hyvfTUwvBCZZBFSI6rhU1omY4hLs1QkSdL9sYppPByySfyLlRNo4A?key=Y3tSvPSx9fa3RP07_JmwXA" alt=""><figcaption></figcaption></figure>

Check the privilege assigned to your user account or role if you cannot view a link from the list.

{% hint style="danger" %}
Contact your school’s system administrator to request view or edit access if you cannot access the rights management screen
{% endhint %}

## Create a New Refund Plan

To create a new refund plan:

* Select the Term - Use the term selector at the upper-left corner of the page to choose the term where the refund plan will apply

<figure><img src="https://lh7-rt.googleusercontent.com/docsz/AD_4nXcBKSX3POipRWZee-Q3T85NIblQ3QVL9bAW-GJFKy-G4qVsguACX7nLDnJCPTmvqhXlyC9Qbk07tbOL2K69UP2HgeSnVY8UEbK66eV_PpH8mTdvT4ic_2SQ3rA-1nt32p-_Cpdr?key=Y3tSvPSx9fa3RP07_JmwXA" alt=""><figcaption></figcaption></figure>

* Click **New Refund Plan** located at the upper-right corner of the page
* Fill out the Details in the pop-up form:
  * **Name**: The name of the refund plan
  * **Rank**: Determines the priority of the refund plan. Must be unique. A lower rank number (e.g., Rank 1) has higher priority
  * **Refund Rate**: The rate used to calculate the tuition refund. The calculation takes effect at midnight (Philippine time)
  * **Applicable Dates**: Set the start and end dates for the plan’s validity
  * **Rate**: The percentage of the tuition to be refunded.
  * **Applies To**: Specifies which students are covered by the refund plan. All criteria must match for a student to qualify:
    * **All**: Applies to all students
    * **Student Starting Term**: Applies to students starting in the selected term
    * **Program**: Applies to students enrolled in the specified program

<figure><img src="https://3973081029-files.gitbook.io/~/files/v0/b/gitbook-x-prod.appspot.com/o/spaces%2F-M1SysIMhMO_ls3VlZcw%2Fuploads%2FEM16SJoUpt6tziSpFF0Q%2Fimage.png?alt=media&amp;token=a6288a3f-4098-4204-84ad-213e33372c9c" alt=""><figcaption></figcaption></figure>

* Click **Save Changes** to create the plan

## Edit a Refund Plan

To edit an existing refund plan:

* Hover over the refund plan you want to modify, then click the **Pencil** icon

<figure><img src="https://lh7-rt.googleusercontent.com/docsz/AD_4nXfyFGc2tkmobJ9gkO43hQcgDDeNT1tBL4gwQFi1n53KoaDh4tOAlXiyujnSlR2CXayZenQDKIhVGj--p1WUvUn4CjRQvLHnPfgpzL4xoPlWVXP_3vihRteCTct59BTTxxlkC8pThA?key=Y3tSvPSx9fa3RP07_JmwXA" alt=""><figcaption></figcaption></figure>

* Update the necessary details in the pop-up window

<figure><img src="https://lh7-rt.googleusercontent.com/docsz/AD_4nXfL9h9YjzyVd1Y2zBL0RxRgTWsh7Cc5S0A5Wp3W8ycQRHTCoZUSRoMBs9PT-oqySMac7KXqroAkWkslt6LDGd35THHHgjhvuB4M50SwB2K0dymFNbusjDhWDw_I2XLlqjm6nFtO?key=Y3tSvPSx9fa3RP07_JmwXA" alt=""><figcaption></figcaption></figure>

* Click **Save Changes** to apply your updates

## Delete a Refund Plan

To delete a refund plan:

* Hover over the refund plan you wish to remove, then click the **Trash Bin** icon

<figure><img src="https://lh7-rt.googleusercontent.com/docsz/AD_4nXemiP9CRaaa1aiMIg6pzZhlq0flQ_mLxueghacoy6nDcuKfSyRtE5vs2ML7gOX8CDaxvGUNH1DJq87x_yjRZlLiuImflKxjSXLz9bDvdMcE4G7yI5CmOT9Kb3EUWl-Qub2B4FLy?key=Y3tSvPSx9fa3RP07_JmwXA" alt=""><figcaption></figcaption></figure>

* Confirm the deletion when prompted

<figure><img src="https://lh7-rt.googleusercontent.com/docsz/AD_4nXcT9CDDxxO2AzBN46OU5U-zPz6ZQUiPqOu2Xmm_dSynxcbn-4ZDJi4IRNpRCVy61jdTdfjkPt19mHGoHWGXxn4oIc9HPFsCq-7U-eNzmeZnDbrhRtld2mfRAAgpJoZPJETfouVYmQ?key=Y3tSvPSx9fa3RP07_JmwXA" alt=""><figcaption></figcaption></figure>


# Adjustment Charges

Last updated: June 2025

This page allows you to set up **adjustment charges** for students, which are additional fees applied under specific conditions, such as enrollment or schedule changes.

## Access and Navigation

You can access **Adjustment Charges** by navigating to **Finance > Finance Setup > Adjustment Charges**

<figure><img src="https://lh7-rt.googleusercontent.com/docsz/AD_4nXcGQRwxGy8Jy2L-_rjdZ5V7iN4ukh1zv9VxWVRswGXS1iNamXF19fYxfsw7EmIGNFmttu4STWopgdg8FZcD2uXkAyeU6qCIP4jIeJYw0NI7RtkxrH9p5-9mpficFgGl8zdjk65KTg?key=Y3tSvPSx9fa3RP07_JmwXA" alt=""><figcaption></figcaption></figure>

Check the privilege assigned to your user account or role if you cannot view a link from the list.

{% hint style="danger" %}
Contact your school’s system administrator to request view or edit access if you cannot access the rights management screen
{% endhint %}

## Create a New Adjustment Charge

To create a new adjustment charge:

* Select the Term - Use the term selector in the upper-left corner of the page to choose the term where the adjustment charge will apply

<figure><img src="https://lh7-rt.googleusercontent.com/docsz/AD_4nXf0a5VuGMQFT88COYMY_jTCykmuzHf222Lm9YD5Nf1UFG0g44z81NuWNb1NKFcdwzEqQ7u2xuB4PZOWLWiBjj6jfhEGxGy-kQYtye2Rng7Z03NFhORl5QcU7iJ4vcoEiUhCrZiwpQ?key=Y3tSvPSx9fa3RP07_JmwXA" alt=""><figcaption></figcaption></figure>

* Click **New Charge, l**ocated in the upper-right corner of the page
* Fill out the Details in the pop-up window:
  * **Label**: The name of the adjustment charge
  * **Rank**: Determines the priority of the charge. Must be unique. A lower number (e.g., Rank 1) indicates higher priority
  * **Amount**: The monetary value of the charge
  * **Adjustment Type**: Specifies when the charge is applied:
    * **Enrollment**: A charge is applied when the student is enlisted
    * **Change Section**: Charge is applied when a student’s schedule change is confirmed
  * **Applies To**: Defines which students the charge applies to. If multiple conditions are set, **all** must be met:
    * **All**: Applies to all students
    * **Date Range**: Defines the start and end dates during which the charge is applicable
    * **Starting Term**: Applies to students beginning in the selected term
    * **Program**: Applies to students enrolled in the specified program

<figure><img src="https://lh7-rt.googleusercontent.com/docsz/AD_4nXefsyAhTXFV2B1TUpnSzuaQmQOVuLoHaMK7wqF14E801jfDn8LM7Tzih-uZ5H1xi-PAChuTU7RL_ve8QUM7195SNCUUl2QNJfmd7kVht1xJ1KOvPQKP17PEHu8Pg1fBS8D0V5UB8g?key=Y3tSvPSx9fa3RP07_JmwXA" alt=""><figcaption></figcaption></figure>

* Click **Save Changes** to finalize the adjustment charge

## Edit an Adjustment Charge

To edit an existing adjustment charge:

* Hover over the adjustment charge you wish to modify, then click the **Pencil** icon

<figure><img src="https://lh7-rt.googleusercontent.com/docsz/AD_4nXcIP4J6JoQeHCaF8F4Gqjf9VZBT_26VTjoeokXP3mRLewGpFYO4AsNJ7kAumqF7ONkKSx5wdhMEwxsvNc0G86sd6BFeFvkKdidt2yVh4ZI5z1YrgQ1YxhVg0WAb_pFhyIh4-bLHmw?key=Y3tSvPSx9fa3RP07_JmwXA" alt=""><figcaption></figcaption></figure>

* Make the necessary changes in the pop-up window

<figure><img src="https://lh7-rt.googleusercontent.com/docsz/AD_4nXfJhlgqQZe2m4oSHocpsKjTeZnuSWeCzZXoLTR_Xbh0fVtr7Jf6GhHZ3BoG21OyPAMxeMTPR_fD1WhLUvszSo6G09dgLfs3IYOyj2_m259Bk2cQwkr_nZhs7SZ-otf_dYSkls40hA?key=Y3tSvPSx9fa3RP07_JmwXA" alt=""><figcaption></figcaption></figure>

* Click **Save Changes** to apply your updates

## Delete an Adjustment Charge

To delete an adjustment charge:

* Hover over the adjustment charge you wish to remove, then click the **Trash Bin** icon

<figure><img src="https://lh7-rt.googleusercontent.com/docsz/AD_4nXffGcw-WR2wwwuSP0Sl2lOIC5DvX7AKvh2tz5rVlAxynvOV2Z-SD_CzDzUYP0xUNmbstmhdGJ9vtIoE1_x-q8s8UcrSg49Z5wIS84s4b7AjIrMgUkmQbJtnWdTWubHv2bdwXFRUOg?key=Y3tSvPSx9fa3RP07_JmwXA" alt=""><figcaption></figcaption></figure>

* Confirm the deletion when prompted

<figure><img src="https://lh7-rt.googleusercontent.com/docsz/AD_4nXds5qwYIVq8aKEY9Teo3EGnA_sfUUFP0f_Ufq6plGirj9RCoSYeaHlO3VHe0Skf6DxKTzcaGmGeNyyZ7BqCwG05z9d8fKZMvp2AZXXNk2U-5GRlWveJHBkYEKZPOJn1ZqMbvPHz8A?key=Y3tSvPSx9fa3RP07_JmwXA" alt=""><figcaption></figcaption></figure>


# Preview SOA Instructions

Last updated: March 2025

This setting allows you to customize reminders and payment instructions in the SOA Preview sent to students.

## Access and Navigation

**Preview SOA Instructions** can be accessed under **Finance** > **Finance Setup**.

<figure><img src="https://lh7-rt.googleusercontent.com/docsz/AD_4nXfBhf9LZ554dv1bzsvGpo5jFdRNCFkLAkxHd0Izi-uQ7EQlMCOfE7S4ZpiKvq5Uf4aEEjhHuZ9aE9L4u8KfZLmWG2or8jQ0gFX-VdXeFUkRWW40KU1PZZ5JAIMUuzZAoDC9X5LVxaqVDAs7g5ntMLgjgdyl?key=Y3tSvPSx9fa3RP07_JmwXA" alt=""><figcaption></figcaption></figure>

Check the privilege assigned to your user account or role if you cannot view a link from the list.

{% hint style="danger" %}
Contact your school’s system administrator to request view or edit access if you cannot access the rights management screen.
{% endhint %}

## Setup SOA Preview Instructions

<figure><img src="https://lh7-rt.googleusercontent.com/docsz/AD_4nXcr-mp3UUAV2CydP6egEjNYuBmhULA0gQot_nh4jDgCLrDW0oDbSeUdey7IkDaNxu1I7ie3D1n9CNVo2VNinfkbcjHWRAi4MNiu6EZxlUByTc9CCsHDry5ghDdlmkjIjHiXQRPS1kD1RcZhWfSfaGO7Y0hz?key=Y3tSvPSx9fa3RP07_JmwXA" alt=""><figcaption></figcaption></figure>

* Use the Preview SOA Instructions editor to input relevant instructions
* Click inside the text box to format as needed
* Click **Preview** located in the upper-right corner to check how the SOA Preview document appears
* Click **Save Changes** to apply updates


# Enrollment Payment Instructions

Last updated: March 2025

This page allows you to upload payment instructions for the mobile app during enrollment.

## Access and Navigation

**Enrollment Payment Instructions** can be accessed under **Finance** > **Finance Setup.**

<figure><img src="https://3973081029-files.gitbook.io/~/files/v0/b/gitbook-x-prod.appspot.com/o/spaces%2F-M1SysIMhMO_ls3VlZcw%2Fuploads%2F8FHh0JyvWp5jrdSq2DCY%2Fimage.png?alt=media&amp;token=98c78889-ea43-4fbf-9bff-5563c7a72041" alt=""><figcaption></figcaption></figure>

Check the privilege assigned to your user account or role if you cannot view a link from the list.

{% hint style="danger" %}
Contact your school’s system administrator to request view or edit access if you cannot access the rights management screen.
{% endhint %}

## Upload Enrollment Payment Instructions

<figure><img src="https://lh7-rt.googleusercontent.com/docsz/AD_4nXcUCzHyTKBuyfLxD7t9INQU60cGv3W3UE30YhFoHIqgwl2NjE-nH1FnWHlbzccIiSFVWli1hAObU2IyiSC-a4ulSew4-vWYmwPRKguG9AEt5UkH-vQrOe7rdQnyD0s0BziDZP7RW4NRiDpzs4wydcmi1qpM?key=Y3tSvPSx9fa3RP07_JmwXA" alt=""><figcaption></figcaption></figure>

* Navigate to **Finance** > **Finance Setup** > **Enrollment Payment Instructions**
* Click **Browse** to upload the payment instruction file


# Receipt Number Settings

Last updated: March 2025

This setting enforces a format for AR and OR numbers in all transactions, including online and manual payments.

## Access and Navigation

**Receipt Number Settings** can be accessed under **Finance** > **Finance Setup**.

<figure><img src="https://lh7-rt.googleusercontent.com/docsz/AD_4nXe2tbioWnWVLdHkyscGweVmIBTO6AXq6DZnNXtHu_8Evs037baSNcKf9V56HMq78Qh8cmxInspyo28fdAq7t2WOqKSvEZPzFA7q7Vt4wwqENYZe8cYwoEcxeVlAzczgw5-h-PyukGOtmeg2cEMVV5m8EUfj?key=Y3tSvPSx9fa3RP07_JmwXA" alt=""><figcaption></figcaption></figure>

Check the privilege assigned to your user account or role if you cannot view a link from the list.

{% hint style="danger" %}
Contact your school’s system administrator to request view or edit access if you cannot access the rights management screen.
{% endhint %}

## OR Number Generator

<figure><img src="https://lh7-rt.googleusercontent.com/docsz/AD_4nXfwLQJ-Ad8u7abDiJD21Hab7tIRa8cJoIdSvmt3Q3KFkVv2zhcaKjsGwmVndvCOIA0ykK7bBTSSijYAtX1LjZr-WSRllsw0Kg72ZtyWTHZ-FMOL-hPAw16K7PRyutC-abknppXZgzUoOv1olqxtOc-CXeY?key=Y3tSvPSx9fa3RP07_JmwXA" alt=""><figcaption></figcaption></figure>

* Toggle **ON** the OR Number Generator
* Enter the OR Number format in the OR Number Sequence field
* Click outside the field to auto-save
* A confirmation message will appear

## Update OR Number Settings

<figure><img src="https://lh7-rt.googleusercontent.com/docsz/AD_4nXf9PXfT-6obi3xgoTISel_4WkGuTvZa5YUb5JrtpqP16obXu8v38VStbGbLrghrZspIPmKxSqc2Iia_uW4S0cu5U-heoy2EsxfudGf4pVX-Vp7YZ8NAUvmxdKMyQwuTADkSKbk2y6sO2BUuWMebjvHCfUWu?key=Y3tSvPSx9fa3RP07_JmwXA" alt=""><figcaption></figcaption></figure>

* Toggle **ON** the OR Number Settings to display the OR number field when posting payments
* (Optional) Toggle Allow Editing and Manual Override of OR Number
* A confirmation message will appear

## AR Number Generator

<figure><img src="https://lh7-rt.googleusercontent.com/docsz/AD_4nXcgRobRGp6g0PR16XIBTsXpKLkOL2G3w6K5pOAewNDQCPVFv11oNILhPLwtOuvkVYwJ1NU7eT4tGYNeWlv8GfYAjEtcvKRZb-wFtLejNBlj6QeTAEkPOLBbY9Waw0VrMrjhOyp8L4Xjro_WoxM2iD9M6GXm?key=Y3tSvPSx9fa3RP07_JmwXA" alt=""><figcaption></figcaption></figure>

* Toggle **ON** the AR Number Generator
* Enter the AR Number format in the AR Number Sequence field
* Click outside the field to auto-save
* A confirmation message will appear

## Update the AR Number Settings

<figure><img src="https://lh7-rt.googleusercontent.com/docsz/AD_4nXe5TGMsp2DStcU-Gq-2OLNFR-seeXY2NeqCcMZPCyX6fkMUf1iSiQtpJopF2OuL_gYbO4-dRSvAGDYxBNIZFIrLUYsKa5Ex7LB5anauV2RnTM70rhNQBA31NOFP6iLZKSGKBkAcbxa8FJLZAHpEMZi-IyeY?key=Y3tSvPSx9fa3RP07_JmwXA" alt=""><figcaption></figcaption></figure>

* Toggle **ON** the AR Number Settings to display the AR number field when posting payments
* (Optional) Toggle Allow Editing and Manual Override of AR Number
* A confirmation message will appear


# Payment Channels Manager

Last updated: March 2025

Payment Channels allow you to set up links that redirect students to external payment platforms like Dragonpay.

## Access and Navigation

**Payment Channels** can be accessed under **Finance** > **Finance Setup**.

<figure><img src="https://lh7-rt.googleusercontent.com/docsz/AD_4nXfvKOXjzMre5jtOHpkSuFYmyvZHhJ59_6Pxaly_S9n3kCFPnkJ6ViVKIKRnBux-QmDEaQO3ZKL1YMWRI5zFUgUIBTlpsMTWgb7nkUXm2Cz3oihHJSdPS1wzPH7w1Y9_H_6Ph_hnHmAHabQg0j3P8pObqWXh?key=Y3tSvPSx9fa3RP07_JmwXA" alt=""><figcaption></figcaption></figure>

Check the privilege assigned to your user account or role if you cannot view a link from the list.

{% hint style="danger" %}
Contact your school’s system administrator to request view or edit access if you cannot access the rights management screen.
{% endhint %}

## Add a New Payment Channel

* Click **+New Payment Channel** (upper-right corner)

<figure><img src="https://lh7-rt.googleusercontent.com/docsz/AD_4nXfZkQfv4K8UkNfX63Cg-_xvw6f3cwtDEeqsurdoOnPKUuGksO-0ZeR6VZ_VbCF-GjLEbot3kSgWIYaTw5Ig94uLNguaqCZiBYKqYug4lEr7qnp1zYh4KZsd12VrKDL8B_Vo-b-7Fp5vWJiKNxkyPh-3BQis?key=Y3tSvPSx9fa3RP07_JmwXA" alt=""><figcaption></figcaption></figure>

* Enter the required details:
  * Name
  * Description (optional)
  * Logo
  * Payment Channel Type (Link, Dragonpay, or Unionbank)

<figure><img src="https://lh7-rt.googleusercontent.com/docsz/AD_4nXddFqvgWflcBDWI3pPBG9jcPubr2rdPX2HRAyOe4pMGFOJNDmfjY5BK9eQsqGVjcYTYdcBf4ppVR_pCs6Ty49THzSMwQgArMh0fzx3n68G0nThO-F7rob14nMgx0JvK1p8OPFhSf56YbQDtXkrJNJLpGeg5?key=Y3tSvPSx9fa3RP07_JmwXA" alt=""><figcaption></figcaption></figure>

* Click **Save**

## Update Payment Channel Details

* Select a payment channel and click the **Pencil** icon

<figure><img src="https://lh7-rt.googleusercontent.com/docsz/AD_4nXcz2qzHC8KBP-bdH25kIEZzFYnqkpy0JX-yFZa5uGsp4giT39W7c34aOG7usBcShkU0IxFkHMoli4HbR7wj4kDEYn1Zs_veFhIfI-sGHlefeVEbRhlnrJclfrNv4nzFIzXPp0b1ONwVqlPZGcM2zWKh5HCG?key=Y3tSvPSx9fa3RP07_JmwXA" alt=""><figcaption></figcaption></figure>

* Modify the details in the Edit Payment Channel form

<figure><img src="https://lh7-rt.googleusercontent.com/docsz/AD_4nXeGXSy2APoSQPCgTDHUOHLII461GCPoLSrlzNSlMXqfca6DQDWWbCidSU7CrpBRm5VP4t9knzM0pDBNm-NlICiohU5pr8R07tidkTJLcpV3fq6V_i3F45BZ1J_uXLzxKLIknHaM5SGGf49tWB4mitn4n7Q?key=Y3tSvPSx9fa3RP07_JmwXA" alt=""><figcaption></figcaption></figure>

* Click **Show Advanced Settings** if needed
* Click **Save**

## Enable and Disable Payment Channels

{% hint style="warning" %}
Although not recommended, as it may disrupt students' ongoing transactions, this setting can be updated at any time.
{% endhint %}

<figure><img src="https://lh7-rt.googleusercontent.com/docsz/AD_4nXdmK7ZNv1Zp1wvnNuPbIdyk8POR_CXdKnQtR1qbW0JFa81ARGgaS6tdALJRCsogaARODVsl_yuMQwYXgqIrM1rDNGIc_ggcPhqI-dExc3iq_ZoskUwBUvWMFja3WqrSD_Vs5q_qagRhysWtRWSasthT0tA?key=Y3tSvPSx9fa3RP07_JmwXA" alt=""><figcaption></figcaption></figure>

* Toggle the Status switch to ON or OFF:
  * **ON**: The payment channel is visible in the student portal
  * **OFF**: The payment channel is hidden

## Rearranging Payment Channels

{% hint style="info" %}
The order of payment channels in the Payment Channels manager determines how they appear in the student portal.
{% endhint %}

<figure><img src="https://lh7-rt.googleusercontent.com/docsz/AD_4nXdAZmFAWqCJLYMc82M6u4Ub58xpTcX3VhumC_rLUp8MN9480s_lFH7_fQM-31Za1wdXb2pcXBJQfVYHaKAMSka5Z7nrjC3662Qo5abtGGL3lypSt6Yn6Ggpd5hcbCJerc_EmEVbwQOKHYZVehJNSFIcL7-y?key=Y3tSvPSx9fa3RP07_JmwXA" alt=""><figcaption></figcaption></figure>

* Drag and drop the three-bar icon next to each channel to reorder
* A confirmation message will appear once saved.

## Delete a Payment Channel

* Select the channel to delete and click the **Trash Bin** icon

<figure><img src="https://lh7-rt.googleusercontent.com/docsz/AD_4nXdHq1TGTwAbF9Wi0DXpV8kzNrdt9d9YOkGZYA9pswt9hJR8F9gbODj09pEQVf0wxtQ7YU72VzyJYF7DK-vupnLaAw_HaIwx20CYfMXfwQgFiA9pU2xbDwdIhqH293PV37SRmKEYKLbXHW84UEprej2K3IvN?key=Y3tSvPSx9fa3RP07_JmwXA" alt=""><figcaption></figcaption></figure>

* Confirm the deletion by clicking **Delete**

<figure><img src="https://lh7-rt.googleusercontent.com/docsz/AD_4nXcB6Aql-QR_7a9NRKkNRpK1CtdqH9s_FnKPfdH35TJIew_eD3CWoFQdGJ4flU14HHZx0NuKFGML9KFZk5EMmA9ODDfgoo3qq2RBsMNHCqCa5AC7ObwUIWfN75kJ4awUPuLDiBzvVUxIOwvSYQ4KaNwDHJOp?key=Y3tSvPSx9fa3RP07_JmwXA" alt=""><figcaption></figcaption></figure>

## Frequently Asked Questions (FAQs)

**Question:** Can I pay my reservation fee via Dragonpay?

**Answer:** Not yet. Contact your school for available payment options.


# Online Payments Dashboard

Last updated: March 2025

The Online Payments Dashboard provides a centralized view of all payment gateway transactions made by students through their portals in Edusuite. This module allows users to review and monitor transactions, assign OR/AR numbers, and print receipts.

## Access and Navigation

You can access the **Online Payments Dashboard** under **Finance**.

<figure><img src="https://lh7-rt.googleusercontent.com/docsz/AD_4nXdwj_5rqPSb3ojkWdAiqVOwxExd7zf0vOYDZcxYU0fmV506tRuYRVE7N9wm0_nDMJnDZYJu12L8PHkTHpD6sm01MX4GYHr28X27Jhh72Zn11xogZPQst61WNydIokNKkxyQHtHpcD35qUEzmLmfaZcmVGYt?key=XLkdOqZSBPCp1UGcDUaKyQ" alt=""><figcaption></figcaption></figure>

Check the privilege assigned to your user account or role if you cannot view a link from the list.

{% hint style="danger" %}
Contact your school’s system administrator to request view or edit access if you cannot access the rights management screen.
{% endhint %}

## Filters

Users can filter transactions based on the following criteria:

<figure><img src="https://lh7-rt.googleusercontent.com/docsz/AD_4nXeikJcZ7EejWVgSGbRRIT-nTYuvFFGOhXXnhXOiZbdcBCA9JwkDggG8kqSmgPq8HpIf4Q7JO-cp-0__j561AjV1VIDBOlN_2N8hHDZ7F4mmiNaXyYAmxZBJ_A1hkJnYpjjQLQFDzRiV065wCed35kG7XmQ?key=XLkdOqZSBPCp1UGcDUaKyQ" alt=""><figcaption></figcaption></figure>

* **Term** – The academic period (Semester, Trimester, Quarter) in which the payment was recorded or applied
* **Status** – The transaction's status as determined by the payment gateway (Dragonpay or UnionBank)
* **Payment Channel** – The gateway used for the transaction (Dragonpay or UnionBank)
* **Receipt Number** – Filter payments based on whether they have assigned receipt numbers

## Columns

Each transaction includes the following details:

* **Student** – Displays the student's full name and ID number
* **Payment** – Shows the payment gateway used and the reference number generated when the transaction is marked as "PENDING"
* **Amount Paid** – The amount paid by the student
* **Status** – Indicates the payment's current status:
  * **CREATED** – The transaction has been initiated, but the payment gateway has not yet processed it
  * **PENDING** – The payment is being processed by the gateway but is not yet confirmed
  * **FAILED** – The payment attempt was unsuccessful
  * **SUCCESS** – The payment was successfully processed and credited to the school’s account
  * **UNKNOWN** – The payment status is not recognized by the payment gateway
* **Date Recorded** – The date when the student initiated the transaction
* **Date Posted** – The date when the payment gateway marked the transaction as "SUCCESS"
* **Term** – The academic period in which the payment was recorded or applied
* **Type** – Specifies whether the payment is for assessment or other fees
* **Receipt Number** – Displays the school's issued official receipt number. Only transactions marked as "SUCCESS" can be assigned an OR or AR number

## Frequently Asked Questions (FAQs)

**Question:** How do I view more details about a transaction?

**Answer:** Click the **Details** button in the right-most column. A pop-up window will display:

* Student ID Number
* Student Name
* Student’s Program
* Student’s Amount Due
* Transaction Date of Record
* Transaction ID
* Transaction Status
* Payment Gateway Used
* Payment Gateway Reference Number

***

**Question:** How do I issue an OR or AR number for an online payment?

**Answer:**

* Click the **Details** button in the right-most column
* Ensure the transaction status is **SUCCESS**, as only these transactions can be assigned OR/AR numbers
* Click **Issue Receipt** to open a new pop-up
* Select whether to assign an OR or AR number using the toggle switch
* Enter the receipt number
* Click **Save** to confirm

***

**Question:** How do I print an Official Receipt from the Online Payments Dashboard?

**Answer:**

* Click the **Details** button in the right-most column
* In the pop-up window, click **Print** to generate the official receipt
* The system will redirect you to a print preview, where you can print or download the receipt\\

{% hint style="info" %}
Only transactions with a **SUCCESS** status can generate an official receipt.
{% endhint %}

***

**Question:** What if a payment has already been credited to the school's account but is not marked as "SUCCESS" in the dashboard?

**Answer:** Click the **Manual Refresh** button next to the **Details** button in the right-most column to update the transaction status.


# Payments

Last updated: March 2025

The **Payments** page allows you to view and document student transactions, manage payments, process refunds, issue exam permits, and download assessments.

## Access and Navigation

You can access the **Payments** page under **Finance**.

<figure><img src="https://lh7-rt.googleusercontent.com/docsz/AD_4nXfl2GZutZ2Ho5tkddAYKClLsOPu816L-xLzQgKK6FX4tRPo8R_Y8TER72b1HFEn5-jz9azlVc4SG9aH2pxO-oBe2S7n5ghcQ3KIq6oC6_Xw6y04ZWrA7qvknZFGveV5L9hvl2YllTXNhSYbBp5CDA9o36WH?key=DxzDdKOJj67CHHVStJNPXA" alt=""><figcaption></figcaption></figure>

Check the privilege assigned to your user account or role if you cannot view a link from the list.

{% hint style="danger" %}
Contact your school’s system administrator to request view or edit access if you cannot access the rights management screen.
{% endhint %}

## Search for a Student

<figure><img src="https://lh7-rt.googleusercontent.com/docsz/AD_4nXelGDKdDGY0eTGWi39lGUIQmBNWA4vQRPqRH21oYwwpGn3DZxqVoXminFItlxgTlAjJqjo8QZgVbkP_36Xw1Seou2wJHTbBvxeQyv380f1vykb82H6HQbA7uDDajmSXJkBssPv6tzEhuEhSAx5C79X6F90F?key=DxzDdKOJj67CHHVStJNPXA" alt=""><figcaption></figcaption></figure>

To find a student:

* Enter a keyword or the exact student information in the search bar located in the upper-right corner
* Press **Enter** to display all matching results

## Manage Student Transactions

### View Student Transactions

<figure><img src="https://lh7-rt.googleusercontent.com/docsz/AD_4nXd4Yr4ROpwJ66dT9FLDIoXLr_8qQb73BKPngQfCt507BFUvD_TzaLWdD1u6tuGJ4tAl0xRXq8r0Xj2GZELzth22yU2NzQ5C4gaXLDqs4HE91D9ipyyvJy8prTD56iKiQFsyM0YO3zL_L1P3j-QxxgbNihMV?key=DxzDdKOJj67CHHVStJNPXA" alt=""><figcaption></figcaption></figure>

* Search for a student
* A list of terms the student has enlisted under will appear
* Click **View Transactions** for the desired term
* A list of all transactions made by or for the student will be displayed, including canceled transactions.

### Issue Exam Permits

<figure><img src="https://lh7-rt.googleusercontent.com/docsz/AD_4nXcMHzEE_gL4_gTydxFLN-m23eNv5rWVQkWOhY3WQwi-p7NrFzLeTBZXANWCb4tLa8ULL5CyO8jClmKI70Zdgfb3Eeib_ub34GHdAtNeg6pK0gQf1hYx_KXYCsINWMmEsv5VWVCUEktW5avsjEUTg8lxic8?key=DxzDdKOJj67CHHVStJNPXA" alt=""><figcaption></figcaption></figure>

* While viewing student transactions, click the **Exam Permits** button
* Select the grading period for the permit
* Click **Issue Permit** to finalize

<figure><img src="https://lh7-rt.googleusercontent.com/docsz/AD_4nXcefoZg-OCrWPFgnhAfmR3dA52GYTmItg_YIsb-EiKERswKFDrz9O_SbUsFO7lh0CkW7hxLwoP1zuew8ZDMkwspKRZ9zsTCT_GIduq1ikdHTTNsBM_Z-cb7k8BtJSUYpohhx2a5e9JKX0behagm4F8ehMs?key=DxzDdKOJj67CHHVStJNPXA" alt=""><figcaption></figcaption></figure>

### Record a New Payment

* While viewing student transactions, click **New Payment** located at the upper-right corner

<figure><img src="https://lh7-rt.googleusercontent.com/docsz/AD_4nXekavtz4GEOC3oZ6ZeFcyJ5cFy1hptikKKVHTTiLw7ahCH9mfIiBbFUAVI-GCIjqLlahpYG5mtk3JtiHJi1m0IrFEx9-AMwfl1DhPRFJ9us0QrFg9HaxZ52k-yzj0PqCtSb0IC8Jt6qJ5Y9dW3ozTfrRpfv?key=DxzDdKOJj67CHHVStJNPXA" alt=""><figcaption></figcaption></figure>

* Fill in the required payment details and any remarks

<figure><img src="https://lh7-rt.googleusercontent.com/docsz/AD_4nXdirlvIogCuTv502wu3S8PHX6_8uL_FqoQsXRPh-jW3bWMMMq_7Hw9GbfSQmg-Qjr7yYCd7zfaTc12tLhWWd5f08cWiVCAp5ixokAZ636WfyUUg1DGAwY1Cx-OtHo-K4Gw-hgcxEbzzSIFOdJP1KRDrFqXy?key=DxzDdKOJj67CHHVStJNPXA" alt=""><figcaption></figcaption></figure>

* Click **Record Payment** to save the transaction

### Record a Refund

* While viewing student transactions, click **Refund** located in the upper-right corner

<figure><img src="https://lh7-rt.googleusercontent.com/docsz/AD_4nXcjzd20GpBDC0eJp8vwPIKqc4EgUj2Rk9jr15jOQbi8pVn95V0QGf7mtuZSyhVa_0LQE6VDiLvLB4-SRXEyAYGWVL38QauqMTKOTx4jCf9u9ckcfHHhAng3-193kQNH-DTPaDmfeMc-mzrpDp708ad_ixL3?key=DxzDdKOJj67CHHVStJNPXA" alt=""><figcaption></figcaption></figure>

* Enter the necessary refund details

<figure><img src="https://lh7-rt.googleusercontent.com/docsz/AD_4nXfh0vgMxgD1Up559HAqdPSlmv1W3Av3BSTmf4O4PIWFd_ocXa2k9afuxWwxH-1kDKEIxFxek9zK78cVkYCu1EJnBTxs-dxEJ780WjiYiAgBAm0ZXkbJ9kkACaTMXnyFLCEnblv_A8KAO3u_Zb1hBlo2u53T?key=DxzDdKOJj67CHHVStJNPXA" alt=""><figcaption></figcaption></figure>

* Click **Add Refund** to process the refund

### View Payment Details

To see more details about a payment, click the **Details** button next to the transaction

<figure><img src="https://lh7-rt.googleusercontent.com/docsz/AD_4nXfyTd3UJ_n3MWQseae5pBq8V5oz68myHdXDwIieoYxw0HlUpU2xHASWqbmGeKVmwKdgJEL5TDLBgVLez0MbiRBvVPi9pwn2WPClLiAa5itCArlGU_DUSVGWUT6ndaNYt0liKOiraL7D0Vlabh4nhtJ_F6BZ?key=DxzDdKOJj67CHHVStJNPXA" alt=""><figcaption></figcaption></figure>

<figure><img src="https://lh7-rt.googleusercontent.com/docsz/AD_4nXcYiygix9ICldMaAHY_0y6ZiwiCLbo9V7TH7wIbphzUz6I8AcOktbvbqemZ3dbIQLV_ieWGr5D_Y293OkVkBoAeddMM0MeoAbE7_-FPzgxkkS4s6BUexZoOtCUabKMOVUJchmM-nqlWBK0_KJ6UI6HFpA-G?key=DxzDdKOJj67CHHVStJNPXA" alt=""><figcaption></figcaption></figure>

### Cancel a Payment

* Locate the payment to be canceled
* Click **Cancel** at the end of its row

<figure><img src="https://lh7-rt.googleusercontent.com/docsz/AD_4nXefq7zwuoNhamTjMp3hvpAoQF9ScjA_qjSE6HMb-BLU4f9wfNuPWyrKgCk2_h7Jg9i9ey6ppoyvGGAZVGv5hhtBf1D3V-pI0V6yqDl_MQPHOkya28R3CgfyzQntpLIFgtzBoTlPBCRrGAX9NKtpdDvZ65KU?key=DxzDdKOJj67CHHVStJNPXA" alt=""><figcaption></figcaption></figure>

* Fill in the cancellation details and confirm

<figure><img src="https://lh7-rt.googleusercontent.com/docsz/AD_4nXdg5Src_407eSF-NBvwQOoe3VuqweorQbmdcZRtM9FYLa0I9PL5CrVbADGp3YTREn-Fupv_juW2-zsclBR8dlApUcXYcCt93WvorwLGBYNYsxTLXUqWulRgBJDaIAgDXf132HnD4p0N2d8b7fW2TVhuHeE?key=DxzDdKOJj67CHHVStJNPXA" alt=""><figcaption></figcaption></figure>

**Note:**

<figure><img src="https://lh7-rt.googleusercontent.com/docsz/AD_4nXc7ZE3jFUvAFup66APbVi6WUfI1Cxla0vtIeAw2rv_8QPtA1fZi5E9x-Qe1DqRZssSeUF521A7vY9vhYT8uI9r8ipa2ZjLnTnUhgEoPlix05PRr6s3B7CnSmUim07oDywdWg75yJg?key=DxzDdKOJj67CHHVStJNPXA" alt=""><figcaption></figcaption></figure>

If all payments are canceled and the total amount equals zero, you will have the option to:

* **Keep the student's enlistment and enrollment status** – The student remains enrolled
* **Cancel the student's enlistment** – The student will no longer be enrolled in their courses

## View Term Ledger

* Click **View Ledger** under the school year and term

<figure><img src="https://lh7-rt.googleusercontent.com/docsz/AD_4nXeRpv-VBFejEnPccBdAjhe5Jq_jIe4vm4IQvhGzi1JPgedQpk16faU-u9VxOtM9AVR884J5ezuHxR6E8HXt8mb3UKzJHQE2Ihu_cEiZW7T7QWX_MeRDGbFxQN55YLGTiDakBC1LQ1CfBt7-u3V9ykhTW0Jv?key=DxzDdKOJj67CHHVStJNPXA" alt=""><figcaption></figcaption></figure>

* A detailed breakdown of the student’s transactions will be displayed

<figure><img src="https://lh7-rt.googleusercontent.com/docsz/AD_4nXek3hZCiG-XfFLtLbxzyjCdNVxQ70NMN6UjZgm69eG8k7TiXoXb5b73XD-OfoV03_xqxBpQB06DKs6Z9MVzP6shBu43JBuprRmt2JQSEcxasP6iE284nKP3J6Ns310hCFoPBWVMz105eM1UBcD4RAK4CBM?key=DxzDdKOJj67CHHVStJNPXA" alt=""><figcaption></figcaption></figure>

## Handle Overpayments

If a balance appears in parentheses, it indicates an **overpayment** for that school year. This overpayment can be transferred to another term or used for other fees.

{% hint style="info" %}
Once an overpayment is transferred, further payment cancellations and refunds for that term will no longer be allowed.
{% endhint %}

#### Transferring Overpayments

* Click on the balance (in parentheses)

<figure><img src="https://lh7-rt.googleusercontent.com/docsz/AD_4nXdDbv5lExERy4_QwtvFzVVrYRwE3e_ngfQM79uMYAJ_2Necs6nQV2Abd_DINp5JzkppceNNlG_9yWOIPe_yBdiB5_coKbRMGrtW1jj-5OiLfZDwzUGub_5_7KBEfoctRoa6WUuT?key=DxzDdKOJj67CHHVStJNPXA" alt=""><figcaption></figcaption></figure>

* Select the term or fee where the overpayment should be applied

<figure><img src="https://lh7-rt.googleusercontent.com/docsz/AD_4nXfm_bHPnM1_8g-E3OjIkE00t8sHej0L39ABgSiMolCX8K2TknEEz3Pcu94aBjaQTd71dBpbIoKNMV7nQKPxQ3YpYDTcDLFKtQQro9ocHWx4uNKxb4g4MlqL1CIXzTaDoCpnsX5vkw?key=DxzDdKOJj67CHHVStJNPXA" alt=""><figcaption></figcaption></figure>

* Click **Transfer** to finalize

{% hint style="info" %}
Once transferred, the amount will no longer appear as a transaction for the original school year but will be reflected as a deduction.
{% endhint %}

## Manage Other Fees

<figure><img src="https://lh7-rt.googleusercontent.com/docsz/AD_4nXeqpFCKSA5Tx6oSZWIe9YRD487ZxCHFYbwTanln2pYvh56aeClWae9Ajz0C2kYACWt60Y9h6AjzLgMjc8PbSr7dOYIenKqN6YeaWEj-OiU625k2nJ5msK2a1iYzLM6_pV0kU9FJgLBaXjJ4FLsvKx8UleVr?key=DxzDdKOJj67CHHVStJNPXA" alt=""><figcaption></figcaption></figure>

* If a student is assigned to pay **Other Fees**, a section for **Other Fees** will appear in their **Summaries** panel
* Click **View Other Fees** to see a detailed list of assigned fees

## View and Manage Assessments

### View an Assessment

<figure><img src="https://lh7-rt.googleusercontent.com/docsz/AD_4nXed_c13k-SWfHI82OTnzhvhqlRGidzfayum7AVE2mXULsjecIt9aJgD6JCoq3mdbQHshWghqocdc3Ua8A93PG6S9IdIp7xeUs6JGn3OVBVGv_BUp-KolMZU0UOJbn9ATZwjHFJWZLWxEmcBYK_7-L4HcFnw?key=DxzDdKOJj67CHHVStJNPXA" alt=""><figcaption></figcaption></figure>

* Search for a student
* Click **View Assessment** under the desired term
* A complete breakdown of fees will be displayed, including:
  * Enlisted courses
  * Miscellaneous fees
  * Other fees
  * Penalties
  * Discounts
  * Payment scheme chosen by the student

### Add a Discount

* While viewing an assessment, click **Discounts** at the upper-right corner

<figure><img src="https://lh7-rt.googleusercontent.com/docsz/AD_4nXetoWT-1WdzAK33nBiX5NPLmYLK6Y2iYuAS8LzOs-3o4Q9Xd2qMivmyb0U6A4uPhWs7Qdw0I3xfc3Z-JG7U2nUWLU-dbBjPHfjqj_PvM4jjuQMzbaN_q_PZBvaLaPS5xykazO43zhyWLFp9vA7Qo1U2Oejf?key=DxzDdKOJj67CHHVStJNPXA" alt=""><figcaption></figcaption></figure>

* Select a discount from the dropdown list (these are predefined in Finance Setup)

<figure><img src="https://lh7-rt.googleusercontent.com/docsz/AD_4nXfNYT85VKHif-AvIO0YBvIu6Smc4QbM3w0roniWgc8RLTQ6PE2EyC3uBp8aDhAH-ppFPTm-KZbA78bBOi8hGvWzJDpGcQnN2mITNnWMoYmzllOMv7xwx2u9EBRfdq-iEN1Vm4G7Q-sAH7IMe2En9kDmSaTl?key=DxzDdKOJj67CHHVStJNPXA" alt=""><figcaption></figcaption></figure>

* Click **Add Discount** to apply it
* The discount will appear under Deductions/Additions

### Add a Penalty

* While viewing an assessment, click **Penalties** located in the upper-right corner

<figure><img src="https://lh7-rt.googleusercontent.com/docsz/AD_4nXc1mgS-YRJPKWrud_mafmq-Eon6V2em_9GMsrZAg28gb_Ia9TDvbNGzgBXYbr4-pI_pmxx4YOVCy3jiyFin1nz51Wwwv5qyhcaj8C4ztpv1UCPc_E4VG79ilFgY6moqBsgg8pvORXiqbPOTRi3MLAfU3MeO?key=DxzDdKOJj67CHHVStJNPXA" alt=""><figcaption></figcaption></figure>

* Select a penalty from the dropdown list (these are predefined in Finance Setup)

<figure><img src="https://lh7-rt.googleusercontent.com/docsz/AD_4nXdJ9LffDPhxt1dXwqRTOtisHMnD3bX5Si3wu_a64og7xDb_WsuECSuCdEyaYuXfpEgP_Fy4d9fe13khRIXFcko-PLT6IgxdB__bOc73KJYdnrVwS1VZeIct4B6cxqqVvpi9JsIktdXmjJY-TBcmyCDt41NK?key=DxzDdKOJj67CHHVStJNPXA" alt=""><figcaption></figcaption></figure>

* Click **Add Penalty** to apply it
* The penalty will be reflected under **Deductions/Additions**

### Download an Assessment

While viewing an assessment, you can download the student's assessment for the selected term.

<figure><img src="https://lh7-rt.googleusercontent.com/docsz/AD_4nXcVjS7KGlK26715TSx9Eiic38Dkk3oH7mE_4XbaFjI-uWXKxedy4M9l53RdZx0LL4wtLIvXernzynn_1O0vUOlyDYvqK29SB9EThaJHH6fF-gxg1Fz1PjP-RtKI2YeIdy6JYHJ4Dw468T-JaswYST_W7TU7?key=DxzDdKOJj67CHHVStJNPXA" alt=""><figcaption></figcaption></figure>

## Frequently Asked Questions (FAQs)

**Question:** Why can’t I refund a student’s overpayment amount?

**Answer:** Refunds can only be processed within the **Total Payments** amount. If the refund amount exceeds the total payments made, the system will not allow the transaction.

***

**Question:** How can I re-enroll a student after canceling their enlistment?

**Answer:**&#x20;

* Go to **Finance > Payments > (Student Name) > View Transactions**.
* Click **Add Payment**.
* Enter **0** as the amount and check the box **Mark as Enrolled**.

***

**Question:** Why don’t I see a "Cancel" button for a transaction?

**Answer:** If an **overpayment transfer** has been made for that term, transactions within that term can no longer be canceled or refunded. This is because the overpayment amount is derived from all previous transactions.


# SOA Manager

Last updated: March 2025

The **SOA Manager** allows you to **view, generate, download, and send** students' **Statements of Account (SOA)**. You can generate SOAs in bulk or for individual students.

## Access and Navigation

The **SOA Manager** can be found under **Finance**.

<figure><img src="https://lh7-rt.googleusercontent.com/docsz/AD_4nXf2HuEyPzFAEntY7gv9H7nsD0NZUqnZPro2Ld49e8UENkBZwVstFmXElhOMhkykvrjqj6XqK5X-vnx3qdtFJcCd_2fR3VGJQMnldG3bF5S1Z6cx1cYLvqxQ0LonOJOuUaa_Gs41FqWy1j8g5wJDt1bxoEgm?key=pXre46LEy2mgXwC6eEc0ZA" alt=""><figcaption></figcaption></figure>

Check the privilege assigned to your user account or role if you cannot view a link from the list.

{% hint style="danger" %}
Contact your school’s system administrator to request view or edit access if you cannot access the rights management screen.
{% endhint %}

## Generate Statement of Account

* Select the **term** and **payment scheme** for which you want to generate SOAs

<figure><img src="https://lh7-rt.googleusercontent.com/docsz/AD_4nXdkT-GS6gI_G_z-UX7KSTR9k1iU5YnQpH_Klp-TBEQCv69woa67IBoy4cft8G3hwMF23zwY0Ttseo_FqyhExWHsL1WSUKei3WltLMpqyesQ2eSfnBXOYavjL7tnOwQn4HtNXalvLLAR3DmJEA51TnoayMNv?key=pXre46LEy2mgXwC6eEc0ZA" alt=""><figcaption></figcaption></figure>

* Click the **Generate (refresh) button** next to the due date
* Choose one of the following options:
  * **Officially Enrolled Students** – Includes only students who have been tagged as officially enrolled when recording payments
  * **All Students with Active Assessments** – Includes both **enrolled and enlisted students** who have an active assessment

<figure><img src="https://lh7-rt.googleusercontent.com/docsz/AD_4nXfiUVELpoQoizk9dRhOCkfWX0pNRGUY8JqciJTqctz9RAn9pUpSCJFwxBv2iLhDcSbGYb3mdMpVdSNjxiCDWLjDoCihYntW03ZQanVX4D0rno-PkJOFcz6WEZmXPnj4DBkoiGFYoLAffwcQNNPfNjkUymw?key=pXre46LEy2mgXwC6eEc0ZA" alt=""><figcaption></figcaption></figure>

* Click **Generate** to proceed

{% hint style="warning" %}

* Ensure that all students have selected a **payment scheme**. The SOA Manager **cannot generate** SOAs if at least one student is missing a payment scheme.
* Once generated, you will see all SOAs for the selected term and payment scheme.
  {% endhint %}

## Download Statement of Account

<figure><img src="https://lh7-rt.googleusercontent.com/docsz/AD_4nXdD_OVM1iPhnuDG3cCb-52EWYeI0j5m3_9OoWzAnqva6PexE2SbA8zi4QlINo-asU5gxk6XFS2YlzSUU_ycVj2vjkajlEAi4AOIEMrEqqd_vXYht8EANzqcKw26MWudmUNHh80LBQyD0LLJ1wLm8NNVYELS?key=pXre46LEy2mgXwC6eEc0ZA" alt=""><figcaption></figcaption></figure>

* **For an individual student**: Locate the student and click the **Download** button on the right
* **For all students in the selected term and payment scheme**: Click the **Download** button next to the search bar

## Send Statement of Account

<figure><img src="https://lh7-rt.googleusercontent.com/docsz/AD_4nXerhVuAG-mUZqv_DA0GNLxUpIUSXWHKFNRKMLzwuTSEslBJ_1ELZ0Yk2PGSPEPeuAtPI5GeGK05lT9_RVJPEFPtmpGfsjQzupZA8_lkH_jYo-ybEwZpHydPkXzqZ5x6jXOJO1cOiP_tKJHkdHeUTJt-pfBk?key=pXre46LEy2mgXwC6eEc0ZA" alt=""><figcaption></figcaption></figure>

* **For an individual student**: Locate the student and click the **Send SOA** button on the right
* **For all students in the selected term and payment scheme**: Click the **Send SOA** button next to the search bar


# SOA Preview Manager

Last updated: March 2025

The **SOA Preview Manager** allows you to **generate, review, and send** a preview of the **Statement of Account (SOA)** to students. This gives them an estimated amount they may need to pay for the upcoming term's enrollment.

## Access and Navigation

The **SOA Preview Manager** can be found under **Finance**.

<figure><img src="https://lh7-rt.googleusercontent.com/docsz/AD_4nXeHg5OKaNZZ47hzl9Y0suXn2g4TJns2GtzH_7RVf5Nktu4VPfhMPsUv1OwnTgJEqksJpPbiKRuQQVvexDXse3peJCrPfmqqgSr8F4lIhNGc8Acy3Nve-jpm6Imq0blN6pWSw0KOXieekN3yhYwgz3306QU?key=72s8aPYkqkCLimfWCsvPvg" alt=""><figcaption></figcaption></figure>

Check the privilege assigned to your user account or role if you cannot view a link from the list.

{% hint style="danger" %}
Contact your school’s system administrator to request view or edit access if you cannot access the rights management screen.
{% endhint %}

## Generate SOA Preview Documents

### Before Generating the SOA Preview

Ensure that the following have already been set up and generated:

* **Payment Schemes** for the upcoming term
* **Tuition Plans**
* **Class Demand**
* **Preview SOA Instructions**

### Steps to Generate the SOA Preview

* Click the **Generate SOA Preview** button in the upper-right corner of the screen

<figure><img src="https://lh7-rt.googleusercontent.com/docsz/AD_4nXehmEHlFvq6Wj-fgvmfR-5P3oTfvuGk-Q6L_WLlJ7DtEQoreysPb3paB7750sr_4p93JR3a_cptw22X63kJV3KzaMTmkdydm1ybmDtrNY1WkdoAB0tF1suCw_y6A30euUef-oBiQPrt6RBb67CZNkFs9EE?key=72s8aPYkqkCLimfWCsvPvg" alt=""><figcaption></figcaption></figure>

* A pop-up window will appear, prompting you to **select a Class Demand** as the basis for the SOA Preview

<figure><img src="https://lh7-rt.googleusercontent.com/docsz/AD_4nXcrXI6HkBzM3kvXFojmTC6zGmbEWckvwT9rIgkOLOKCoOQjKZ5XTp4vljGwsOBkfx4kTrAiRptOqxwhdTcmtnMfSYBJqEUjFC_1SlPxtz7GEOd7WFkwAbnaD02FIL-btAdVSK7L2MZlPWQxRIIpZNqfcLk?key=72s8aPYkqkCLimfWCsvPvg" alt=""><figcaption></figcaption></figure>

* Click **Generate** to proceed

{% hint style="info" %}
You can generate the SOA Preview multiple times as needed. However, **previously generated versions will be overwritten** and will no longer be accessible.
{% endhint %}

## View the SOA Preview Summary

* Once the SOA Previews have been generated, click the **View Details** link in the upper-left corner of the screen

<figure><img src="https://lh7-rt.googleusercontent.com/docsz/AD_4nXeG-756c54sf7m1wZMVeY2EEvAHAo6b46dW7-sHm1Ft220d-RnA25Lv7pNNOjOVdAzmqkqjLPrylCxA8VfMPGJjv7ZGWYFe83R5Bfrq0w_ztChI9qOZMrva_EI4485nmUYnO2R_zXC_j_5TCdNlQ0GMbP1k?key=72s8aPYkqkCLimfWCsvPvg" alt=""><figcaption></figcaption></figure>

* A pop-up window will appear, displaying a summary of the generated SOA Previews

<figure><img src="https://lh7-rt.googleusercontent.com/docsz/AD_4nXe0hDheAxuExpVpeW8jyngtl1TsoAeeFcJCjQO9GxzzZVqzTCnERN_KRSgVXmRsM0Afj7LP_doqLycaDGLwbGoxE7w1bDROM0Pzv7gOWctCpXbQPm39xZ3MrhfbmTqHvAI1XZ_tfamQnE72MqfIkP1MuKvj?key=72s8aPYkqkCLimfWCsvPvg" alt=""><figcaption></figcaption></figure>

#### Summary Information Includes:

* **Name** – Student’s name
* **Program** – Student’s academic program
* **Units** – The projected number of units the student is expected to enroll in for the upcoming term (based on the selected Class Demand)
* **Amount** – The estimated total amount the student will need to pay (based on the selected Class Demand, Tuition Plans, and Payment Schemes)
* **Download** – Allows administrators to **download and review** SOA Previews before sending them to students

## Send the SOA Preview to Students

To send SOA Previews to **all students**, click the **"Send SOA"** button located next to the search bar.

<figure><img src="https://lh7-rt.googleusercontent.com/docsz/AD_4nXcR8U2WXQYvOKaMJJ4xxzG5ddF2bEFLS_2MANy-QT3x3k1FN5ijQpQY5JKI6beKCAfqudjwn9hJBGl1ILs0gc4rJFXUKpEAXayNGeptsAY0niiXJJ6DPFm23QfHSwSJY7019hASEoP-5pucpNnwXJUyHYv6?key=72s8aPYkqkCLimfWCsvPvg" alt=""><figcaption></figcaption></figure>


# Reconciliation

Last updated: March 2025

The **Reconciliation** feature allows you to **manage your school's bank accounts** and track their transactions efficiently.

## Access and Navigation

The **Reconciliation** page is located under **Finance**.

<figure><img src="https://lh7-rt.googleusercontent.com/docsz/AD_4nXeJ4XeM0A95uwLwT_xSVqJTh8nEPV_7K9CrUOdkjjbvBCIxvtWhRfzAQOckjjib5CTdS3Dt-kGQLT8xtsJRGuqFr9vtfOCdKSMoImi8Q_w5fU0KNUv1-3fONEyWcoQ-_U17upnxy-A4a1DpMyPO48f3ILCU?key=Mujyqbm6XQY49l9CKxic7A" alt=""><figcaption></figcaption></figure>

Check the privilege assigned to your user account or role if you cannot view a link from the list.

{% hint style="danger" %}
Contact your school’s system administrator to request view or edit access if you cannot access the rights management screen
{% endhint %}

## Manage Bank Accounts

### Add a Bank Account

* Click the **three-dot menu** at the top of the **"Accounts"** section

<figure><img src="https://lh7-rt.googleusercontent.com/docsz/AD_4nXdNoUIulC8hjLV4b_WYf8XGdwwuhHlC1-_-Bc2vTSxq-OTwd2g7zWZzAReL32vjifO4gF3nc9FZ09IWK77kEBU_Wv8Wl-7l49Xl9KUAJngBghNU0_R084q_fo1UBHX0fjxt-0OLNNOpN2eV5ZblUKULJzf-?key=Mujyqbm6XQY49l9CKxic7A" alt=""><figcaption></figcaption></figure>

* Select **+ Add Bank Account** from the dropdown menu
* Fill in the required details in the pop-up form

<figure><img src="https://lh7-rt.googleusercontent.com/docsz/AD_4nXdZkxPeSfvJvr8LeM1PaUb3lgPuahMAGVTljsroluWKMG9PeEwktnKhKWVPJnUhMSkQ7_lZbksBWp4CIOqq_07AWGnhhhS3hvkjsaU32PGcVFosbe1KLBZJTThzkG_J1VU69hD1bXPNZONt4ATcmtMRVsw?key=Mujyqbm6XQY49l9CKxic7A" alt=""><figcaption></figcaption></figure>

* Click **Add Bank Account t**o save the account

### Edit Account Information

* Locate the bank account you want to edit
* Click the **three-dot menu** next to it and select **"Edit Info"**

<figure><img src="https://lh7-rt.googleusercontent.com/docsz/AD_4nXdOyLPpIgjJTOT656NwEoCbECJ4PmPabfJ3O-zYi4ieB3XjkU1wTTVvlYt7ozM9Ciws6E3312iWBnmwkZqXEcIS-gYVfWQQe_farBiOGBc79plNyvZGyAI04QRL0TrCWuwajecqE-k66gmwhuZRaqX1NWPR?key=Mujyqbm6XQY49l9CKxic7A" alt=""><figcaption></figcaption></figure>

* Make the necessary changes

<figure><img src="https://lh7-rt.googleusercontent.com/docsz/AD_4nXeFFPld52AJ9on61MJY8MhJ-wcn8bGjqcYUaTQeVww-YS5U-x27o7poxPMOWqq0g2W1LQK9iQvkfnVhv8fY8oytMW6mpfnhXBOvZGnsds7UjEiYC6fSZWpNSTiRpy3y9FOXGKVnIxykhmLZ7LbbqpILMcA?key=Mujyqbm6XQY49l9CKxic7A" alt=""><figcaption></figcaption></figure>

* Click **Save** to apply the updates

## Record Transactions

### Record a Debit Transaction

* Select the bank account where the debit transaction will be recorded
* Click the **three-dot menu** next to the account and select **"Debit"**

<figure><img src="https://lh7-rt.googleusercontent.com/docsz/AD_4nXfneGMr3-C5brykeDJqWJkkninvHQgnBoHTQRINrUIT4eY-198HO2Og0btfXRT-gRxWfgTOfb38X7hk1V97qwgcSHF-vjXB5W39FDQhjlHQ7ybOFMp5sDhPPpM47GXIwTHTtsO-L6rOn6lDxgI1TJdne7N2?key=Mujyqbm6XQY49l9CKxic7A" alt=""><figcaption></figcaption></figure>

* Enter the amount to be debited in the pop-up form

<figure><img src="https://lh7-rt.googleusercontent.com/docsz/AD_4nXeWtgdCWdveH8lyvFVGiIcalto44QiCpa4VtvXsaxvMxCAxhTHRrr_2Op8Z08mF1aSSj8qloA9t2sP7_dN2zrdZJrzGX4gYOPOcRAJ_N7mHqjAan5DOQulAosIIJswB6eC8YjFSkPQOHfg5jeX9ALriCaF8?key=Mujyqbm6XQY49l9CKxic7A" alt=""><figcaption></figcaption></figure>

* Click **Debit Amount** to confirm

### Record a Credit Transaction

* Select the bank account where the credit transaction will be recorded
* Click the **three-dot menu** next to the account and select **"Credit"**

<figure><img src="https://lh7-rt.googleusercontent.com/docsz/AD_4nXc5iUQvemN7Xj8kjLSXBVAMMmCELRQeWeZaYSrLNWvQU_-uGqzQTKRXuP_yntnq4PSKps9avJ9AfuxCGQiFqwXLi5kmyLK0rve5-Zwhz3D12wdzgZLvJs3JxZD6OcZggrbaWd2-M5dMkaywY6NxXNPqSBU?key=Mujyqbm6XQY49l9CKxic7A" alt=""><figcaption></figcaption></figure>

* Enter the amount to be credited in the pop-up form

<figure><img src="https://lh7-rt.googleusercontent.com/docsz/AD_4nXdMeg-phHMkgL0SiCx57vFV9kV-KYps1A63lCp48S3oLlVC288tytzbCNzY4QVJz-uh3xRp7xR-Q6OGNj3xO-rQdCbgTI-MKU_1I7WMQbq8q2Iu7SD5eeAz9dMUDr-DWTVez7tFUxScYOTmT00x338pK_Pj?key=Mujyqbm6XQY49l9CKxic7A" alt=""><figcaption></figcaption></figure>

* Click **Credit Amount** to confirm

### Transfer Amounts Between Bank Accounts

{% hint style="warning" %}
This requires at least **two bank accounts** recorded in the system.
{% endhint %}

* Select the **bank account** from which the amount will be transferred
* Click the **three-dot menu** and select **"Transfer"**

<figure><img src="https://lh7-rt.googleusercontent.com/docsz/AD_4nXeMr6sGNMf0ld5Uyon71zgneQLHjKPDlRMXtkpPR_aaSXNpQ_gMgd6Yz8O-zNZ0DFzIinJfA5q81QrmdgXEHlpzcqQNQ0oc8-3CHWnvBJ79FWNTphF0ZREDgqeZQpU2_6XHcEBtMnW_X5PdKiiSUIwYNIfu?key=Mujyqbm6XQY49l9CKxic7A" alt=""><figcaption></figcaption></figure>

* Enter the **amount to be transferred** and choose the **destination account**

<figure><img src="https://lh7-rt.googleusercontent.com/docsz/AD_4nXfDrjngnVg94OMW0lo2MPIifah4-27wwe63iEGJlCV1lsnnMFEua1CQTMGZ7HYwVsuZFEO7TGPz3Rmfomi8ZDPdDnaZemryiUX6i79Sl-j42f8S6fbmW3NOt4Lw37vyjIOWctlHFIfqSIomii9UrvdLYslO?key=Mujyqbm6XQY49l9CKxic7A" alt=""><figcaption></figcaption></figure>

* Click **Transfer Amount** to complete the transaction

## View and Manage Transactions

### View Transactions

<figure><img src="https://lh7-rt.googleusercontent.com/docsz/AD_4nXe03wUvW88c6RPDX26HzteLdhAjo_QXl2KTeWPTVjT8_cChXzGiHAj0v-1SZ6LMJN-IxoXkmGnBvuNrYEY5yP9_YvMd2dSZPX5HM7BKjja8N60vCbpEOifHB4lD94d1Bgyzp8OsUqNxTr0lLSj8FlKG2xs?key=Mujyqbm6XQY49l9CKxic7A" alt=""><figcaption></figcaption></figure>

* Select the **bank account** you want to review
* Click the **View Transactions** button
* A list of all transactions recorded for that account will be displayed

### Filter Transactions

<figure><img src="https://lh7-rt.googleusercontent.com/docsz/AD_4nXfR5sYY6RANRMZ44BH8P0-LJpmFsOmRnF_n9uJLu5mBTYiglARsi4nbmZ7Khbsje27LQqzM8TCKqDEDXGlWtSznR_5QwMPeOVPI3DbbKGwzi5-dYSUs4cfk1-A9dAFunvNsKkXEsGWbYk8OSGrlLCVS7_UN?key=Mujyqbm6XQY49l9CKxic7A" alt=""><figcaption></figcaption></figure>

* While viewing transactions, click the **Filter** button in the upper-right corner
* In the pop-up form, choose the **transaction types** you want to filter

<figure><img src="https://lh7-rt.googleusercontent.com/docsz/AD_4nXeP9cDm4zXfzJra88jBUqiIuzL2ERonjPeoM7Rdw-G2_Du-L58oKgMIhNqgc9ocz0SSfN-fNDUfl3MNsYTp7RLhukZ7UUCfEPDIdXxf_1UubI3hKGNLXC6tfKeT3UwqqStzdqLplDKQHWxnhm0uaE0qGgw?key=Mujyqbm6XQY49l9CKxic7A" alt=""><figcaption></figcaption></figure>

* Click **Filter Transactions** to apply the filters

### Verify Transactions

<figure><img src="https://lh7-rt.googleusercontent.com/docsz/AD_4nXeuqmfoGV2SgLVQQ1VcYvWdVapuCQUGxBzo2lbLEeM0T0RCeZx-HzWc7oMDRYpdDm7vzmZd9fAeZ4bYWKXzCLlaJUpZ2tBMpBfbTAE1aKsw0D7LO85jq2qyVfL-em-QsiF1CFOvZh55Y2NGJPH5j8sGuzCh?key=Mujyqbm6XQY49l9CKxic7A" alt=""><figcaption></figcaption></figure>

* Transactions can be marked as **verified or unverified**
* To change the status, select a transaction and click the **gray check icon** on the leftmost side of the row

### Group Transactions

* Select multiple transactions by ticking their checkboxes

<figure><img src="https://lh7-rt.googleusercontent.com/docsz/AD_4nXe-4luQGGDQa2fox7iAodoqAFj8Yq27W_e_6yjRjzejmin_e5pe3k-KFxASKyBVyyA7lj08PTVKdzo4__h2dfi-Uq2zor5UJ4UOOmxYNvgHvRxBgEqcLsjyY0r38rlPtSAAjoQM_Q?key=Mujyqbm6XQY49l9CKxic7A" alt=""><figcaption></figcaption></figure>

* Right-click the selected transactions and choose **Group**
* To view all grouped transactions, click the **Group Transactions** tab

<figure><img src="https://lh7-rt.googleusercontent.com/docsz/AD_4nXcNT4X_Sw4z_oB8zjc4qf2L-GT6bcsqm-T5gY1ouOgPA5_uVmfRK1isbDGnVwEXNYgy8SLiY3E7fKd1pk6sGi04wtwl7tfrbHwZwT5Enf4iM8xitw5m0S6_UO5Pf2zhW6g1csa3?key=Mujyqbm6XQY49l9CKxic7A" alt=""><figcaption></figcaption></figure>


# Users

**Edusuite UNI** provides a robust and user-friendly **User Management** system designed to cater to the needs of higher educational institutions. This feature ensures seamless setup and management of various users, including administrators, faculty members and students.

{% content-ref url="/pages/-M62vB2yVf587a0HffnF" %}
[User Setup](/product-guide-uni/admin-home/users/user-setup)
{% endcontent-ref %}

{% content-ref url="/pages/-M62vFbclHWGPpI9rg3G" %}
[Students](/product-guide-uni/admin-home/users/students)
{% endcontent-ref %}

{% content-ref url="/pages/-M62vG1ZCHhMIQPIIAbk" %}
[Faculty](/product-guide-uni/admin-home/users/faculty)
{% endcontent-ref %}


# User Setup

{% content-ref url="/pages/-M6315LtSLPzX5eguo-Y" %}
[User Groups](/product-guide-uni/admin-home/users/user-setup/user-groups)
{% endcontent-ref %}

{% content-ref url="/pages/-M62ugNpaNUjcnrulhFy" %}
[Users](/product-guide-uni/admin-home/users)
{% endcontent-ref %}

{% content-ref url="/pages/-M6316srOYBtoDdSrz-E" %}
[User Information Fields](/product-guide-uni/admin-home/users/user-setup/user-information-fields)
{% endcontent-ref %}


# User Groups

Last updated: March 2025

It allows administrators to define the actions different user types can perform in Edusuite.

## Access and Navigation

The **User Groups** module is located under **Users** > **User Setup**.

<figure><img src="https://lh7-rt.googleusercontent.com/docsz/AD_4nXfhYVs1EW_5wYh_zASqTmyOGbz5ivEAxRTGFrLqjW-r-JG2mEZxuqdyQHdrNCs_VcLaRFZT2Z_am9e4B0vV0YWbITviyHGEERF-RqXWtIujKGEuQF7HVNu5nirAIjXfOItHSxeLQ5kPFFYkBFtlc7S8HB0?key=rICIFfLc8tVy71wD2Nf9pw" alt=""><figcaption></figcaption></figure>

Check the privilege assigned to your user account or role if you cannot view a link from the list.

{% hint style="danger" %}
Contact your school’s system administrator to request view or edit access if you cannot access the rights management screen
{% endhint %}

## Add a New User Group

* Click **New Group** in the upper-right corner of the page

<figure><img src="https://lh7-rt.googleusercontent.com/docsz/AD_4nXeHdwqx-xJMgTxCWE6hDUAh4YFgcOjYI9SmZUXfrEbusMqgJ3udpDT9zh_j7OWtINLDP3bgaPOI6Tc7zcM81XjpyVd7sNaSH7qvjEXqokrBqnuIErSRIfg4Dxb3vC8qp_cHSBon5Es-DCAPSQB8Ycynhd3s?key=rICIFfLc8tVy71wD2Nf9pw" alt=""><figcaption></figcaption></figure>

* In the pop-up window, enter the group name and select a profile type (e.g., Teacher, Student, or Others) from the dropdown menu

<figure><img src="https://lh7-rt.googleusercontent.com/docsz/AD_4nXePWxoLcGGc9bkwMq6cL7vUQIfCzH46_ewHNXsQTOoxx_Q9Yp9u_3MPjfa1M0zrI9g7jfN1vgH3yphE7eK5j-H92RDTan1tcZhKlR7eAHpxrSlDPCOlJs7oWNrRsHOQhbyq_dp4qzVRDiZfvNW6E26pttRd?key=rICIFfLc8tVy71wD2Nf9pw" alt=""><figcaption></figcaption></figure>

* Click **Add User Group** to save

{% hint style="info" %}
Profile types adjust backend settings accordingly for each group
{% endhint %}

|      User Group      | Profile Type |
| :------------------: | :----------: |
|        Student       |    Student   |
|        Faculty       |    Teacher   |
|       Registrar      |    Others    |
|        Cashier       |    Others    |
| Academic Coordinator |    Others    |
|       Guidance       |    Others    |

## Edit a User Group

* Click the **Pencil** icon next to the group

<figure><img src="https://lh7-rt.googleusercontent.com/docsz/AD_4nXdpBDxoJzmX7rqK873eVYgxT3vVM6Y6IrrQc-4aY1Y9fHIHFLDATc-mLEEpJamIaJQxQnWKwOB2KIOs5KSSuW0Alw4DOPNs5rwZUAIQsQSfAAIeWwKMk73EokiV-eearneNU6-FBBQ82J5TMfHlCVM8six2?key=rICIFfLc8tVy71wD2Nf9pw" alt=""><figcaption></figcaption></figure>

* Modify the details and access settings

<figure><img src="https://lh7-rt.googleusercontent.com/docsz/AD_4nXfSgDTagPMvuhnDwqaYNOtQm_H6DT_kJgVT35Q3_5aqSnU7fxm5TYJ3pxy9IimNnDkwO5UJ1p8fIquo3pCaQjadLXHeLOuwPnmEjmmzPpCI1-wGCjfjqlbsD5GGq4avI8XPmj1l4ybCGLQ8O2bvFkfMp17S?key=rICIFfLc8tVy71wD2Nf9pw" alt=""><figcaption></figcaption></figure>

* Click **Save**

## Assign Privileges

* After creating user groups, assign privileges by selecting checkboxes to grant **View** or **Edit** access to screens
* Edit privileges allow users to modify settings on that screen

<figure><img src="https://lh7-rt.googleusercontent.com/docsz/AD_4nXdcnYL9mQRjui3Xy-B6Momr4nndgtI3zP7mQbT-zIIojex_fsgNr4STUMMMn3CmBoz-wWaehoRFyspA6z4z5f56M0qpAh3-1vlHvmx3X0c3OyOU9mr0ALRSkZ6Oytq_TrYskt9M9K45pZETgAMmM6VNSfX-?key=rICIFfLc8tVy71wD2Nf9pw" alt=""><figcaption></figcaption></figure>

## Delete a User Group

Click the **Trash Bin** icon and confirm by selecting Delete Group

<figure><img src="https://lh7-rt.googleusercontent.com/docsz/AD_4nXdIRoDU8oN7j0dBTksvBXc7DjmpahPKihXZllGn5DJKK7hA1rBHv39fMrVSpszQG0NqQl1Xj6RvhF5X6eWkna5hP7yECY8T7UcLpbuSrfD66gCEubBVp6Ku-e_LKnuT7sNtBE-dvbcHMLY60-l1IRFYiGxd?key=rICIFfLc8tVy71wD2Nf9pw" alt=""><figcaption></figcaption></figure>

## Manage User Groups

* Rearrange: Drag the **header** left or right

<figure><img src="https://lh7-rt.googleusercontent.com/docsz/AD_4nXe9APNf4qU5evy1DLiflIz6fXAqXbpGczbB3p09Nw9t-WaqG9End95hySnSv3XXeUSDm430MokRtyeiiQPgC7teWEJ33g1mIc_p3oW5MTKMKdMII5I4_bA_nV4ujp_adWOaclTrYuJYvg-UAtMtHyWBVcZh?key=rICIFfLc8tVy71wD2Nf9pw" alt=""><figcaption></figcaption></figure>

* Search: Enter a keyword in the search bar to locate a group

<figure><img src="https://lh7-rt.googleusercontent.com/docsz/AD_4nXeN2FHR3j2qv2KSLHvqGlEXIA0CkCNulBZWIPQy1rsWHInh6Fgzs_OaKYpAi9IjlgH0KVMOWKxmgAS58of9FBgeM-0Qr97FaYaIHZwGedvsY1XoABwOwxKkB7KstTaPGEcZk5z0RCFeyTUNpK3hP-EmtYwy?key=rICIFfLc8tVy71wD2Nf9pw" alt=""><figcaption></figcaption></figure>


# Users

Last updated: March 2025

This feature manages the user activities.

## Access and Navigation

The **Users** module is under **Users** > **User Setup** > **Users**.

<figure><img src="https://lh7-rt.googleusercontent.com/docsz/AD_4nXfR0l1NWy6PV-sQSmX3ZvLcMZt5WrLNb-N6QxnyvimoSay0lLTmaRYB7sxWxxFXPFg3j6JDgO0AOzofKR6uzAIioImLv-QkZupkQ464RR0yPJjsua_-D-4LPXBgrjLc33LEjdIbNMP9j7D24PZOHEqajfs?key=rICIFfLc8tVy71wD2Nf9pw" alt=""><figcaption></figcaption></figure>

Check the privilege assigned to your user account or role if you cannot view a link from the list.

{% hint style="danger" %}
Contact your school’s system administrator to request view or edit access if you cannot access the rights management screen
{% endhint %}

## Add a New User

* Click **New User** in the upper-right corner

<figure><img src="https://lh7-rt.googleusercontent.com/docsz/AD_4nXdDiso1mUUS58UCgowaY82EZGggBSqWACrskbESFC8G5oJSu4mkq2_uY6LathQN4netZq6U7O2Le5V-SMME7VTZ3VamhMLP83R170OVHHi8HoVTcxSc0BAiJfOxTdBR3aYkjDZK8wiWsSB7-75L0QD9veY?key=rICIFfLc8tVy71wD2Nf9pw" alt=""><figcaption></figcaption></figure>

* In the pop-up window, fill in the required fields, select a role, and click **Add User**

<figure><img src="https://lh7-rt.googleusercontent.com/docsz/AD_4nXckEMkjAZJ184GlyWrt_mHR11o8NU8z8lJUUEEqTyYMh5xysgn6fGWnde6M_jwkmZwn5pCeXCftOiBocep2Dt9Os2kqAoNB2jA7Szyq65AGI4mgZtzlgcPV0nHsYw946z5g78O2OyFmqwLOBk5POqW-Vkgb?key=rICIFfLc8tVy71wD2Nf9pw" alt=""><figcaption></figcaption></figure>

<figure><img src="https://lh7-rt.googleusercontent.com/docsz/AD_4nXf7aOzUBBHUydsTZGnXSo7LXkz7admumCS32OUspkGDpA9Sm2VLcX1G70_bmLnEixVx7NPR1QUoHhWQTzM56OWq0X1nLOSe_TcaFmRSU8n3GpQ6NdksiUK_s3E-Gm_32heXfYWKZALHo8cep5D5DcSCCrY?key=rICIFfLc8tVy71wD2Nf9pw" alt=""><figcaption></figcaption></figure>

* To add users in bulk, click **Import from file**, upload a CSV file (First Name, Last Name, Email, Role), then click **Import File**

<figure><img src="https://lh7-rt.googleusercontent.com/docsz/AD_4nXdwR1ywkPP4H7hLeRcOYolJmCgzd9YaV0PDUXNQtKn-tnmOEtOyzjF0ByBk8j1pUW7C87Y3U8Kmjlobe9dowM7rKvXrRRVsyRCDRnA2LV-g9VJYoTj5VXugoGpGESuV_4zqoeGRRub-toKmY5SYVwfPhMy8?key=rICIFfLc8tVy71wD2Nf9pw" alt=""><figcaption></figcaption></figure>

## Manage Users

* **Download User List**: Click the download button to export users as a .xlsx file

<figure><img src="https://lh7-rt.googleusercontent.com/docsz/AD_4nXc1-J4cQP88tMHu-dwWXMapGdCjm983LFzDb7Qa-1TdsvNtPnx_dXRKHJ19bjdx2czqwOcBID-oCXhczlW9PEItZoDfpHOH3K6yfMf1PllVUKW7a2Dt4R0X1KuDjziZugMhpBz1fdhMED8VwjpMyrtSIZMu?key=rICIFfLc8tVy71wD2Nf9pw" alt=""><figcaption></figcaption></figure>

* **Search Users**: Enter a keyword in the search bar

<figure><img src="https://lh7-rt.googleusercontent.com/docsz/AD_4nXdynNALyUF3EEzGoWpQIy5-ajERE11__YWL3sNlFl9t-KCQKKZqFpc4k-VT7gFvwsCayV4RJwuKBGpgIJ0qxZ2W2OvdfwxvswWv5tWGqHYHUayAYTF9bP_70rKs2QhXzDN957Z1jLkB6bUDq-Wg-hOVzu0-?key=rICIFfLc8tVy71wD2Nf9pw" alt=""><figcaption></figcaption></figure>

* **Edit User**: Click the **Pencil** icon, update fields, and click **Update User**

<figure><img src="https://lh7-rt.googleusercontent.com/docsz/AD_4nXc80ivfndjfo2c9xPkYWCBHzN8jXPLlL14CWn4hQhUrNoLTn3tBP_dA55qvqxq8STF0C6FicfYzDiwSK8HUNT0nfCG3qdYzruLZEfUNVoxK5DJ_h6vL10ui747F8BWjkqsejePXX5fmqSD_LkLEM6tQzMen?key=rICIFfLc8tVy71wD2Nf9pw" alt=""><figcaption></figcaption></figure>

<figure><img src="https://lh7-rt.googleusercontent.com/docsz/AD_4nXfp1z1njm5eqMYDpuocp7iMX0lZejJHcq4A1RbgFcGtR0JtgQVGFfIL4GgX3x2IFvS-Eej_mdN7qnFKjAksWX5WImJS04Rlm6FfebQSp6cC3d_7wVFRdI2PwvlWHRwPWSDCFd7vhsEX-9CJenYRGk6Ndf71?key=rICIFfLc8tVy71wD2Nf9pw" alt=""><figcaption></figcaption></figure>

* **Deactivate User**: Click the **Cancel** icon. A "Deactivated" label will appear. Deactivating a user does not delete their records in Edusuite; it only prevents them from logging in.

<figure><img src="https://lh7-rt.googleusercontent.com/docsz/AD_4nXc4SxAyf9oe-TIS6Zfo0ipqN42XyaK1XmBbltGQ17um5Ohmg3ZIFlaJ-iAHwNG3YZYQBfjOpORuTObhxZcZwLeEiw7WITIc-T1MZiIttHUMpUYAadNe7P5gDfP_vndzafwjfatiiWhegaTgaLg3waznXjAu?key=rICIFfLc8tVy71wD2Nf9pw" alt=""><figcaption></figcaption></figure>

<figure><img src="https://lh7-rt.googleusercontent.com/docsz/AD_4nXd7ONay4tC92OahviSUeaUM5ZUGRZDm3pnVFxxZrmpjz0CO_-sSmwMiZ0CU8M5PAEpgcKV2uzW5hnix0nsXST8vJnWdzh378Wv7q-t_ANvz-SnXNFXpVMyCPYIAureO5fhQbjhAVh9iBgNowVvclQ3TdA8y?key=rICIFfLc8tVy71wD2Nf9pw" alt=""><figcaption></figcaption></figure>

* **Reactivate User**: Click the **Activate** icon and confirm

<figure><img src="https://lh7-rt.googleusercontent.com/docsz/AD_4nXeiDn7ZSnBmGIrkJZy5Jg4N-B-q44b112ry2XolYidE_xBMuEU4sV1MYgaiuz3VIi5QKp7bQ17v1ehrZtrXbZr-vY7of4Kt9sDpw2fdeXz5yaja2zOKi-9oVKppTbj-VpS6QelJZtL7Bj5FUe05oU8CzJP_?key=rICIFfLc8tVy71wD2Nf9pw" alt=""><figcaption></figcaption></figure>

<figure><img src="https://lh7-rt.googleusercontent.com/docsz/AD_4nXfBvTEDZ6GkWW1M3jaiN3ut_bFy134mLivLULu8KlZOmzUf-ZpbaLXfwLfscktSVHelttnDAB9OKSG2tHJLjQ8RfKnescSsAjVlirlM62FN5RNclUPutrbRutu306yMYPttyQbXlePEyMdOQ0oA6sHxI1gH?key=rICIFfLc8tVy71wD2Nf9pw" alt=""><figcaption></figcaption></figure>

* **Reset Password**: Click **Reset Password**; the user will receive a reset email. Ensure the 'Reset Password' notification is enabled

<figure><img src="https://lh7-rt.googleusercontent.com/docsz/AD_4nXc2LCaV5lS3miKIEXs8CM7uVkIaHcQn6OLAS5Ax3hDq9N5MgBulR3-TMztpKkUm2Fk2tsOQr1SZ-U8inX54CmT9OdP14crxQWl-lvEtcQY8iaM9pw82E1miBDwjDlqP7b19RfzPdAL_rscmPZZ_2dzEoaSj?key=rICIFfLc8tVy71wD2Nf9pw" alt=""><figcaption></figcaption></figure>


# User Information Fields

Last updated: March 2025

This feature manages the information fields.

## Access and Navigation

The **User Information Fields** module is found under **Users** > **User Information Fields.**

<figure><img src="https://lh7-rt.googleusercontent.com/docsz/AD_4nXdOYv0R1S0uswTHxBYjJCdS8-eVlfJeXZ9OhYFTH7xg2Xza5GedWs_ozOgZIfkAw3q5xPL69eHaFhBpsY80gEqh448Nc9rQ1kwd7LMcsZwAPvqQZRz69MhlF0htNRkG1j7jhWwtIlB5tBwjeK51_oSuDZs?key=rICIFfLc8tVy71wD2Nf9pw" alt=""><figcaption></figcaption></figure>

Check the privilege assigned to your user account or role if you cannot view a link from the list.

{% hint style="danger" %}
Contact your school’s system administrator to request view or edit access if you cannot access the rights management screen
{% endhint %}

## Add a New Field Group

* Click **New Group**

<figure><img src="https://lh7-rt.googleusercontent.com/docsz/AD_4nXcf8QQ-h4SxX_LuiB_GmRca7e6j2gfG5ANTqIFL9PZNLIzOJy0QHfPomWxg9ljaJfDj4v5mRtbF6VKOwA3qK0194KdAJkEYtw6uG7SL-I7NnwjNQnFi3ylavzHXFZVl0qAkp0zAthCx7FzioaoFtsX0icsp?key=rICIFfLc8tVy71wD2Nf9pw" alt=""><figcaption></figcaption></figure>

* Enter a group label and click **Add Group**

<figure><img src="https://lh7-rt.googleusercontent.com/docsz/AD_4nXfCnvi7dYYp332tfuBMapY25TO4WtuRLxOD_loTFKYGb-Mg6EHW6nlfqGj348Os85Ct5dWOXjsRCc2snz5gR9w9r5HcXp7SXztKFPO4u_AzMk_HXhdwbo9RK17KjkPmgG0jC2-IWymxbsPvCH4aeYW8Bt59?key=rICIFfLc8tVy71wD2Nf9pw" alt=""><figcaption></figcaption></figure>

#### Field Access Controls

* **Per Field Access**: Limits who can see and edit fields for better security. With this feature, you can set permissions to filter which users can view certain fields and who can fill them out. This ensures that only authorized users have access to sensitive or specific information, enhancing data security and management.
* **Field Group Access**: Grants universal visibility to all users. This means that every user can see and fill out these fields without restrictions. It is a straightforward approach where no additional permissions or filters are applied to control access.

## Edit a Field Group

* Click the **Pencil** icon

<figure><img src="https://lh7-rt.googleusercontent.com/docsz/AD_4nXciYIKBG1xmuljJlgu71f9C_H6nm95h7WX0NcNXC5KIw5ovahVRZRwJG0_0htOgc57L3SHjGmDb647RNgWkU3LzOyf0S4_o6hxkZiQHlm8kl0kmOsXCwDanmqhWJzmWw6ozb8PmK-HxL0LvfW6b3T5D1FQL?key=rICIFfLc8tVy71wD2Nf9pw" alt=""><figcaption></figcaption></figure>

* Modify settings, then click **Save Changes**.

<figure><img src="https://lh7-rt.googleusercontent.com/docsz/AD_4nXe-2DvraXIaUdFygMNvOLYf1FQzkNWFlpF6TIHM6Rzder9h5mr-gXBUkcjMZ7LoVu-kICTv0GV253RXBeqe1inVjwBiteDUCmvkqksGDkDsnxVqbdloHRqvvXbMaAuOdhWUzO3uc-OnriKZhKe1fuPz0P3N?key=rICIFfLc8tVy71wD2Nf9pw" alt=""><figcaption></figcaption></figure>

## Delete a Field Group

Click the **Trash Bin** icon and confirm.

<figure><img src="https://lh7-rt.googleusercontent.com/docsz/AD_4nXdm_w3yDnuNpsml2zzdv_L3KB_fFtZYS_aRCyuBm40Qlx1gh2Rc9Y2wS35eHfqyhphKQvksbXO4rn97nL0YFdIBvzun8LyONLzblieMXFfl3CxE_3Aqf2MsSdYqQSeSH-jYdd4xq_GPXdl7GEP7ve12nSa6?key=rICIFfLc8tVy71wD2Nf9pw" alt=""><figcaption></figcaption></figure>

## Add New Field inside an Information Group

* Click **+ Add Field**

<figure><img src="https://lh7-rt.googleusercontent.com/docsz/AD_4nXcAz_UwyeFj3dlHzDnSd50gyNknbjHFBCbw8L4iHsnt53R89uRlLT6lh--7ZjjMgGiDTNuK_IVelECzpFT2Qz9omLHUcLKq5C-98JPoeZhi8wIf6Y26WF_orQQ1KdRAyoeoxGHGz5OLpJUxQ33-qly_QYUX?key=rICIFfLc8tVy71wD2Nf9pw" alt=""><figcaption></figcaption></figure>

* Enter details:
  * **Label:** Field name
  * **Input Type**
    * **Text Field - freeform**
    * **Number Field -** only numbers are allowed
    * **Dropdown -** create a selector in which the user can select one
    * **Dropdown Multiple -** create a selector in which the user can select more than one
    * **File -** for attachments
    * **Email -** for email address
    * **Date -** for date-related input (e.g. birth date)
  * **Required:** Tick the box if mandatory
* Click **Add Field**

<figure><img src="https://lh7-rt.googleusercontent.com/docsz/AD_4nXdDYgotx35ezsUmJPQgbTHuifeEmf0aSp6s8BYAU4xMepaG2KOL3MnqA2Mef4IxuI9StFyUnzkCq2j59uOyM2A-Vt7dSSEcX6ShW-ztclqoDj5p30j4k-jnh6pHxwT51BsaM7u7MxDhYQ6m6F5biy0uhRW6?key=rICIFfLc8tVy71wD2Nf9pw" alt=""><figcaption></figcaption></figure>

## Edit a Field inside an Information Group

Place your cursor on the field, and the **Pencil** icon will light up. Click the **Pencil** icon to edit the field.

<figure><img src="https://lh7-rt.googleusercontent.com/docsz/AD_4nXd3GwVjlVodlRCzvClrkC9vkmjXIaTZu8D5-NbeZkwzhfUKn5capUCR6AbU--lUUimV0Z1k90A1TC_IU3jgztx-O8_jhqQ6ndfSjkLDRsM_NLigImg83thzhwiisxOI5U8cPo36qZnmioRS56gw-kxFxYkH?key=rICIFfLc8tVy71wD2Nf9pw" alt=""><figcaption></figcaption></figure>

## Delete a Field inside an Information Group&#x20;

Place your cursor on the field, and the **Trash Bin** icon will light up. Click the **Trash Bin** icon to delete the field. Confirm the deletion.

<figure><img src="https://lh7-rt.googleusercontent.com/docsz/AD_4nXe7bXPdo5Bsj0zGp_V9PtyS2XRXA-eHA5_AWczP23rEV5AqRBn7VUyy_mwOmn62GhnRcL69hyoCFtRIRCoEBFpOAm544zIkd4G1cA2QWpmknF85NxkRfiIqXfVDTSul-P3mUcVNvSIQmSRp5ISbEut0uZU?key=rICIFfLc8tVy71wD2Nf9pw" alt=""><figcaption></figcaption></figure>

<figure><img src="https://lh7-rt.googleusercontent.com/docsz/AD_4nXf1AJFl51Es1A0MaPc9sJqMRdi4jPw9unTSq0OG5T7XKMa24wNLuFH4PL3eJ97Z1W_YVgMn4SoRxa-pu4_xjg9CKdYg3XAle_x7QCQYQDkzz3zpPEe18BQRi4RuzzHHcqigQKGh2rn9ZncJSVBZo46ICJ8?key=rICIFfLc8tVy71wD2Nf9pw" alt=""><figcaption></figcaption></figure>

## Arrange the Fields inside an Information Group

The arrangement of the fields determines how they will appear in the user's profile. To rearrange the fields, drag and drop fields into the preferred order.

<figure><img src="https://lh7-rt.googleusercontent.com/docsz/AD_4nXdVaR3a3zRmRmJSKw7YxyOgVSHMCfqdJgYiOppr7OpAXyhUiCMKQEVOKV0--1ks7q20aWb3UOZuHQfAufYNPFD-ikwQOT8pDJEEZbXAAhYaQtBIVqKlfPg9m7BoDZXCMok8pXbHDTLVhWXS7zzho71d4KG5?key=rICIFfLc8tVy71wD2Nf9pw" alt=""><figcaption></figcaption></figure>


# Students

Last updated: March 2025

This feature allows you to access the information of the students. There are **two** types of students and **nine** different statuses.

{% tabs %}
{% tab title="Types of Students" %}

| Type         | Description                          |
| ------------ | ------------------------------------ |
| Active       | Students that are currently enrolled |
| Inactive     | Students that are not enrolled       |
| {% endtab %} |                                      |

{% tab title="Student Statuses" %}
Active Students

| Status      | Description                                                                                                             |
| ----------- | ----------------------------------------------------------------------------------------------------------------------- |
| New         | Students that have their Starting Term set to the current term.                                                         |
| Transferees | Students that have their Starting Term set to the current term and are marked as Transferees by a school administrator. |
| Old         | Students that were also enrolled in the previous term.                                                                  |
| Returnees   | Students that did not enroll in the previous term and are enrolled in the current term.                                 |

Inactive Students

| Status                | Description                                                                                                          |
| --------------------- | -------------------------------------------------------------------------------------------------------------------- |
| Not Enlisted          | Students that are not enlisted for the current term.                                                                 |
| Incoming New Students | Students that have their Starting Term set to the next term.                                                         |
| Incoming Transferees  | Students that have their Starting Term set to the next term and are marked as transferees by a school administrator. |
| Deactivated           | Students that no longer have access to their user accounts.                                                          |
| Graduated             | Students that have completed all requirements and passed all courses in their curriculum.                            |
| {% endtab %}          |                                                                                                                      |
| {% endtabs %}         |                                                                                                                      |

## Access and Navigation

The Students module is under **Users** > **Students**.

<figure><img src="https://lh7-rt.googleusercontent.com/docsz/AD_4nXcq2LOWtUxxTv3R0BMWuwxwsevmqFeh9ATxBe4tSJdjj3ikAzeAuRRkM0DBdXFbJ53Cb5jq3eBF6lgC55ehV_T8W7rTTObNmOhypo_IUmGwr-1BHLApz2OmT4hytc5nGWjpvjJ5LPL9U37VmEqJytZ8hKEr?key=rICIFfLc8tVy71wD2Nf9pw" alt=""><figcaption></figcaption></figure>

Check the privilege assigned to your user account or role if you cannot view a link from the list.

{% hint style="danger" %}
Contact your school’s system administrator to request view or edit access if you cannot access the rights management screen
{% endhint %}

## Manage Student Data

### Search

Use the search bar

<figure><img src="https://lh7-rt.googleusercontent.com/docsz/AD_4nXdvblX_aR7QhBKnmvPUT5Z4Wp9dJxF8s69w53NACk9pg-Agnd_DVQcRTaboPrSwDn-x3dwp68LOnMv5Puw33a-YyA0C5QTymTy8aI5X34lPOvgfDRdzSvauuKgr3ZAcb8xYcNvZXiu4lTi0-czwudpctyA?key=rICIFfLc8tVy71wD2Nf9pw" alt=""><figcaption></figcaption></figure>

### Import Students/Grades

Upload a CSV file via the **Import** button

<figure><img src="https://lh7-rt.googleusercontent.com/docsz/AD_4nXeKqGNJ3xGfMdKcHu-qbEN3K2Obgs3DtGyrH29MzHGwVlhT9wv5dGgt9oy86TIlN7UrxxHDTrO_BfoEjg6K3oBsjB3mDBc5Ly_fxKR7GRj3avMkbv1ujgLlsrEAHFxrU10AW3B8zw-mRhWjPq0qvLfLXz4M?key=rICIFfLc8tVy71wD2Nf9pw" alt=""><figcaption></figcaption></figure>

<figure><img src="https://lh7-rt.googleusercontent.com/docsz/AD_4nXd9Qv-9S7D4O3wEJVi4WNSb0g7ZytRaJ_TBGDC3U1Ff1B-4D_UXR3Zxu_Gm5t3kxdQEEFbZ4mOrlgEotqYEv_d0v_-swHiVH1-Z4_VzUusMcnz09-xLhRa2pNnENmg0end-7MfLoNbMYRh-cx-at6vCMzzf?key=rICIFfLc8tVy71wD2Nf9pw" alt=""><figcaption></figcaption></figure>

A window will pop up where you can upload the file. If you don't have the template, simply click **Template,** and it will download a template where you can fill up all the data. Once you have the file, just upload it by clicking **Choose a file**, then select **Import File**.

<figure><img src="https://lh7-rt.googleusercontent.com/docsz/AD_4nXe9ZDNHBA43Oz9lM7icd6hzea-1nP55oerEzf55chpFPHj4ohk2ufqfvSEohCdePmS0yEGiagmJGbVutV8Lpngbz76W01zq1zBBkESZ70da-Rvbz6fKWsMF2McCe8DqU4ynJ3VHzQ5M4qwBDqqlAH9gRNxJ?key=rICIFfLc8tVy71wD2Nf9pw" alt=""><figcaption></figcaption></figure>

### Create a New Student

Click **+ New Student**, fill in the details, and save by clicking **Add Student**

<figure><img src="https://lh7-rt.googleusercontent.com/docsz/AD_4nXcyvXeVgVr0uBlIRmZdssTK6Pc7kZI7gzBX4RFi4IEz46vAeaeUhqZ5Wnm_zbndaXbAlF55A6REXDHI_1l4Iry5M6R1376du-Ce8JWe8XLG_4haBnD2AKKCJi8z-QmCUQjRD2eOAJNoaiRh9XufpOxS7YlD?key=rICIFfLc8tVy71wD2Nf9pw" alt=""><figcaption></figcaption></figure>

<figure><img src="https://lh7-rt.googleusercontent.com/docsz/AD_4nXdxQ9Sn21pX56Yzf57dXz8pfE7H7uKcjaQEkleekhPShDbYkNCDPgccTrOwDgEZE6xj96uOEM8XB5m3bT8uPJAF1gUK92BLUMUDEWM_jgPJZ3ZzXqrADlGosmCS7-_rDwgjAcjrfpnGIyNOIY-45uVKL-U?key=rICIFfLc8tVy71wD2Nf9pw" alt=""><figcaption></figcaption></figure>

## View and Edit Student Records

Click the **three dots** > **View Records**

<figure><img src="https://lh7-rt.googleusercontent.com/docsz/AD_4nXflFQW-3lYfMNbPb-Otg8chi9icURwpbb3TSg5rlNfsln6Iv67YM0yXq3RPd0kko1Owwvcvg3W0aHoR3pJC0N7dUrRR_iFzeVVnsJeo382wNlA8egL2_WPBZq-X5jf0pv2R1E-0mGgfsXp3aqhgnsohBQ?key=rICIFfLc8tVy71wD2Nf9pw" alt=""><figcaption></figcaption></figure>

A menu fill appears.

<figure><img src="https://lh7-rt.googleusercontent.com/docsz/AD_4nXcZ0tFCm_ckNSR5MnTQUP6qUhX3iwr8zqfMhaZX_oJXCHw32AFJtJDy3d7ySWXIL6oXLRVlUIweMBfrR03mckaGMOT_Lr-S4Mb727bO0RmiduUUxCSjYWBPRTPIeGIztLAQ2ztzfutsXtY1qkTWUG8zsn-G?key=rICIFfLc8tVy71wD2Nf9pw" alt=""><figcaption></figcaption></figure>

View Records contain all the student information, such as the student’s profile, the student’s Clearance requirements list, grades, payment history, and deliberation notes.

<figure><img src="https://lh7-rt.googleusercontent.com/docsz/AD_4nXc6lxE-Q4bjk79FdPCKC8ZGMJO18tMBqTmFdutyu4jx9ir48PDUAjzshvjgYMifw_M2OZpS0nQV6oOScmobgWlk92q0kw4aDdNjJ4YMrUOsfdR5hHKYhX9ataMaavNyKPV0Ljz0qXuDmS_QmCN75rXAh7Tf?key=rICIFfLc8tVy71wD2Nf9pw" alt=""><figcaption></figcaption></figure>

### Edit Student Profile

Click **Edit**

<figure><img src="https://lh7-rt.googleusercontent.com/docsz/AD_4nXeBaz6tEnhbHYFg5b8MRFsfvfsF3kFaAw6sSMDvp35IoLxNFt5cSvTX0eGph8KEQzOiG4xNNVJVe7vTqkow9RbYJ6xYBRly8H6Zo2EaU7yYac6JnkcLHAPLieqmjIyeUkqDxv9N5NIO2VPWrO5oD5sNqrOm?key=rICIFfLc8tVy71wD2Nf9pw" alt=""><figcaption></figcaption></figure>

Fill in the student information as needed. Click the **Save Changes** button to update the fields.

<figure><img src="https://lh7-rt.googleusercontent.com/docsz/AD_4nXcZ1T0k6eZbXfZyWWk0Vv_oG2cxk9nBXkN57TuUQsrbERpGgpEzY611MW5tIHjHFmiEPGYOnZJCpYJrPEeDlBIp1E6cEe7KsaEIB_n0xJ6awPuv2QqPkzKntyPxJray5jGZhGkOiDYYaJ7NKb1Y3Q6a02ED?key=rICIFfLc8tVy71wD2Nf9pw" alt=""><figcaption></figcaption></figure>

### View Clearance

Displays clearance requirements

<figure><img src="https://lh7-rt.googleusercontent.com/docsz/AD_4nXf1jDPAL69Ba3S1ZlTKPM7C9ROaA7MYLXQ58kO_xVN9flRVVMY2vDn6T1v66wYbqmwaVLiMrU_lROmdVEznE9DFCwxUkBVhOIRS2o10Wd1eGSCsy9MlyC1Gw35lCGojPgKwCtbrA4pH1nHp1eb8A6Tk0ZCW?key=rICIFfLc8tVy71wD2Nf9pw" alt=""><figcaption></figcaption></figure>

### Manage Grades

View, edit, or download term grades and transcripts

<figure><img src="https://lh7-rt.googleusercontent.com/docsz/AD_4nXeSjODRi8Bu5b01h1SobL2xt652Cfoe3o39J2uvOWTPDHqyP5kCSaFn3pFqYdzajqf7SPjPhzGIbfnmUlWuaJwO21zNV8VMQOH9aHNQRSiY9sasqbAuPKBDBoHWEdVhQDumrtzsSZOV-MEgHkW_VVla34Hm?key=rICIFfLc8tVy71wD2Nf9pw" alt=""><figcaption></figcaption></figure>

Click **Download Term Grades** to obtain a PDF file of the student's term grades.

<figure><img src="https://lh7-rt.googleusercontent.com/docsz/AD_4nXcos0_dAP2HgAUfetx6J1xcN0Y6q9sXa2fQQPp7W25_fUrvv14PlZn3Da6FwjkuJLrBUOk-8NkmrFisCxFm9kz-J0vwaucbCz6wp25ZKur6bAaeW0hzI1IH1osZdCCaaK67WsZe5dOOLnQe4IlT_90Tn1Io?key=rICIFfLc8tVy71wD2Nf9pw" alt=""><figcaption></figcaption></figure>

Click **Download TOR** to obtain a PDF file of the student's TOR.

<figure><img src="https://lh7-rt.googleusercontent.com/docsz/AD_4nXd8NzAJEUG6xfRZBZlCc6qEIGrdChgxkx00v8QcMIcqwEVD29__Emg6BZxxDt6sslL4_VPlWfL3OvW9--fEV8vozxXMAdgy-x_MqXDEPMT4A9nYwA_7uBuEKLabY3ihiyz8uDosA90IvVlGMbVqWorW0SI?key=rICIFfLc8tVy71wD2Nf9pw" alt=""><figcaption></figcaption></figure>

### View/Add Penalties

Manage student penalties

<figure><img src="https://lh7-rt.googleusercontent.com/docsz/AD_4nXf7ywCm2ggtsEiX1-jx8d5SjAJLvVPzPhEPqL8o6-N0ojFoytA2v5r4Whj0AVKteYLy0wMJbGaSTNZoq2un_0HENhm2cM9jIap7gbZF3537iV368zlwcvQqM4d7NFxanPRR7_HBDX4DB_JgQQdwmrNhTYmt?key=rICIFfLc8tVy71wD2Nf9pw" alt=""><figcaption></figcaption></figure>

Click **Add Penalty** to add a penalty for the student.

<figure><img src="https://lh7-rt.googleusercontent.com/docsz/AD_4nXeEx4JL0u5yVG2UPpF5t4hUoIo5xD7ojWeytuOxtaUkuXTvKa4SE_m0M3FG8J3hIM6i3Cs_MJs9m8S6a7CWVER_rlb_W4sB1OTqVk9iH3UhKX78oB-UpGrmgMSQuGkiFEhgrjQ81RNBPvs3J1xvqrUy776O?key=rICIFfLc8tVy71wD2Nf9pw" alt=""><figcaption></figcaption></figure>

A window will pop up. Click the dropdown menu, and once you're done, click **Add Penalty**.

<figure><img src="https://lh7-rt.googleusercontent.com/docsz/AD_4nXeVoBiNtKeI-IWUxkCy7RXAdmp7akwSADCwkdQMVMj6LBY_G4FHSxW4u-iMNFINct50lyw1nyHGfhwQacHqzxLEMeqH1Ui0SmAfR73PvZdHofqit_XpBeUjZP_5u8euGjJH39Yp46RHFaXP_5Noeu5p_cXQ?key=rICIFfLc8tVy71wD2Nf9pw" alt=""><figcaption></figcaption></figure>

### View/Add Discounts

Manage student discounts

<figure><img src="https://lh7-rt.googleusercontent.com/docsz/AD_4nXfAFiX0Bw944hngZ75HKx-txAol_zTXjXmMGf5aa4VfibjAAGu4dUu3s4isGKfy1_BQAXMizQKFgP26dF3Usfm6I2kFsOJcI5lbUyQLOeAVnvmo4fpw1fayX7P7_TxDryPBkgdrGlfDfkZWsyQHeY94MmNs?key=rICIFfLc8tVy71wD2Nf9pw" alt=""><figcaption></figcaption></figure>

Click **Add Discount** to add a discount for the student.

<figure><img src="https://lh7-rt.googleusercontent.com/docsz/AD_4nXfMn7bQpNwl1Z1K6glzSkmXowEo3yak0qV-GEDkpoR-1n0vU8EZdYdgTQfEC9eb8Lh_OlP6F7j0vzVWW6CSQ6MSJgoXNcJU7LO9_-kGnOh98gKrK2Y7jLO9dv0Jt3pQ3fuKOp85Mf2tYe3CuCAhJkZ4TBjJ?key=rICIFfLc8tVy71wD2Nf9pw" alt=""><figcaption></figcaption></figure>

A window will pop up. Click the dropdown menu, and once you're done, click **Add Discount**.

<figure><img src="https://lh7-rt.googleusercontent.com/docsz/AD_4nXdSEVaxRsNnCUR73wkqZtm4Gchkx3xiWwDCvLNwyUev0hDyWOu_dMctR5w3QfzFNgKarHGhFKGOHlWUlMRSyg90OBEL_Iwg79Qmc-4rwRDZarf0qVNgPhKwLKJ8EmNpRUNo13y8PVddw2EKJJgIgvYdaUxW?key=rICIFfLc8tVy71wD2Nf9pw" alt=""><figcaption></figcaption></figure>

### Ticket Requests

Filter and manage student support tickets

<figure><img src="https://lh7-rt.googleusercontent.com/docsz/AD_4nXe9ZPhm_-GO25p2StD8hsWB12jmXFJjwGq5gL6look2aKZbkFlOzGXiq1efIHa2SF1EHe1JfntYe6O0Pd1_6MLeDX5DfnOjrlOggDpBiFOWLdLM-izt2mYhq2u-qXQWjEQ_VTnvGCEbzQlLicKWx9AbkAzD?key=rICIFfLc8tVy71wD2Nf9pw" alt=""><figcaption></figcaption></figure>

To filter the tickets based on their status, such as resolved, open, or archived, click the drop-down menu on the top left.

<figure><img src="https://lh7-rt.googleusercontent.com/docsz/AD_4nXdY8jsrV_l_jNegi2Wt-IO2Dl9dYJU4NLJMOSIK-npBmVJ_uCji9NSdZd7H613ysnnhWzK6xlA1wrgWm2Ukk253vDdMnQL8V4bWGLme_rnU34vhy0j_9ICmXE8RdknYTR0YjzzB14exzfOZC3FN-qFEg1DD?key=rICIFfLc8tVy71wD2Nf9pw" alt=""><figcaption></figcaption></figure>

## Update Student Info and Status

### Update Info

This feature allows you to edit the information of the student. Click the **three dots** on the right side of the screen.

<figure><img src="https://lh7-rt.googleusercontent.com/docsz/AD_4nXflFQW-3lYfMNbPb-Otg8chi9icURwpbb3TSg5rlNfsln6Iv67YM0yXq3RPd0kko1Owwvcvg3W0aHoR3pJC0N7dUrRR_iFzeVVnsJeo382wNlA8egL2_WPBZq-X5jf0pv2R1E-0mGgfsXp3aqhgnsohBQ?key=rICIFfLc8tVy71wD2Nf9pw" alt=""><figcaption></figcaption></figure>

A menu will appear.

<figure><img src="https://lh7-rt.googleusercontent.com/docsz/AD_4nXftmwhsRyPijOYSjXzSXc6M5ENiLVlvleF7XKFzP3NmtqMpW7-vOugQRJ6rzjLHyPl6DPBnZIW31gAticGvUY8kO4vV5IzGsUvEE_c1dnuaUDMcaSU-wjnaiIAnwgwDiQ3rkmOvVyYX7PUV3IyZjJGbvr4e?key=rICIFfLc8tVy71wD2Nf9pw" alt=""><figcaption></figcaption></figure>

Update the student's information. Once done, click **Save Changes**.

<figure><img src="https://lh7-rt.googleusercontent.com/docsz/AD_4nXcbNo7B_PkaS4-bhHYjKX4nZDWXZkSOby7DpZ1jtry8vmn8dVjHyq6qErPFVDmoJ6TO9mQqc79Px_KZ3H2-7GwRyw8IZ3NwWS1RiV5TAEnTpOrKkXJNJjezoU9ifyKTsqmog76ZrgzpvjgAy9FBmPU3toWW?key=rICIFfLc8tVy71wD2Nf9pw" alt=""><figcaption></figcaption></figure>

### Change Student Number

This feature allows you to change the student number of the student. Click the **three dots** on the right side of the screen.

<figure><img src="https://lh7-rt.googleusercontent.com/docsz/AD_4nXflFQW-3lYfMNbPb-Otg8chi9icURwpbb3TSg5rlNfsln6Iv67YM0yXq3RPd0kko1Owwvcvg3W0aHoR3pJC0N7dUrRR_iFzeVVnsJeo382wNlA8egL2_WPBZq-X5jf0pv2R1E-0mGgfsXp3aqhgnsohBQ?key=rICIFfLc8tVy71wD2Nf9pw" alt=""><figcaption></figcaption></figure>

A menu will appear.

<figure><img src="https://lh7-rt.googleusercontent.com/docsz/AD_4nXeNghJS1DjWJck5htV30R5jnadz_a1fwjpQDodBb_ZIf3ToXhjOI6jrs8vCAZOYzf_3DwXGU2btdSZiQC8Qw8FsZJXJxx__PH3T_5fELw4LpNAyQ4EA7gHL-E56dL53nBvPs2fP1--Kb-9oDr7WiaCZKMHx?key=rICIFfLc8tVy71wD2Nf9pw" alt=""><figcaption></figcaption></figure>

Change the student number, then click **Save Changes** once done.

<figure><img src="https://lh7-rt.googleusercontent.com/docsz/AD_4nXd2qOV4FS-s4pNzLM09ncDvSSrZhtlF5IMxjUUOkDyuP1YU9dz5gyAkNUzoSYf1LMzIk_ZImPVOhTQFQlXY5aqgke2XkGnnEzWmP58yfBesP59sBuMSC_WD35czNzX0HMgXm21TO9KCUKuwI8gXZFNQhWUL?key=rICIFfLc8tVy71wD2Nf9pw" alt=""><figcaption></figcaption></figure>

### Intent to Enroll

This feature allows you to update the student's intent to enroll for next semester. Click the **three dots** on the right side of the screen.

<figure><img src="https://lh7-rt.googleusercontent.com/docsz/AD_4nXflFQW-3lYfMNbPb-Otg8chi9icURwpbb3TSg5rlNfsln6Iv67YM0yXq3RPd0kko1Owwvcvg3W0aHoR3pJC0N7dUrRR_iFzeVVnsJeo382wNlA8egL2_WPBZq-X5jf0pv2R1E-0mGgfsXp3aqhgnsohBQ?key=rICIFfLc8tVy71wD2Nf9pw" alt=""><figcaption></figcaption></figure>

A menu will appear.

<figure><img src="https://lh7-rt.googleusercontent.com/docsz/AD_4nXfbuRAkrfVMFmEzNqkqF0WCblmHp8YYVsPBWZdEzcl_hChxqpkTdukg4X5uT_rQ8D2Cm4onkBiPbymizG3N1VKXgtmL5q1FTXAaBno6Lz9ysZslEO-TlSVTG_VIIW9fjTztgPMTMZm5gVWbxKWUnWZdHm4?key=rICIFfLc8tVy71wD2Nf9pw" alt=""><figcaption></figcaption></figure>

Click the drop-down menu "Yes or No," then click **Save Changes**.

<figure><img src="https://lh7-rt.googleusercontent.com/docsz/AD_4nXfjDZd-Rc_NWitHXmJLpYmhKkh-nFp9f6UoG5HaZ8zozVfD6MjNFWmlhBV_nrqp814_YDEdsoyqhTe0iBOB0LrJ29eMaaS8Df1Y7cG-09rKYlN5c3-FIRlXE32iSySizriTCFG0vCf85CD44FPPFjinXkg?key=rICIFfLc8tVy71wD2Nf9pw" alt=""><figcaption></figcaption></figure>

The student will be marked "Yes" or "No" for their intent to enroll.

<figure><img src="https://lh7-rt.googleusercontent.com/docsz/AD_4nXdJU35g3mh-5Hr0ZRi6IYOuAAcwN-ryBOkkxqG1nzynWyRTOVag0ZwEPrpJASK2BkA2Q0DJOzbx8Jpsm20Z6opn1eNjxj3XMJ-s1hW_M8wDKAMA5HV7mlAp7cTOvWxO4rJ1VRkBGcg_Ior8YiZjYytOIUB1?key=rICIFfLc8tVy71wD2Nf9pw" alt=""><figcaption></figcaption></figure>

### Mark as Graduate

This feature allows you to update the student status. Click the **three dots** on the right side of the screen.

<figure><img src="https://lh7-rt.googleusercontent.com/docsz/AD_4nXflFQW-3lYfMNbPb-Otg8chi9icURwpbb3TSg5rlNfsln6Iv67YM0yXq3RPd0kko1Owwvcvg3W0aHoR3pJC0N7dUrRR_iFzeVVnsJeo382wNlA8egL2_WPBZq-X5jf0pv2R1E-0mGgfsXp3aqhgnsohBQ?key=rICIFfLc8tVy71wD2Nf9pw" alt=""><figcaption></figcaption></figure>

A menu will appear. You will mark a student as graduated. In doing so, you will not be able to use this student in any form of enrollment process.

<figure><img src="https://lh7-rt.googleusercontent.com/docsz/AD_4nXetxV3a3AqYRfWECw4tpyx_RTROwEJXC__SUQz7BMtQdybLVGOyGaT5Z7kd9ZGOYRib31DOQ9de_wO7zumbUhSIYNGQYFFD8zQ_s1mwA_7S_Bp7vtWXk8X5_bpJYziYyQfa6UYzAQHDAF39AkEulfZ2EOI?key=rICIFfLc8tVy71wD2Nf9pw" alt=""><figcaption></figcaption></figure>

A window will pop up for confirmation; click **Graduate** to confirm.

<figure><img src="https://lh7-rt.googleusercontent.com/docsz/AD_4nXdxGHcImnPocQcfJLxN9eeTAYZRJ--nXGYio7Rmt6hCvXmq6haBvzN5tX33vlLAXPcjs8e09eJgSqgdXwlc2-Y-GjAOoFU6fu_oUsVL14XZ_lW9nxF-zlWmmu0pe8KVh4qYU7Wx54Mmvwd0DkN6rPa-mNRz?key=rICIFfLc8tVy71wD2Nf9pw" alt=""><figcaption></figcaption></figure>

The status of the student will be marked as Graduate.

<figure><img src="https://lh7-rt.googleusercontent.com/docsz/AD_4nXe2wVztBlpLBy2iaG9JK1j1rNVXlFOH4AxjKQV9jZMS8iEzVU1FRBI_0PucIXyE23vbXrxGFdgeE1A465Akwei8otXatEzwolxF2ELn57fpJjwdz-upcg1-1Fe8J0il6xIiOIcMiadwnnNr86DngjG9qP8?key=rICIFfLc8tVy71wD2Nf9pw" alt=""><figcaption></figcaption></figure>

If marking the student as graduated was a mistake, you can simply undo the action by clicking the **three dots** again and selecting **Unmark as Graduate**.

<figure><img src="https://lh7-rt.googleusercontent.com/docsz/AD_4nXerAyoLyVb6_HteQccZ2I-c_w1B3k8vchVjG8290DIevQO4qW10tJeZUY_qRv0U2ggfHrfz3Q0zKTBJNAVxBMy05qkhgFaihTCOXL1V_NPO4NP6oS8SzHG-_qzu1mEqLwnxGWPV2F_ho6PmXMwPc2pmkJWs?key=rICIFfLc8tVy71wD2Nf9pw" alt=""><figcaption></figcaption></figure>

### Deactivate/Reactivate Student

This feature will deactivate the account of the student. Click the **three dots** on the right side of the screen.

<figure><img src="https://lh7-rt.googleusercontent.com/docsz/AD_4nXflFQW-3lYfMNbPb-Otg8chi9icURwpbb3TSg5rlNfsln6Iv67YM0yXq3RPd0kko1Owwvcvg3W0aHoR3pJC0N7dUrRR_iFzeVVnsJeo382wNlA8egL2_WPBZq-X5jf0pv2R1E-0mGgfsXp3aqhgnsohBQ?key=rICIFfLc8tVy71wD2Nf9pw" alt=""><figcaption></figcaption></figure>

A menu will appear, click **Deactivate.**

<figure><img src="https://lh7-rt.googleusercontent.com/docsz/AD_4nXf-f_qPjzf509k5-czlW7NVsYc3OISTuh6NbKBwj2TeIMh0xjoXHvbNF_43qpHUtTDE6XWTNwzvyh3LzIu_6K6zMfe36R-wLOx4i1CEVU1UaH5U9EsictM1hoodqsXYsnvhM8qMSSFiHRmYMeDL4lTzHxGL?key=rICIFfLc8tVy71wD2Nf9pw" alt=""><figcaption></figcaption></figure>

A window will pop up for confirmation; click **Deactivate** to confirm.

<figure><img src="https://lh7-rt.googleusercontent.com/docsz/AD_4nXf6cQT2ZtxjFgidzTiM5EXJSKj3Zap0xIoXcWEicqm9iV9dioG-7qxRYqh6Lpo6Q34rcoYCzJMk1efKlYbCvLHBdzSzgoOKEnOm5EkP_0S3E6I-wafDMq3CsKSV3nVV9WhZJhVFJo91HScRBrdQ9jJeDI0?key=rICIFfLc8tVy71wD2Nf9pw" alt=""><figcaption></figcaption></figure>

The student's status will be marked as "Deactivated," and they will no longer have access to their account.

<figure><img src="https://lh7-rt.googleusercontent.com/docsz/AD_4nXc4133aQr50RQnwpiPDaq1di-dXZX0FjFSv83XCct_yatwKNSBpTezaKlVt64U9a9LhvhSBzVqhtxPr99v496GAPbP4d99Ldy9jy1XFJSNxyWkk3XTqB1xF9x89l9VhWtwf76ypfwvjabZs3ibLc6LWVLL0?key=rICIFfLc8tVy71wD2Nf9pw" alt=""><figcaption></figcaption></figure>

To reactivate the student, click the **three dots** on the right side of the screen.

<figure><img src="https://lh7-rt.googleusercontent.com/docsz/AD_4nXflFQW-3lYfMNbPb-Otg8chi9icURwpbb3TSg5rlNfsln6Iv67YM0yXq3RPd0kko1Owwvcvg3W0aHoR3pJC0N7dUrRR_iFzeVVnsJeo382wNlA8egL2_WPBZq-X5jf0pv2R1E-0mGgfsXp3aqhgnsohBQ?key=rICIFfLc8tVy71wD2Nf9pw" alt=""><figcaption></figcaption></figure>

A menu will appear. Click on **Re-Activate.**

<figure><img src="https://lh7-rt.googleusercontent.com/docsz/AD_4nXcCIWbcfab9GaQpBVFaf8UX-JUPmtm-BW0rIXy__MzHp6Uv---J3-T3Ay9ORejVmmYzI3IQjfFdRLtUnAxqGdUT1hk_4hr5PHy9OR8Zip0XOMXWblTGalDIfga3tH0NBH1ahQkrnNOSRqtuMmTJf0jgaint?key=rICIFfLc8tVy71wD2Nf9pw" alt=""><figcaption></figcaption></figure>

A window will pop up for confirmation; click **Re-Activate** to confirm. The deactivated mark will no longer be visible.

<figure><img src="https://lh7-rt.googleusercontent.com/docsz/AD_4nXfWxZTCPlHwqiCOGaIXgPKHga-HvrTXyPDtVesbGYI0R8dJn6SJGg1YFlhmdi_CbKuMHX5fAa1kxVTACMywct0B84j-r4TosUyXRUnTQk8btvhHaXv7NgkMhHEZZR0ZWbKyyrVTZg4LDlhG2Ww2pJ7cEis?key=rICIFfLc8tVy71wD2Nf9pw" alt=""><figcaption></figcaption></figure>

### Delete User

{% hint style="info" %}
You can only delete an account that has no associated records for example, grades. If the account has a record, you cannot delete it, and an error will be shown.

![](https://lh7-rt.googleusercontent.com/docsz/AD_4nXcqB80T1GbvO2pR-Ta9XooqS-mYYcQqTHL3Ad5IC0B0Nk6QIhn1cUd-rnMDwxtvx4c25cT89SqBDtXxcJjnptlP2mYdxFrNYtRQd-RJciJ-ruAX3vor6H0UTerCH9wB_d1uSSagWzYMAx-T_i0vu-Y_pvqz?key=rICIFfLc8tVy71wD2Nf9pw)
{% endhint %}

This feature will delete the account of the student. Click the **three dots** on the right side of the screen. Please be cautious, as this action cannot be undone.

<figure><img src="https://lh7-rt.googleusercontent.com/docsz/AD_4nXflFQW-3lYfMNbPb-Otg8chi9icURwpbb3TSg5rlNfsln6Iv67YM0yXq3RPd0kko1Owwvcvg3W0aHoR3pJC0N7dUrRR_iFzeVVnsJeo382wNlA8egL2_WPBZq-X5jf0pv2R1E-0mGgfsXp3aqhgnsohBQ?key=rICIFfLc8tVy71wD2Nf9pw" alt=""><figcaption></figcaption></figure>

A menu will appear, click on **Delete.**

<figure><img src="https://lh7-rt.googleusercontent.com/docsz/AD_4nXcozIiylPMoftkaW5-QvAyapvIodIiOBkxXon89GobQ1oSIsLXfzz4kClAaG2uVsCtDtzcr4_qPuSvoW060pHW8BezpteQGmaqL0KOaJe9WPxFoykYp8S5DhypljcLlme7d2zXve9hiIJjPChoHqBbJZwiP?key=rICIFfLc8tVy71wD2Nf9pw" alt=""><figcaption></figcaption></figure>

A window will pop up for confirmation; click **Delete Student** to confirm.

<figure><img src="https://lh7-rt.googleusercontent.com/docsz/AD_4nXdte5KAJvvSHalj6v6ACVs50EAusWKPVCAijv-5FAASdBDFJr3b3RtSBvaozbXyMdeOGOSDXGAOvuVSSnK_-ygtbJNBBmFLb5a_R9b1gCbw_-ZB7nRy83UnCxFMh0elVseeYtW5ynod67D0SDLTXaiSuuZ4?key=rICIFfLc8tVy71wD2Nf9pw" alt=""><figcaption></figcaption></figure>

A notification will indicate that the student has been deleted.

<figure><img src="https://lh7-rt.googleusercontent.com/docsz/AD_4nXeqHuymgQnSVX8mGfD_rqrwldsvO5m3ZYpqTaxh6ck2MvBT6v9TO2m8pnMVlH2aH_WNIoCPhzz_zGLLNZ6WxOtEhjJ9XmfLstKHJSXoNT9L5S7a0xIAcSJlP-4H-Rp9-4jgobFbdVyULwZt_28jLG4Wdrwl?key=rICIFfLc8tVy71wD2Nf9pw" alt=""><figcaption></figcaption></figure>


# Faculty

Last updated: March 2025

This feature allows you to access the information of the Faculty.

## Access and Navigation

The **Faculty** module can be found under **Users** > **Faculty**.

<figure><img src="https://lh7-rt.googleusercontent.com/docsz/AD_4nXdeqDEqpcYPkhzQsCMuG6SyHiRtL6QDZ7alN8zqFOvSdbdeeBsa_KaWBGaOJUHyfsM1bv1Q_WWOL5bIq174mY1BdnroEZNvzgyCFbgE1bR-fMXPw6BwMZgM6Oq4itS2UK6lPLBmkhf16rAcnzdLglZ_Bbvj?key=rICIFfLc8tVy71wD2Nf9pw" alt=""><figcaption></figcaption></figure>

Check the privilege assigned to your user account or role if you cannot view a link from the list.

{% hint style="danger" %}
Contact your school’s system administrator to request view or edit access if you cannot access the rights management screen
{% endhint %}

## Add a New Faculty

* Click the **New Faculty** button on the upper right corner of the page to open the “Add a new faculty” form

<figure><img src="https://lh7-rt.googleusercontent.com/docsz/AD_4nXcfJMaDwcN4JzDgum0bBrD_7xok7Wj5axUClJ4Qu-5cJQgMaOY_bj9MIMYN_0OlFh56YYffw6YWW7jgnlmsROLagqnXx4FMsSTuNFVb82sZoxOs6G6aiY_qjiInult98luOUu0qLmRIkjwC2ZWzOjca4YTA?key=rICIFfLc8tVy71wD2Nf9pw" alt=""><figcaption></figcaption></figure>

* Fill out the necessary details on the form. You can choose if the teacher works part-time or full-time and if they are active or inactive. Afterwards, click **Add Faculty**

<figure><img src="https://lh7-rt.googleusercontent.com/docsz/AD_4nXedb-hRQkhFd51WGlM-aGWnEsp5PWfncgJ6iDpwlxSYNoyU6Hxd0amm_1IEwfOHcefjPgnN3QSsSVkJGUUBLMdkJtDSb1mVPHPyHjFQ1CCHjJ8ObuInaxFwexNIuIdgzStWmdn_7Pt1t2DsfTAnb-MBiZkU?key=rICIFfLc8tVy71wD2Nf9pw" alt=""><figcaption></figcaption></figure>

## Import Faculty via CSV file

You may also add faculty in bulk by clicking the **Import from file** icon on the left of the Search Bar.

<figure><img src="https://lh7-rt.googleusercontent.com/docsz/AD_4nXd-Nk-91DyNd8FDNwknHigtMPJE4PTfdmDoAlXdczbU4mIwpZRTn-XP-50TvVeYNCET9FqbF5Lwt3A_BKvtHptqtn7WRPMTCINUwWPtJS3Zinyor9wrrq577DaDVAXBRDMBCxopjamYmFok5jqpy0AiB9k?key=rICIFfLc8tVy71wD2Nf9pw" alt=""><figcaption></figcaption></figure>

You must have a CSV file with the fields: First Name, Last Name, Email, Employment Type (Part Time, Full Time), and Status (Regular, Deactivated, On Hold). Choose a file or drag it into the space provided, then click **Import File**.

<figure><img src="https://lh7-rt.googleusercontent.com/docsz/AD_4nXfPUZlnmc6v2M8fonOA7gM_vxv5Gukkoi3xbyLOBIW37Z8tUgQ21CpIS021SXur_tHa1XWXVinQDqPaWnr-otweZY0hL7VB25sFfxipC57xKlZCcNR2gpjJdfH6i6A5o7XoDAxK4_9qWdg_QNH0l37dj1Oj?key=rICIFfLc8tVy71wD2Nf9pw" alt=""><figcaption></figcaption></figure>

## Manage Faculty Data

### Search Faculty

To search for a faculty member, input a keyword or the name of the faculty member in the search bar above, then press **Enter** on your keyboard. Your results will be shown in the list below.

<figure><img src="https://lh7-rt.googleusercontent.com/docsz/AD_4nXeyPZD1SU3rYZyYLQRec9ItOpuz0wCM2HUySvZxVytQQ2VG23igrgupguN0zkZuv3sLrYwuy4-dbCXoHIldh-nNgP1f87u2AbCxnmj5Qj5rpLGBuIDc9-oCAXAZFEStweTJLvG3hvlqatcX-kRWP5yqC-aa?key=rICIFfLc8tVy71wD2Nf9pw" alt=""><figcaption></figcaption></figure>

### Filter by Status

This feature allows you to see the status of faculty, whether the faculty is ‘Regular,’ ‘Deactivated,’ or ‘On-Hold.’

<figure><img src="https://lh7-rt.googleusercontent.com/docsz/AD_4nXcClys5LwlTbSLk1frj1nrMp8hsHwu_ciO2QFQ2oQwp422AaoIgKy9gJC5V38gu5JRnVzyXq8RA0NiavWb6_lmlGvULqYGDTaWxWRpMAe0Hk7cwRELVYykEX8CN_2b9PXhiDNCsKowmPN_WnECMylo9nwGZ?key=rICIFfLc8tVy71wD2Nf9pw" alt=""><figcaption></figcaption></figure>

A drop-down menu will appear, allowing you to select the status you want to filter.

<figure><img src="https://lh7-rt.googleusercontent.com/docsz/AD_4nXcIv1LgXlC1Mh3FK1QfFrpbGPO0GHBEq9ijriMtoOgndxwDOL5DH99PhvXJUO1Yuc4JIco4uiRWa3krxhxB3v-ABd4ISj2L3LeJhPR3HY05qqu12o14dLXCfYdPbilPD7FOjlNp9ugijJHb2khC2TzxZ4H5?key=rICIFfLc8tVy71wD2Nf9pw" alt=""><figcaption></figcaption></figure>

### View and Update Teaching Profile

With this feature, you will be able to see and update the profile of the teacher. Click the **three dots** on the right side of the screen.

<figure><img src="https://lh7-rt.googleusercontent.com/docsz/AD_4nXcRlPUsPrDVWkFaijIt0APoiCSrhL5YdpD3hhNdvOxcimWJCbVsVBBNCVLsg_iuX5p8vfAW_F-8w-l7ZDI2TTMpLKDh8pyEL3P3i6i65VEXLhluCaGyH_yvMtNvK1LWl4G4I1I6SJUe-ChflmQxqGHGsEnm?key=rICIFfLc8tVy71wD2Nf9pw" alt=""><figcaption></figcaption></figure>

A menu will appear. Click **Teaching Profile** to view the profile of the teacher.

<figure><img src="https://lh7-rt.googleusercontent.com/docsz/AD_4nXeC2y0cu7MZ9l6Je1gt7QGI1e1Ix9DkKytHvgzyUitqyD3VfLq_03-WY5AHT2XWDz439_lWFRrZHHR-YxneIKBPhu_cBc2nqsGvEicSuczh49Wi-16NbpEgSBEOVJ0l2ahNHqjsFeA_GZXZ_NSGEF119dt3?key=rICIFfLc8tVy71wD2Nf9pw" alt=""><figcaption></figcaption></figure>

<figure><img src="https://lh7-rt.googleusercontent.com/docsz/AD_4nXc0TQdT_PNDim9KDTM44XKuToqW9-Sdnagre2TXG9wlHUaSUkGefMAVnvnDQm0-SQ_hTPyvtQ4y0qQMVWcea1apgavE9Ye5yr4ToLz1ks6vDrSJ5CzE1niVu2UfTtJF03yfvGb58TBn4f5cbxWzTJnMclOA?key=rICIFfLc8tVy71wD2Nf9pw" alt=""><figcaption></figcaption></figure>

### Intent to Teach

Indicate if the teacher will teach next term.

<figure><img src="https://lh7-rt.googleusercontent.com/docsz/AD_4nXfpZdOmGmD5N1ork6YQ6xwFWaYCXaqv7Fbz_PyLFpbRuDvcI7V8trr9DD4nJrrO1v8OJ4LC2JSRw6MKHo82TbRbN6tazK4iAyynwiRiwL-oph7KceuqotcyiI-ClUcEJOTJxyFsBUg8VOnZDVT52g9KqAnz?key=rICIFfLc8tVy71wD2Nf9pw" alt=""><figcaption></figcaption></figure>

### Preferred Teaching Load

In this section of the Teaching Profile, you can set the preferred number of units for a teacher each semester by inputting the number in the text box labeled “Units”. This is usually based on the faculty type, part-time or full-tim,e or according to your school’s policy.

<figure><img src="https://lh7-rt.googleusercontent.com/docsz/AD_4nXeOFsBsXNhQpFIej16GJ8RECHMxeiCM5e0FYSMji5IB0udvB_U2P4swDgaDIpzdkytmGr9cHvBiITd5vHtkQjckTtokqd39tevMn8NOzshWGUd9FJrMMe-b7NI0xebtKVR0j0w-lHvdDbrWwXx53LbGDKol?key=rICIFfLc8tVy71wD2Nf9pw" alt=""><figcaption></figcaption></figure>

### Preferred Room Assignment

Set your preferred or assigned room for teaching. A drop-down menu will display all the available rooms. Select from a dropdown list.

<figure><img src="https://lh7-rt.googleusercontent.com/docsz/AD_4nXcep6P3XLtasVF8lVLk0aLKRJrS_r5I76PIulE_FU0avbGJxj34Sldty1-JXtcVo_FCHkPv30BxW3VjeCYbVvQy3ws2BikH53knmDvp5ytrpOfit9yK6g-b5zPLjhUuEUgsQHIssVP1EYsLBtKwYzAS-DJT?key=rICIFfLc8tVy71wD2Nf9pw" alt=""><figcaption></figcaption></figure>

### Days Available to Teach

The availability of the faculty is set on this part. You can choose whether the faculty is not available, available all day, or available at a certain time on each day of the week.

<figure><img src="https://lh7-rt.googleusercontent.com/docsz/AD_4nXfJQymJYfivDFIrxcs6MCq6f5seWkMNnB4cQSJoSNcgZ6MQjFP9GrlUVtbYL4OgZBH5t-5PW1-ARxdzPeVuka36sIenB9J-CtrPZWoZ9rRbhLqY6hKkCwZqchufKOI4ByxBbmytdY_Ke-2dXVLLVttJM2M5?key=rICIFfLc8tVy71wD2Nf9pw" alt=""><figcaption></figcaption></figure>

### Courses Faculty can Teach

At this part, you can set a teacher’s teachable courses and course proficiency by clicking on the **Edit Courses** button on the upper right part of the section.

<figure><img src="https://lh7-rt.googleusercontent.com/docsz/AD_4nXfHUH4iNuSkNvfegBtlZ72JvrpLW9sTXKbgjZSmxMfjnbZt1VH36Ue9q9YwV-4VuVjandU_z4Ty0KD_LeBm2DbhEkXq-AHZLq3ZKpambeyPjOfOe90KwekUL_GRb_27cHYf2i_Xc2lDvQ-Tt7CRIlN4gosK?key=rICIFfLc8tVy71wD2Nf9pw" alt=""><figcaption></figcaption></figure>

<figure><img src="https://lh7-rt.googleusercontent.com/docsz/AD_4nXfT6Y1J1Tv12f9HfVPlFeYXox6lg8-MgGT7U5PyhzWtCnhAXZ8al6AoRgxOUTPHcsjLRmj3EyvM6zZBZWsHXwyWJDpr71nU8KXSyK7Sro9XToN1vFSymUK6I8D69dM6ksCtnf9Ttwp3EdLnNGSeghna_1j1?key=rICIFfLc8tVy71wD2Nf9pw" alt=""><figcaption></figcaption></figure>

Scroll to see the check box.

<figure><img src="https://lh7-rt.googleusercontent.com/docsz/AD_4nXffOtg0VNSZSWtNVpAY5yB4qC2mwXmtBFgWNKH35gNG_g-KSvwlOCuRhCLPRZJfvpGq27GT6qiz2Yv-i5LTcH0N0XQeekUvlxdYoPe7WvxdGwzPlMg7xGMur8opCDKgvt3S1F9ueH3jJt8uYnn9gx2zgkMJ?key=rICIFfLc8tVy71wD2Nf9pw" alt=""><figcaption></figcaption></figure>

Once you are finished updating the profile, click **Save Settings**

<figure><img src="https://lh7-rt.googleusercontent.com/docsz/AD_4nXd2H0e3AOuC5r5f0GvzilRsmup2FIEhcDjmJ5IXm8Wp5NZ24FxAOPHRfsZMWsQtjqWl_BGSegUATSrSaGXSbNSYp6sgBGzUuYMrnzF50D-G4tX_yKojxfHtJm7CeH0NLiz2lMdUyFhPASmFTgOFAucrra_w?key=rICIFfLc8tVy71wD2Nf9pw" alt=""><figcaption></figcaption></figure>

## Update Faculty Information

### Update Ino

This feature allows you to update the basic information of the teacher. Click the **three dots** on the right side of the screen.

<figure><img src="https://lh7-rt.googleusercontent.com/docsz/AD_4nXeV3MeIFVAd4KjmjvWJIkdow9ziBl2RuAzzPSaJHUY2lpi7RLhy-MZkXVnRVLe8iOQ8fafJk2E_abCawtt242NEKc4HFlzPVpyRGmfEmiSe8bs9CeHDQaT1nSoiwL3mLAPI5zvXtmnAApQc7guus1AZmguQ?key=rICIFfLc8tVy71wD2Nf9pw" alt=""><figcaption></figcaption></figure>

A menu will appear; click **Update Info** to update the teacher's information.

<figure><img src="https://lh7-rt.googleusercontent.com/docsz/AD_4nXc16hc1r0n9oSH7YPFnVYfyI0nDX0GXPCxoQrMOQoA03UTTDH_tx7B4IHHcLP--9Dz77XhsmZJHQAIrN1FLuPRbGEcg0_OmRtmFt55NgFl20Ed3p6ANssRRnNtfBi6zYdjSMksbdHNJYJZxu-7AZB0lKRGk?key=rICIFfLc8tVy71wD2Nf9pw" alt=""><figcaption></figcaption></figure>

Update the basic information of the teacher:&#x20;

* **First name**
* **Last name**
* **Email Address**
* **Employment Type**: A drop-down menu where you can select if the teacher is Full Time or Part Time
* **Status**: A drop-down menu where you can select the status of the teacher. The options are:
  * Regular - The teacher is active and currently working
  * Deactivate - The teacher is no longer teaching and cannot access their account
  * On Hold - The teacher's account is on hold, and they cannot teach

<figure><img src="https://lh7-rt.googleusercontent.com/docsz/AD_4nXewLdTCNlz1dm6JdzHQ_tf__4-aYlLSYuL5DXMMS18DFdRj50kPQyARPX2ctMnUewUar6u-OOH1VFfb8-BIpEPy9gwaIrNxDFSVHONjQhdilXlYOKejT7iQWis9KRY5ss0Rn1T9O5b6bAKTS9IJ34V-5RE?key=rICIFfLc8tVy71wD2Nf9pw" alt=""><figcaption></figcaption></figure>

### Teacher Rating

This feature allows you to rate the subject that the teacher is teaching. Click the **three dots** on the right side of the screen.

<figure><img src="https://lh7-rt.googleusercontent.com/docsz/AD_4nXd9BSOEApyQaULjBVBvlmyUVprCvgrTrAtisdmdSN8wVqi8t67J9h4ygX3BaFTu_5yJqLl-dIsaLR2H0VGGhzB09cKX5i5A9bTCYj41TPiGAGPcwM_5VQU9dWvbFQ1__q0tjWZcNVpOMu8eMFBSTIPm4U8?key=rICIFfLc8tVy71wD2Nf9pw" alt=""><figcaption></figcaption></figure>

A menu will appear, click **Teaching Rating**

<figure><img src="https://lh7-rt.googleusercontent.com/docsz/AD_4nXcT-Wi24kIgrXFL4S3TDigUuc-La1XZwfYxei3fa6WbTt8X38q9Ed8MBIn-ZoV3NRW0e3Ek2-2wxigCj65a3msT_Zn8eJoYVn8eUtZ3lxAWPLC1F06x5yMrGH7iXohIyiOIDJYa-4Tvy-XC09QuouV7jIk?key=rICIFfLc8tVy71wD2Nf9pw" alt=""><figcaption></figcaption></figure>

Rate the proficiency of the teacher in the subject they are teaching. Click **Update** once done.

<figure><img src="https://lh7-rt.googleusercontent.com/docsz/AD_4nXdcxGev26ivTCuYswUJQS6SRmiNm6OrO6eULhILOBDOteZZeuyjJXSd2R3Edh08Mk0HA-TQEesZk2CMCAG8TGL1c4BXLGtJ2ZUGAorpMYglvtq29obMjzFUtF-kaxYwxzKPT8_CrwaQ4934K03omx_6zvvp?key=rICIFfLc8tVy71wD2Nf9pw" alt=""><figcaption></figcaption></figure>

### View and Edit Faculty Record

This feature will allow you to view the information of the teacher. Click the **three dots** on the right side of the screen.

<figure><img src="https://lh7-rt.googleusercontent.com/docsz/AD_4nXd76WmYtAx2hhgJzCM75mT90Q5wA36soWwblMuxa3mQ7GL4FIDIWivQf1YFJHNoIpQMBS4c64jcQRJoMZfhGdo00ghs5wF2Yw0iGsZ4ukLjW19zZ3sihqYW8Qn9uYWQEZpp6BEpWWkPsoOW-kv1SI6FbR6B?key=rICIFfLc8tVy71wD2Nf9pw" alt=""><figcaption></figcaption></figure>

A menu will appear, click **View Records.**

<figure><img src="https://lh7-rt.googleusercontent.com/docsz/AD_4nXdkiDtiZpR0fM1w16k_H_f2dGvKhpwfYT3u8NyBtIHZprSazEZ0SoMs_cz69hz7qtTFxzrvf_vi_crwhDcS3WsMELmJhM9Uvc8N6FgI3-AdlUzXauIEbJo1WiZq81J_qtQ5bzv9X6IZGL-M-9XePfT2WbGD?key=rICIFfLc8tVy71wD2Nf9pw" alt=""><figcaption></figcaption></figure>

You will see the information about the teacher. To update the information, click **Edit**.

<figure><img src="https://lh7-rt.googleusercontent.com/docsz/AD_4nXdeQRbZZUOMgzmHYk2rQ1RYcCNI48x7qnqWNionGyqGgvGfoCQuLbyPsY6cbIzUJjJDlbtSMbBk8neTh8HsI-aAnV0U-dqDTOoCtLobwjA8a2rMP1RUZIJZvFJnir1dqc5zfCSpqEPoWi4kaYRL2oYL8BQ?key=rICIFfLc8tVy71wD2Nf9pw" alt=""><figcaption></figcaption></figure>

Once you’re done updating the information, click **Save Changes**.

<figure><img src="https://lh7-rt.googleusercontent.com/docsz/AD_4nXd9o6nKM95qBBtnpyVY5b14cIl_W3cohm5GHsymXAHozJOlqNvpIp606IKhOjbdBnHmWaiqhRAzva0eiYg_pygp-OKyVeLiRasOfN9cAgslZuYwGUmpGN4sXwAlWX0kbq7J0kUwOHIa-jB9NoqcfDqp8NO0?key=rICIFfLc8tVy71wD2Nf9pw" alt=""><figcaption></figcaption></figure>

### Download Faculty Profile

This feature will allow you to download the information of the teacher. Click the **three dots** on the right side of the screen.

<figure><img src="https://lh7-rt.googleusercontent.com/docsz/AD_4nXcJbhENcpB0J0DlgFgXo6hzL75jEUqA1II3i4zFePK-DGgn08TJz6h8SKcaGbFsef0yCRQwuXRgK7f7n6GrYTA86aHEQNz_-3uFg5SIvttH2NDhXERtbC6O1tEU27Zurba0lDTnfnDynuDylZGZn77uv8HO?key=rICIFfLc8tVy71wD2Nf9pw" alt=""><figcaption></figcaption></figure>

A menu will appear, click **View Records**

<figure><img src="https://lh7-rt.googleusercontent.com/docsz/AD_4nXdkiDtiZpR0fM1w16k_H_f2dGvKhpwfYT3u8NyBtIHZprSazEZ0SoMs_cz69hz7qtTFxzrvf_vi_crwhDcS3WsMELmJhM9Uvc8N6FgI3-AdlUzXauIEbJo1WiZq81J_qtQ5bzv9X6IZGL-M-9XePfT2WbGD?key=rICIFfLc8tVy71wD2Nf9pw" alt=""><figcaption></figcaption></figure>

Select the “**Download Profile**”

<figure><img src="https://lh7-rt.googleusercontent.com/docsz/AD_4nXcHE6VS-ys_piwXWFoEPEG5OFCM9Xnp9jdiffOYV6fFe4WXD8p1XYvoZ_UPwiZCfniUtZt3TFIYImxzEVmdlFemSXgPjHoZDBO-hnel8EIx23wjyTiCWLmMFSUmROAj3bQH9-_ZXFmzsBI_Cy8mBiI_fjOt?key=rICIFfLc8tVy71wD2Nf9pw" alt=""><figcaption></figcaption></figure>

Click the checkbox for the information you want to download. If you want to download all the information, click the **Select All** checkbox.

<figure><img src="https://lh7-rt.googleusercontent.com/docsz/AD_4nXcv1DAQClg7mCtFJhQ9sY88QsRcACbXlQlrNJcpvEHRquLM3Sa4Cg9kdPT-eSApr1K2wxp7umPaRIfvu8Y1IT_gZAyLqV9ZZvSC7Q3HG7FH0tDFkb0dRRC1mfTNqwnwU7VlPahDwQxDU0aQH9VJhjsU6cuw?key=rICIFfLc8tVy71wD2Nf9pw" alt=""><figcaption></figcaption></figure>

Once you have made your selection, click **Proceed,** and the .xlsx file will be downloaded.

<figure><img src="https://lh7-rt.googleusercontent.com/docsz/AD_4nXcZYJXa9y9EYxv3Mrc3msJ5Dqn8K36fcRtIEIXYRKJ44lqf2N45ZEGD42quk04VGkPyfqVCt966gKxq1HceDYfPEZIaMYCUp7ywjugIv91MAFwotRImzDjV2TZkGPVFxo4v1QoF5oC9nYqZeyTbm5Rguwqy?key=rICIFfLc8tVy71wD2Nf9pw" alt=""><figcaption></figcaption></figure>

## Frequently Asked Questions (FAQs)

**Question:** What is the purpose of the Teaching Rating?

**Answer:** Teachers with higher ratings appear as recommended choices when assigning faculty to courses.


# Utilities

The **Edusuite UNI Utilities** package provides essential tools that empower system administrators to manage school operations efficiently. By digitizing clearance processes, organizing important links, streamlining announcements, and monitoring notifications, these features contribute to a more connected and well-informed school environment.

{% content-ref url="/pages/-M62uoYHE54kF32LcHJ7" %}
[Ongoing Classes](/product-guide-uni/admin-home/utilities/untitled)
{% endcontent-ref %}

{% content-ref url="/pages/-M1T-etNpqW0sT3XAGIH" %}
[Clearance](/product-guide-uni/admin-home/utilities/clearances)
{% endcontent-ref %}

{% content-ref url="/pages/642uCElkWlOh02z429fo" %}
[Student Promotion](/product-guide-uni/admin-home/utilities/student-promotion)
{% endcontent-ref %}

{% content-ref url="/pages/-M62vUrMAGbEaIikg9Qw" %}
[Ticket Requests](/product-guide-uni/admin-home/utilities/ticket-requests)
{% endcontent-ref %}

{% content-ref url="/pages/-M62vUlFkiJItMPxyFrL" %}
[Announcements](/product-guide-uni/admin-home/utilities/announcements)
{% endcontent-ref %}

{% content-ref url="/pages/-M7Hl0yJU\_-3uASTZhxn" %}
[Notifications Dashboard](/product-guide-uni/admin-home/utilities/notifications-dashboard-1)
{% endcontent-ref %}

{% content-ref url="/pages/-M62vUd6D7QNa43SU9fK" %}
[Links Manager](/product-guide-uni/admin-home/utilities/links-manager)
{% endcontent-ref %}

{% content-ref url="/pages/-M7Hl0yJU\_-3uASTZhxn" %}
[Notifications Dashboard](/product-guide-uni/admin-home/utilities/notifications-dashboard-1)
{% endcontent-ref %}


# Ongoing Classes

Last updated: March 2025

The **Ongoing Classes** feature allows you to view and manage current classes. You can check class details, view enrolled students, and update student grades.

## Access and Navigation

Navigate to **Utilities > Ongoing Classes** to access this feature.

<figure><img src="https://lh7-rt.googleusercontent.com/docsz/AD_4nXfjKfPrZ4hdtlMVzDTu_KC9-HUZ78d8L5j34OzFnNuOy4GEVBsf91e9cxLPJzGJ2i7kElGVFdgvZQeybMwr15oPd31itTy_LGr-CFElpP2KbL4zrtLhU2nWrQ46wJmOo9GaiPyuTcoFFOSZfwQnECBl5ss?key=TjbJa5Zh7Vx6TgP0Chz9GA" alt=""><figcaption></figcaption></figure>

Check the privilege assigned to your user account or role if you cannot view a link from the list.

{% hint style="danger" %}
Contact your school’s system administrator to request view or edit access if you cannot access the rights management screen
{% endhint %}

## View a Class

To view the enrolled students in a class:

* Select a class from the list
* Click **View Class** on the rightmost part of the row

<figure><img src="https://lh7-rt.googleusercontent.com/docsz/AD_4nXfQaWBHxqGGkxTti1spqe9J903nNANOM0N7hdblAMIOowirAZmZHBYd5mAj23iWSmMwLi0dR5FJjmJP1zllzpICojEsMdiIDVHnUcx6Mhkqmnb-9iE-dimKcG4_y65YZbAd6JV43oiKsyYQU_hh_1g25MM?key=TjbJa5Zh7Vx6TgP0Chz9GA" alt=""><figcaption></figcaption></figure>

* A side window will appear, displaying the enrolled students and their grades

<figure><img src="https://lh7-rt.googleusercontent.com/docsz/AD_4nXetMMcuOr2PPE0P5MBawYh4KT64U_o9rOO0a4F5rhwUobKj9Akr2_p3Hay3s6jZ_C0amJIzdmusQQoXvpfB5tBaMfFD_BpIqc7zTqM8_UgsPaPpIxMrzG-JQ1EhU-zPKWnq37a67mniNoJg20zfWri4FQuG?key=TjbJa5Zh7Vx6TgP0Chz9GA" alt=""><figcaption></figcaption></figure>

## Update Grades

* While viewing a class, click the **Pencil** icon on the upper-right corner of the page

<figure><img src="https://lh7-rt.googleusercontent.com/docsz/AD_4nXe-h3bXJde8uR1_7tAYBpITv3d3dRo9lRPwTbmyyr--fGuJ4kCTGzwd78k62_W7tuhDCSZzi_EflL158SXkNKmoXQu0_m7UnwhSt0z0nWEGarr23FwxApRgzMIoRgwEfSixdJS5FzaBqvsQc88MS52vYbwG?key=TjbJa5Zh7Vx6TgP0Chz9GA" alt=""><figcaption></figcaption></figure>

* The grade fields will become editable
* Select a student and the grade set (Midterm, Final, or Average Final)
* Choose the appropriate grade from the dropdown menu
* Click **Save Changes** to finalize

{% hint style="info" %}
Related guide: [Auto-computation of Final Grades](/product-guide-uni/admin-home/utilities/untitled/auto-computation-of-final-grades)
{% endhint %}

## Download the Class List

* While viewing a class, click the **Download** button on the upper-right side of the page

<figure><img src="https://lh7-rt.googleusercontent.com/docsz/AD_4nXd-SKNBxhWh_7BsUo5StRRHgWP-57EQctaxKNyHo9KLIgznpaNaKgC0sFiReM7L0dKTQC5tBTXn5jlGaQdxGsy3IZTvMXnS8LcHIG9kFXNWvktp_jvjC5yN1VJ0M9herRyzhXgFT0-t7d9uSYuyLRqTWDY?key=TjbJa5Zh7Vx6TgP0Chz9GA" alt=""><figcaption></figcaption></figure>

* Select the class list report settings

<figure><img src="https://lh7-rt.googleusercontent.com/docsz/AD_4nXf2ZWMFfSoDSZicbLeBG4xXYYAmF-GDltBcaAoXxCkmNUlUU8xCEX6MC8i0d8nuGEXNla1GwD0pMBRXsQgBMQrkgufD29IqjmMw-pnLdXckw_eNDoMB_pUIZlJIpyXGHRCc7MqwHy90zB8MYsqYTGqjdfP0?key=TjbJa5Zh7Vx6TgP0Chz9GA" alt=""><figcaption></figcaption></figure>

* Click **Download Class List** to generate the file


# Auto-Computation of Final Grades

Last updated: March 2025

This feature automatically calculates a student’s final grade based on their grades across grading periods, assigned weights, and the transmutation table.

## Prerequisites for Auto-Computing Final Grades

* **Grading Systems**
  * The grading system must be numeric
* **Grading Templates**
  * Grading periods must have a total weight of **100%**
  * If a student has non-numeric grades (e.g., **DRP, INC, etc.**) in any grading term, the final grade will reflect the non-numeric grade
* **Grading Settings**
  * There must be multiple **Grading Schemes** in addition to the "Final Grade"

## Apply Auto-Compute to a Course

{% hint style="info" %}
Related Guide: [Courses](/product-guide-uni/admin-home/planning-1/planning/courses)
{% endhint %}

<figure><img src="https://lh7-rt.googleusercontent.com/docsz/AD_4nXfnkHrzsbo1OMP3lXN-82i5MP__SoW8AFzP1COlGjQqGYbwzVxvp_FKoM8uysawOi6QtxhedNdxhsluWQZD_5s58A68bcR1CoEyjpe4cwYg5UXxtFBgeA1xXoTV3lhBve5kh7TQsA?key=TjbJa5Zh7Vx6TgP0Chz9GA" alt=""><figcaption></figcaption></figure>

* When creating or editing a course, set the **Grading System** to a numeric range grading system
* Check the **Grading Template** box to enable the selection of a grading template

## Verify Auto-Computed Final Grades

* Courses with auto-computed grades will display an **“Average”** column

<figure><img src="https://lh7-rt.googleusercontent.com/docsz/AD_4nXcR_BQTtqpquc-qEi1Vld5CKQiI4KSEBxjfo7h3n-H5jqf4IHatphNNL-inv8oIrq6KIdY5nXtVe_vbQlSk_BZjxLjI3jlUkRT8FNBhCHwJQ40qcTGpGUZVz4O-oCExVQ9D1PyGmw?key=TjbJa5Zh7Vx6TgP0Chz9GA" alt=""><figcaption></figcaption></figure>

* If no grades have been entered yet or grading periods are incomplete, the final grade will appear as **NG** (No Grade)
* If a non-numeric grade is assigned, that will be the final grade

<figure><img src="https://lh7-rt.googleusercontent.com/docsz/AD_4nXc6DLPxqierCJg-43_pOH01PnT6RsTlGB9XcQ1RqXeqQggKncGyI1igM62taGq4D2dsVfegoSMg4kcMWE-KhItXSQCepq4R9AEGeCcldTCaxLWazrz4sK4QDXB-8YW7NmFBk7EBJQ?key=TjbJa5Zh7Vx6TgP0Chz9GA" alt=""><figcaption></figcaption></figure>


# Clearance

Last updated: March 2025

The **Clearances** feature allows you to create clearance requirements and hold orders, assign them to groups of users, and manage their completion status.

## Access and Navigation

Navigate to **Utilities > Clearances** to access this feature.

<figure><img src="https://lh7-rt.googleusercontent.com/docsz/AD_4nXe0ZhtuReL54i1uS51FTeN4RFT1ES7rdyMi_I1eekAa2YOZ-4EJbLBtz99huIByri1lcq3u-iKGT4VRgaorNDPl3RTQ62L2IiLSaD4ssRh-CLOZne9rmPi-JaO9dGxcF9W-2KBE3mOtzQpr_gFv-JA-8m1c?key=DvjLwbNV8RKVLNOzIYK5bA" alt=""><figcaption></figcaption></figure>

Check the privilege assigned to your user account or role if you cannot view a link from the list.

{% hint style="danger" %}
Contact your school’s system administrator to request view or edit access if you cannot access the rights management screen
{% endhint %}

## Filters

Filters are available at the top of the page to refine your view:

<figure><img src="https://lh7-rt.googleusercontent.com/docsz/AD_4nXdI_ODxi0YOKP0crzYfwAdm7Y_NZuNIqUC0rCXYOx2lxTmKfKfs1vfyTYNim7eb5mAbhpI1w2XhI44nuOevK8f_CxVvUg5_-gkOOx1A8TiPZ54uB0MGei5JHxP41SbJIzlH-Yx9zoJgYc4qa9A8Wkh4QHR9?key=DvjLwbNV8RKVLNOzIYK5bA" alt=""><figcaption></figcaption></figure>

* **For:** Filter clearances based on the assigned term
* **Type:** View only **Hold Order** clearances, **regular** clearances, or both
* **Completion:** Filter by status (**Overdue, Completed, or Incomplete**)

## Create a New Requirement

* Click **+ New Requirement** on the upper-right corner of the screen

<figure><img src="https://lh7-rt.googleusercontent.com/docsz/AD_4nXe_hVugbZo7_z39Zz62Wl9uhxlnOo8WVh7RY7ALf2QWn_jEr5aCNnHgMSHYn2qUera1f94zXjCN7y9Q2VibR8_uVedeEABtGg432huGDQkfK0r4soJcqI-qIRwz0QRyrohLW4PlqAJ-0xjt3FuR0T5EaVQf?key=DvjLwbNV8RKVLNOzIYK5bA" alt=""><figcaption></figcaption></figure>

* Fill out the **New Requirement** form with the following details:
  * **Name:** Title of the clearance requirement
  * **Details:** Description of the requirement
  * **Term Applicable:** The term during which the clearance applies
  * **Due Date:** Deadline for completion
  * **Reviewers:** Users authorized to update assignees and verify requirements. Reviewers will receive notifications when students mark their requirements as **"For Verification"**
  * **Hold Order (checkbox):** Determines if the clearance restricts students from **enlisting** or **viewing grades**

<figure><img src="https://lh7-rt.googleusercontent.com/docsz/AD_4nXcpke4ca5iI_C24eXWDrdvOSk5L38gEyrsHP1DEBYWWtOpHk1ow-mNmCcR2UzFa9QUgSjhBLyFpnxhgzA6p57Me-IgROpwO2D7mq_SlsEFkJVzmVhPio_JQuThLSQntBeaGCTCHB2nZTElknlBKysAzXGlx?key=DvjLwbNV8RKVLNOzIYK5bA" alt=""><figcaption></figcaption></figure>

{% hint style="warning" %}
If the requirement does **not** restrict students, leave the checkbox blank. This will notify students about the requirement but will not impose restrictions.
{% endhint %}

* Click **Add Clearance** to finalize

## Edit a Requirement

* Click the **Pencil** icon next to the clearance item

<figure><img src="https://lh7-rt.googleusercontent.com/docsz/AD_4nXc8nz_qcgrc7dJ8JCkWEMfXigpFqTJsTVGbsmCG6eL1Hru0OBnCnW09lJCFKTWXR8z2g4VTddPZ1i61nhHwzSi4TZoW7x71foHHLuW1-Kyi6fSP89lf6UFSutspkTYG02HmukIXGLQHqTPU330OJhnXiwa-?key=DvjLwbNV8RKVLNOzIYK5bA" alt=""><figcaption></figcaption></figure>

* Update the necessary details in the Edit Requirement form

<figure><img src="https://lh7-rt.googleusercontent.com/docsz/AD_4nXekvxvhTbdJMKW9-zw0-wZkfzATyIZFekQEBBGdXB5U2RMqZpaKPjIod1cKnXi-oFwND0WrAqh7nzd23W0tlqjx2dlpnTM0WzCn93zdUfoZAYsnHiDCNxNiHGTwtcsDjiTTo3iVKbtyVuOeXrF5CRh1sEz_?key=DvjLwbNV8RKVLNOzIYK5bA" alt=""><figcaption></figcaption></figure>

* Click **Update Clearance** to save changes

## Assign Students to Clearances

* Select a clearance and click **View Assigned**

<figure><img src="https://lh7-rt.googleusercontent.com/docsz/AD_4nXeZg3_jOaYJxv17lpP6UNuEDjT9XF55uhUm5uYHZCSYOBFmfb88Pzn3gOdMvkXmadAfBLr-JaoEG2w1s6DcWuFJqXgARnCMCerAVKmI7VqdtYHsgarX5lz_SP-jqpN4HLycbf4ieAiN4tq1KSDj-Jz5B0dR?key=DvjLwbNV8RKVLNOzIYK5bA" alt=""><figcaption></figcaption></figure>

* On the **Assigned** page, click **+ Add User**

<figure><img src="https://lh7-rt.googleusercontent.com/docsz/AD_4nXeNa2moN4OgtPlNV64GyI-t6F5CzVGxjszPzS_0R6P1-k6HJTwK8d-0cEZRxOjVsM5e5Fr60Pfki5MUHbH88dkIsYjBjZoyz9x2gRKvox7dmQT7N7q-d7BIkF7nR5DZdiuRmfX3nbM0LuVE8fys7r2nlUky?key=DvjLwbNV8RKVLNOzIYK5bA" alt=""><figcaption></figcaption></figure>

* Apply filters to refine the list of assignees

<figure><img src="https://lh7-rt.googleusercontent.com/docsz/AD_4nXe8pLkwJzWxNGtn1YmgtwhC8gx-TZdCFRy9qI2UxEijKstqHwx38mbilgaKvww8TaM6LqxrqjkOABgtcmKcKhBWcSWPrIcm1mdgyMociBkhMzJHMkvM1XGQK-6__HnexCiulykTZMvtUQTzFmVK30hMEsy1?key=DvjLwbNV8RKVLNOzIYK5bA" alt=""><figcaption></figcaption></figure>

* Select the users to assign

<figure><img src="https://lh7-rt.googleusercontent.com/docsz/AD_4nXd4l-Nq1eiqzMFoRCoNGa29YKWYnHkgB5VzQpckl7VXVdXT-Ac3-BuISCB-RO5qQkUdtgA2Wj4mH65ehN1ja0erXqD6IWv9YuVhbmu_wo95NJ6_KIRUQGOvbwPrIcyav0TDB5jfaxybVK33TatUemLO6Bw4?key=DvjLwbNV8RKVLNOzIYK5bA" alt=""><figcaption></figcaption></figure>

* Click **Add Assignees** to confirm

## Remove Students from a Requirement

* While viewing assigned users, click the **“X”** button next to the student’s name

<figure><img src="https://lh7-rt.googleusercontent.com/docsz/AD_4nXeDpmZ0bbsD46ddF2c505DA_s6OrOIkmnqKLa3cqcsGqndxr8XMXfqXe1nBJvgEkLLttz2XDIfds6QrpvHxo8SdMSkD3AY7ThrgOoGUhA0QFXMQUxiEOt09OVP52-yCMiivdOUSCiWJONmlPWRog-9P7j4y?key=DvjLwbNV8RKVLNOzIYK5bA" alt=""><figcaption></figcaption></figure>

* Confirm the removal in the pop-up prompt

<figure><img src="https://lh7-rt.googleusercontent.com/docsz/AD_4nXfMMu4NHYuf5cSYoPxpIF1KHC-0F5NndjmVBPmpHemg_QJey4v7ujCQy0bpJoHj-AE_Sj43dIccHyP8m8jRdrH4RGeyql42e6elCuczg3IaiyGNj1gK99YmC2PyheEwOLX2hAdZlIcRQ3OcN5DFnPOfLwY?key=DvjLwbNV8RKVLNOzIYK5bA" alt=""><figcaption></figcaption></figure>

## Delete a Requirement

* Click the **Trash Bin** icon next to the clearance name

<figure><img src="https://lh7-rt.googleusercontent.com/docsz/AD_4nXcdosUzYeXFoIv_jaRFMLft_YTpXZA8OdhTgfekPn9LcH1pT63Uc1i6eMVMKwNZCM4TR4NSTqVkpvCNamGScQBE3GabziQ9qLVTRopqZsbnAmzgOIcfJJtp4F2UlhDH2IrAM7YfgGurRv5FxdIUoOGTe6Q?key=DvjLwbNV8RKVLNOzIYK5bA" alt=""><figcaption></figcaption></figure>

* Confirm deletion in the pop-up prompt

<figure><img src="https://lh7-rt.googleusercontent.com/docsz/AD_4nXc-QREiHraAGtJMAfWQyKqFpVSYMeq7yzyIN695MezNtswqh1Gzy04cXwxby4gkmwMD8ugTduOEVe59If_ik-eVy-hgpVwNN2S8-WW-ZpagrS9XR40oCrA_O3CMiw4TH40y8AeIaFSqllcR31_wGPpk9QE?key=DvjLwbNV8RKVLNOzIYK5bA" alt=""><figcaption></figcaption></figure>

## Search for a Requirement

Enter a keyword in the **search bar** above the clearance list. Matching results will be displayed.

<figure><img src="https://lh7-rt.googleusercontent.com/docsz/AD_4nXf8WKOIrfbk6WljQH9Bf7e9kp5hrfpPvAAYEilFDdHXQMMT_cOrehMUIJGEbngC10xfnt8O1VITtYQv68YHksYlq6dSf67qIhbDDvi1CKjE49Il9jobAM0_WM3pX-r9Zr2b8XtF-SfpOp314tG48ERRqqZo?key=DvjLwbNV8RKVLNOzIYK5bA" alt=""><figcaption></figcaption></figure>

## Frequently Asked Questions (FAQs)

**Question:** Can I assign a clearance to a student without restricting enrollment or grade viewing?

**Answer:** Yes. You can assign a clearance under **Utilities > Clearances** and simply **uncheck** the Hold Order option. This ensures that the student is notified of the requirement but can still proceed with enrollment and grade viewing.


# Student Promotion

Last updated: April 2026

The **Student Promotion** feature allows you to view, evaluate, and manage students’ promotion status.

## Access and Navigation

Navigate to **Utilities > Student Promotion** to access this feature.

<figure><img src="https://3973081029-files.gitbook.io/~/files/v0/b/gitbook-x-prod.appspot.com/o/spaces%2F-M1SysIMhMO_ls3VlZcw%2Fuploads%2FP8hzeZjRQ7CxaOE5vmMM%2Funknown.png?alt=media&amp;token=fba6606d-98ff-47ca-b6d2-76f9cf9fb0de" alt=""><figcaption></figcaption></figure>

Check the privilege assigned to your user account or role if you cannot view a link from the list.

{% hint style="danger" %}
Contact your school’s system administrator to request view or edit access if you cannot access the rights management screen
{% endhint %}

## Filters

Use filters to narrow down the list of students:

* **Status** – Filter by promotion status
* **Year Level** – Filter by student year level

<figure><img src="https://3973081029-files.gitbook.io/~/files/v0/b/gitbook-x-prod.appspot.com/o/spaces%2F-M1SysIMhMO_ls3VlZcw%2Fuploads%2FucaNtgrmC0HsTqO9QF8h%2Funknown.png?alt=media&amp;token=d9aa4d40-cb75-40fb-9386-59fdaff62fbc" alt=""><figcaption></figcaption></figure>

## View a Student

To view a student’s details:

* Click **“View Student”** on the rightmost side of the student’s row

  <figure><img src="https://3973081029-files.gitbook.io/~/files/v0/b/gitbook-x-prod.appspot.com/o/spaces%2F-M1SysIMhMO_ls3VlZcw%2Fuploads%2F1uu5iZI8CIdzpM2BAUy8%2Funknown.png?alt=media&amp;token=b97150e1-2a36-4459-b98d-62ed025c64e0" alt=""><figcaption></figcaption></figure>
* A side panel will appear displaying the student’s grades&#x20;

<figure><img src="https://3973081029-files.gitbook.io/~/files/v0/b/gitbook-x-prod.appspot.com/o/spaces%2F-M1SysIMhMO_ls3VlZcw%2Fuploads%2F4bOxB5Q638hi99UUoF5Z%2Funknown.png?alt=media&amp;token=83780e08-a52a-49de-a4fe-425666142192" alt=""><figcaption></figcaption></figure>

## Update Promotion Status

To update a student’s promotion status:

* Open the student record
* Click the **“Evaluate Promotion”** icon

<figure><img src="https://3973081029-files.gitbook.io/~/files/v0/b/gitbook-x-prod.appspot.com/o/spaces%2F-M1SysIMhMO_ls3VlZcw%2Fuploads%2FNfCx4ojLuQkuTsM6Gj9a%2Funknown.png?alt=media&amp;token=c690234d-4783-4192-980c-1863c62d2e0e" alt=""><figcaption></figcaption></figure>

* Select the appropriate status from the pop-up:
  * **Promoted** – The student advances to the next year level, even if not all required units are completed
  * **Retained** – The student remains in their current year level based on the curriculum’s Year Level Classification and is advised to enroll in courses within that level
  * **Removals** – The student is not allowed to enlist; the enrollment banner is hidden
  * **Dropped from the rolls** – The student is not allowed to enlist; the enrollment banner is hidden

<figure><img src="https://3973081029-files.gitbook.io/~/files/v0/b/gitbook-x-prod.appspot.com/o/spaces%2F-M1SysIMhMO_ls3VlZcw%2Fuploads%2FpiRBdVOWE2Fp77UcAfpz%2Funknown.png?alt=media&amp;token=ccb558f3-7310-4cc2-835c-2c975ebb31b9" alt=""><figcaption></figcaption></figure>

{% hint style="info" %}
&#x20;If no status is assigned, the student will automatically retain their computed year level, and no advising changes will be applied.
{% endhint %}

* Click **“Save”** to finalize the update

{% hint style="info" %}
Related Enrollment Eligibility Settings: General Enrollment Settings> [Student Promotion](/product-guide-uni/admin-home/enrollment/enrollment-setup/general-enrollment-settings#student-promotion)
{% endhint %}


# Ticket Requests

Last updated: March 2025

The **Ticket Requests** feature allows users to file issues and requests. It also enables users to track updates, comment on tickets, and view discussion threads.

## Access and Navigation

Navigate to **Utilities > Ticket Requests** to access this feature.

<figure><img src="https://lh7-rt.googleusercontent.com/docsz/AD_4nXeTzk7GaRrwt6LlJKLpvQEiatSaZrzIz4AUkoDTYTYkxA4ddT4vhUiB5NnuRjfaV5u0vH27BP4hUJQjKO5wPD5WiIBrqp1KyTqfZ1fQMXHYzIHys0rVgeQ8jjUfa2v4lnycLO6gT9VzRKKugKDNuZCDJGQH?key=knRtqbZJygtH4qpIRdxhMA" alt=""><figcaption></figcaption></figure>

Check the privilege assigned to your user account or role if you cannot view a link from the list.

{% hint style="danger" %}
Contact your school’s system administrator to request view or edit access if you cannot access the rights management screen
{% endhint %}

## Manage Ticket Type

### Create a New Ticket Type

* Click the **gear** button on the right side

<figure><img src="https://lh7-rt.googleusercontent.com/docsz/AD_4nXfuEOIZIC8vyq-f_NEUV7SBi41KHDChARPq-D1Kva3FWTphtonUNzQadGXH9siOeluOETYgi3PXG5-D96fVh60L8iYzQ623j1OYqK9JK-63oU4foAhxTyMyzFmlexBT3jyPXvXd-jyPXeNq0t9xWal4Lx0q?key=knRtqbZJygtH4qpIRdxhMA" alt=""><figcaption></figcaption></figure>

* Click **+ New Ticket Type** and enter the required details:
  * **Label:** Name of the ticket type
  * **Description:** Additional details about the ticket type
  * **Concern Handlers:** Users responsible for managing this ticket type

<figure><img src="https://lh7-rt.googleusercontent.com/docsz/AD_4nXes_3RWFbi-M5TQCVRwf8cSy0DXbZ7236JMwZHC1DP10R5f02J0ntLDw89zS-4pnudIFqN7KMSx4m4eMY1DlSB-z2yOUEYon1qpYIdreKJ47A68QkOjY-lNRTFLhbAVDBCuJv-GgspYvmCB7Css7prApcGa?key=knRtqbZJygtH4qpIRdxhMA" alt=""><figcaption></figcaption></figure>

<figure><img src="https://lh7-rt.googleusercontent.com/docsz/AD_4nXd9KpCnBQ2-XGpWmQatX2k0OAmdVjMYTerxqFQTIM5KBsXpy3AnMH60-LMwrQYEqLzUlvEvn6AG9md8L9wMBn439fHvsFn-mWKJo5Gjvvk5c9GAqz8tNsvylz6gfANsIuO9y6tav-BTKARln3WLSSxUUtOS?key=knRtqbZJygtH4qpIRdxhMA" alt=""><figcaption></figcaption></figure>

* Click **Add Ticket Type** to finalize

### Edit a Ticket Type

* Click the **Pencil** icon next to the ticket type

<figure><img src="https://lh7-rt.googleusercontent.com/docsz/AD_4nXeyZVghDh8u5iElX0JASOapF5SdfOi9cJbK2D0oy4Gv6Wrf7GSiXNzUmX6Fp8AxRH3VStnpw0ivq3G3b9qGB5sUoBqcNjqv8cz_K5w6HL7-Pco_Z3lrHpbngDESRnwrKeaCKSj_xp-IfQRNz9m-MDjEjI7h?key=knRtqbZJygtH4qpIRdxhMA" alt=""><figcaption></figcaption></figure>

* Modify the details as needed

<figure><img src="https://lh7-rt.googleusercontent.com/docsz/AD_4nXdVoBwBfPSWLtxOw0EJJjhfAUzdF4tsWekUSPPUtHr48bGmt0Q17yedeTvtS-i6OhbZX3vaTX8MhIe_2lMXsuqoPeokzTNok1xf8CSXW50o_yVmSZwLQVGKcSE9DGQKTxFWGWDPoq7-iDlfeoO9nnAmOg53?key=knRtqbZJygtH4qpIRdxhMA" alt=""><figcaption></figcaption></figure>

* Click **Save Changes**

### Delete a Ticket Type

* Click the **Trash Bin** icon next to the ticket type

<figure><img src="https://lh7-rt.googleusercontent.com/docsz/AD_4nXdjZVZbP4ZfpzXNb05kYk8eTLPCfo3a8jyL2le0VeZ_1fybaKUHaWc80KCFVAU3aayMGxGegN7QKffEJqfbXAWY5gQv8uzgSoauRsNoh_bnFgllJGMnZUohyf85P61PO4Z4pDjrqYrXvZR4UPjHISAK5l0K?key=knRtqbZJygtH4qpIRdxhMA" alt=""><figcaption></figcaption></figure>

* Confirm deletion in the pop-up prompt

<figure><img src="https://lh7-rt.googleusercontent.com/docsz/AD_4nXdW7-nxllZsy45NE2_VpZhbFl7JeyN44FdVRA-Dqe0MI4g1ryWVrSd4ikm1KyLim8DbaJvO2fCRo1jiKZ0h8TFzWVWH5-8oPkhZ__KQOQu27zvDYWljzteH9rxOnk1c56fEAx52vS1XPN2uyDVuAhNLCisH?key=knRtqbZJygtH4qpIRdxhMA" alt=""><figcaption></figcaption></figure>

<figure><img src="https://lh7-rt.googleusercontent.com/docsz/AD_4nXd2dqfu1ZPG2hpqMayM8bXFd2avEtD8zRZ_iFD-bgVrqT5cqJg-MYJdxkdUZ3Cr0zYfsUYRVCX7G31752y96iuTM_2g-f0tBSdXHmSjngIC55PnEcIk-MST_W1u5El4tgU0sQUltjDROt8UacaFd41NFue5?key=knRtqbZJygtH4qpIRdxhMA" alt=""><figcaption></figcaption></figure>

## Manage Ticket Requests

### Create a New Ticket

* On the Ticket Types main page, click **+ New Ticket**

<figure><img src="https://lh7-rt.googleusercontent.com/docsz/AD_4nXdKxI9ldy4HlpQXJk9W7eX5itL_90XIjNLLcDqI44xilH6aBX-LTTE84jo8hXAQfXqThi9STmJdOiyIfR1-3y5l0dpbYKwMxCUsyZz_wgtv584OMUHQrU8KKFSuCuHdBj5Ge1DkErZQEWTgF3Dzev3skFk?key=knRtqbZJygtH4qpIRdxhMA" alt=""><figcaption></figcaption></figure>

* Fill out the ticket details:
  * **Nature of Concern:** Select from the available ticket types
  * **Summary of Concern:** Provide a title and a brief description of the issue/request
  * **Attachment:** Upload a file, if necessary

<figure><img src="https://lh7-rt.googleusercontent.com/docsz/AD_4nXcZ7oGXSeazC6hGiWjKY5M3BOzPRFhnmQVqSepJVM6oShE4RpFSdcv3xRiiGLqno46fTlXiT7OhOkk1SNAYHt448EvQm0nB7A811-PgelL_XZLPqBlmdqzdC_ANfGd5nLKAs3IIaNMlpj0gE09v39VjxtsL?key=knRtqbZJygtH4qpIRdxhMA" alt=""><figcaption></figcaption></figure>

* Click **Add Ticket** to create the ticket

### View a Ticket Thread

* Locate the ticket and click **View Thread**

<figure><img src="https://lh7-rt.googleusercontent.com/docsz/AD_4nXdjKpLERxDCVHCotQILRKb4o9PutqrE52q0ZPc9asDnK9_NMfY0V2D1knnJOisbC0aE3Nw1PoXTFWNWbkidwIiGXbxVmF0VGQrA5djDJUf0r3mjg474og8wc-u-gisWi5SmnwwZqCOxKYzpAkOoCeYGhmU?key=knRtqbZJygtH4qpIRdxhMA" alt=""><figcaption></figcaption></figure>

* The ticket details, messages, attachments, and responses will be displayed.

<figure><img src="https://lh7-rt.googleusercontent.com/docsz/AD_4nXfFSJcRZ4O2DO1ThfNav11LOB9u7q2KnLwW-2ye6f8DD-a3PPgiIXbhH2VEggOPIuE1ttGqgDoercKf-wStCqEyvWkF2mZ5kA9C7T3MlDB9eVV-sgW-4p7fPe5e7U_Pnbi7CtfR8FCQsLMo9fJIC_gKIhf6?key=knRtqbZJygtH4qpIRdxhMA" alt=""><figcaption></figcaption></figure>

### Update the Status of a Ticket

* While viewing a ticket thread, click the **Mark as** dropdown on the upper-right side of the page
* Select the appropriate status:
  * **Open** – The ticket is active and requires attention
  * **Resolved** – The issue/request has been addressed
  * **Archived** – The ticket is closed and stored for reference

<figure><img src="https://lh7-rt.googleusercontent.com/docsz/AD_4nXdtvNGIFKKGAywN_rfPEpverTPATfcDkjDdQPRvTZZk1XSbAHfjgMFtw9qAX0irsbJgSZjyYi_RvexZyoLeZLLspmiWoHikQgF9M_uXproQ9dw7LOHaNhdzitr6sMTO_nAHNnDNP5c6tMH---nDl2-j9HKZ?key=knRtqbZJygtH4qpIRdxhMA" alt=""><figcaption></figcaption></figure>

* The selected status will be updated automatically


# Announcements

Last updated: March 2025

The **Announcements** feature allows administrators to manage system-wide messages that are visible to selected users.

## Access and Navigation

You can access **Announcements** under the **Utilities** module in the main menu.

<figure><img src="https://lh7-rt.googleusercontent.com/docsz/AD_4nXczkiaUk5HItwufJ9oijhTD45zqf3hu4Umjy_DXB-fxm_rHMpMk6Ay5Y316VZO_nTYZVOG7HsCuufi127E-aEUj_Ppk7RhCh9JdKFH9CZjqJjJvp1dcbKIUJX3IIqWVWH3j3jjBO7PGQHq-UwT6MF8rubOV?key=PQhLGf7JvzPk0PJll-Vm2g" alt=""><figcaption></figcaption></figure>

Check the privilege assigned to your user account or role if you cannot view a link from the list.

{% hint style="danger" %}
Contact your school’s system administrator to request view or edit access if you cannot access the rights management screen
{% endhint %}

## Create a New Post

* Click the **New Post** button located in the upper-right corner of the page

<figure><img src="https://lh7-rt.googleusercontent.com/docsz/AD_4nXfyREhK9pS-XR-d_q159Cs0vkokWzq0B5TpMlk4SSP7vs2P3BQMWNx-m6tmXlbxbyQHeakNwH3-zg5s7_8VrvSYHnoXA2SHpeBae4HKqDE5F8FKvsluOFjCPnr9elyOFS4ufnWt8cFVv8DQ6s0HQGw7W4P1?key=PQhLGf7JvzPk0PJll-Vm2g" alt=""><figcaption></figcaption></figure>

* Complete the **Add a New Post** pop-up form:
  * **Title**: The main header of your announcement
  * **Details**: A brief description or message content
  * **Link**: Add a reference link for users. You can enter a **label** (e.g., *"Enroll Now"*) on the left, and the **URL** on the right. If no label is provided, *"Read More"* will be used by default
  * **Audience**: Choose the intended audience. Selecting **Public** will make the announcement visible to all users, including those who access the school's public site
  * **Archive On**: Set the date when the system will automatically archive the post. This should always be a future date
  * **Other Options**: Enable email and SMS notifications if needed

<figure><img src="https://lh7-rt.googleusercontent.com/docsz/AD_4nXfCf-lICGL3GVg_M9FN-9bYfpfZWHzsoO71FiyF1h0nihn-MfchXeqyJTWFjbv8Elqy6M1Fslez5X2Xx7PqDJwDZeQr6Y5tHrp1IW94Ki4I9ikVNMDdO2KLFcYQxaWL-_HgFhtpdRMNtkIoqASZT5HLd78?key=PQhLGf7JvzPk0PJll-Vm2g" alt=""><figcaption></figcaption></figure>

{% hint style="info" %}
Ensure that email and SMS templates for announcements are already configured in **School Settings**
{% endhint %}

* Click **Post** to publish the announcement

## Edit a Post

* Click the **Pencil** icon in the upper-right corner of the announcement box

<figure><img src="https://lh7-rt.googleusercontent.com/docsz/AD_4nXcjd_8B92JnzldYjxtHfhEc11jFCmC7KVV8s0o_EErP6-svmD190xG4TtzLY6y6KT64j603M2vQkM4m9kvdR_4EYdgkOwcsU8mYoJ_d9oVW_MvYT6vw-SVgwn8sBcYFu93gVrQFAY0_CyorZH5r2kfmMPk?key=PQhLGf7JvzPk0PJll-Vm2g" alt=""><figcaption></figcaption></figure>

* Update the following editable fields:
  * Title
  * Details
  * Link (label and URL)

<figure><img src="https://lh7-rt.googleusercontent.com/docsz/AD_4nXd-a-K0IueKOaOY9h874Ns8UeQGyfSy_CbslqfBsjKXWlBoBrTiwgmr2XMBmGOJ2Mza-BXen-5l4jyoEqJdR8bjrPemMECvu8I3l1_PiMJCK_Nj1YFJj8pMau7k3WPzjZppx7_ttGPxN7qyXNZGfosqUUE?key=PQhLGf7JvzPk0PJll-Vm2g" alt=""><figcaption></figcaption></figure>

* Click **Save Changes**

## Archive a Post Manually

* Select the announcement you want to archive
* Click the **Archive/Storage box** icon

<figure><img src="https://lh7-rt.googleusercontent.com/docsz/AD_4nXfwoqGwpqAHvJDJg-JV7vaK-dLKua2mEFcImqOdMsNlfEjR84_YcLXo7CkF5sAB-3qG19rRMDAlGJjdh2JvgTLtIBvRZjziphrXa1Nysgz8yduYKWOmfcEYZspyEo6SYhB56TE58-blJn8d1pma4qBGjBWR?key=PQhLGf7JvzPk0PJll-Vm2g" alt=""><figcaption></figcaption></figure>

* Confirm the action in the pop-up prompt

<figure><img src="https://lh7-rt.googleusercontent.com/docsz/AD_4nXeXO3yx659b1Oy8lt_9nbt9BzSmyfzin3tdHg4PP4fn3DGqawUj7h2QY7sQmd87e664deDV5-YNQA5mOxEBkVBJT2njjtcPap5MBJpl8oiSjLgHc8VyCEeI5mZX3eLl1bTkrlOA5f6JZN-SfRmvtaOVtH9M?key=PQhLGf7JvzPk0PJll-Vm2g" alt=""><figcaption></figcaption></figure>

<figure><img src="https://lh7-rt.googleusercontent.com/docsz/AD_4nXd2FsBBqqVIa5nQdmJuKow8hyhIny-mDqygb4toVHY-R5WZrTl_716MAd7zjeGJv4S2dC7DGJiKS32gBXh6wOVjYWNs6OySRS9WZA33wHi-xFr_UkNa2bn8uuD8p4W8zyS2nkDn4sP85tz4qtshrX18Ztc?key=PQhLGf7JvzPk0PJll-Vm2g" alt=""><figcaption></figcaption></figure>

## Search a Post

To find a specific announcement:

* Enter a keyword in the **search bar** at the top

<figure><img src="https://lh7-rt.googleusercontent.com/docsz/AD_4nXciFre6jbYb9snfpKlDCXwqXsmVRsnUQAvDt_TTo84uxLSjs_PERJS-ajlkGWpBKZYHAd9lq17U7XuiytYi_4ihPWXaAEy56usMtN-JvaHoUUGU3E8KMuCP0dgHMQ8hhXUZAkP2blH2eDR0iY9tVy9FOQBw?key=PQhLGf7JvzPk0PJll-Vm2g" alt=""><figcaption></figcaption></figure>

* Matching announcements will appear in the list

## Frequently Asked Questions (FAQs)

**Question:** Will deactivated users still receive announcements?

**Answer:** Deactivated users **will not see announcements** in their dashboard until their account is reactivated. If the announcement is still active upon reactivation and login, it will be visible to them.\
However, **only active users** will receive email notifications.

***

**Question:** What about public announcements?

**Answer:** Public announcements are visible to **anyone who visits the school’s public site**, regardless of login status.


# Links Manager

Last updated: March 2025

The **Links Manager** feature allows you to manage and organize the links displayed on your landing page.

## Access and Navigation

You can find **Links Manager** under the **Utilities** module in the main menu.

<figure><img src="https://lh7-rt.googleusercontent.com/docsz/AD_4nXePNXKDg5vYSW9S2NZLMQ_51gAX45uAhnJ30oij5Xh6IulRqKgeg10bdHn-AHMjTZBK3_1PWW2fJJf_DtyJbXNdxjvhEWDHY8G14vxwOO8QWiOhaxd9MIt1uHHia-a6vxAJ_U0A5imv80MqBJHnVJ5u-fQ?key=YkK-0cw14ugswHb1AKDP6w" alt=""><figcaption></figcaption></figure>

Check the privilege assigned to your user account or role if you cannot view a link from the list.

{% hint style="danger" %}
Contact your school’s system administrator to request view or edit access if you cannot access the rights management screen
{% endhint %}

## Add a New Link

* Click the **New Link** button located in the upper-right corner of the page

<figure><img src="https://lh7-rt.googleusercontent.com/docsz/AD_4nXd4W5IwEbHvEO4IAJqIvoeWyaSfdGdYbduOZr_AViJBbCc-zbypc2T2Z3h_-spgeWzGvyA3Wyl9Dz8ayXmOZ5E_S8tg3-tuG0-9eQ3K7OC9V3cbi6TS--yqpmnGmZRHRSr1o80VQlQ38jIkWjPW5RvTgMLK?key=YkK-0cw14ugswHb1AKDP6w" alt=""><figcaption></figcaption></figure>

* Complete the **Add a New Link** form:
  * **Name**: The name or label of the link
  * **URL Address**: The full website address
  * **User Group**: Select which user group(s) can view the link\
    Choosing **Public** will make the link visible to all users, including guests
  * **Link Icon**: Upload or choose a custom icon to represent the link visually

<figure><img src="https://lh7-rt.googleusercontent.com/docsz/AD_4nXe0aDC_WB7MGB-saljT9IY4QbTxL6-IWVUeSrxIBkNDYbKlBfqkEhwU6tOHvH7MkbAKZ17HIVeL57Vp1zZMx4rwDCWGiIG8cVVwb8J-nQVAvGd-nBUPNAI9Ib4RVJLAXr_zh_O6EexpBSJgoqqkFFGxIdDp?key=YkK-0cw14ugswHb1AKDP6w" alt=""><figcaption></figcaption></figure>

* Click **Add Link** to save

## Edit a Link

* Click the **Pencil** icon on the right side of the link you want to modify

<figure><img src="https://lh7-rt.googleusercontent.com/docsz/AD_4nXfwSl7gi3txiDji7T00Wzi1BR90kEm7O5WHjst9UYUuoAFijUV7wM7SsV1-FO_3mxVNzxkqE8zlq2oU_KbDm27y6KdxiGvvJtMmf9dZ38xmM7mQEf5WAyKZ4mgL7uj2qi4Ta3MwrCbWRYRfxxPxm1vd2L6F?key=YkK-0cw14ugswHb1AKDP6w" alt=""><figcaption></figcaption></figure>

* Update the relevant details

<figure><img src="https://lh7-rt.googleusercontent.com/docsz/AD_4nXdUcf0mQr7GyE4B3r5RxOz_lvuXx08cEmIE6eNLh5fphO-jnXAQ-Sfy7XKsncd6aFDf8TVB3w_X4th0r9IL3NrDZ-Fetg1zBXT40zB0HNnQTJjyyvh_I5S1XM-uUiEl-NouFiKmeS6xdxBtSaRpKYGWYrFc?key=YkK-0cw14ugswHb1AKDP6w" alt=""><figcaption></figcaption></figure>

* Click **Update Link** to save your changes

## Delete a Link

* Click the **Trash Bin** icon next to the link you want to remove

<figure><img src="https://lh7-rt.googleusercontent.com/docsz/AD_4nXdJo7l1PW7GaG0WzcQZwmLZ98LYPBuLy9wAB6mKtBQHyJgYnTa0z0eQHtWliGgtJFAmzpVdFs-KBPwaZ-6AHA4JemEiOXCEAybLe6V13NX-yU1GIpPFXnIJ55vfoMzpu00vZrVVAYdBX1nO6EmakZF4no1Q?key=YkK-0cw14ugswHb1AKDP6w" alt=""><figcaption></figcaption></figure>

* Confirm the action in the pop-up prompt

<figure><img src="https://lh7-rt.googleusercontent.com/docsz/AD_4nXd20z6l4c22KWBruU6_MkyJZXdSJeHxS75hpXb7pfcP1BLP287RrY5ra9x22sWAeNnjzQqwAZIX7ym4Nsj6UPOzvLQJr0MLSwJ8hlilltrSawS3qqoTzTiBMzJJedCODpgRhksrZp7ThgWSA470EruPPz-I?key=YkK-0cw14ugswHb1AKDP6w" alt=""><figcaption></figcaption></figure>

<figure><img src="https://lh7-rt.googleusercontent.com/docsz/AD_4nXdiYdND2Ywlo1YTDntNMNtMGqZLt2oHcal49iqukKN6m0jwtDPdJfBXIG8MEhwLUV8VqJ04eF7zCtOb_5pFS1uzPIWJNcfskeO2v8cjPKWoyc4TgRo2PwvOC9FgM58QWN6GfLgrcLqNY5BpNgqgAQZ6nymT?key=YkK-0cw14ugswHb1AKDP6w" alt=""><figcaption></figcaption></figure>

## Reorder Links

* Click and hold the **three horizontal bars** beside a link

<figure><img src="https://lh7-rt.googleusercontent.com/docsz/AD_4nXeirE4YMbT1si6UVJJEgzWqX3eDjNXdtXvPSVZHPC-gQ-eCn-mLjWKl6j5ttlvCzL4WWRC2Pw1k4cBNCtfClkSAy-6qAqd-2TaVikk6r0N3yc79fTRkwatHFSbhWvgPK5Dghu0t2wLaahGVFqipnZxXQlFe?key=YkK-0cw14ugswHb1AKDP6w" alt=""><figcaption></figcaption></figure>

* Drag the link to your preferred position
* Release to drop — the new order is saved automatically

## Frequently Asked Questions (FAQs)

**Question:** Can I use the same link for multiple user groups?

**Answer:** Yes. A single link can be assigned to multiple user groups for broader visibility.

***

**Question:** What icon formats are supported?

**Answer:** Common formats like PNG, JPG, and SVG are supported. For best results, use square icons.


# Notifications Dashboard

Last updated: March 2025

The **Notifications Dashboard** provides a centralized view of all **SMS**, **email**, and **mobile app** messages sent by the system.

## Access and Navigation

You can access the **Notifications Dashboard** under the **Utilities** module in the main menu.

<figure><img src="https://lh7-rt.googleusercontent.com/docsz/AD_4nXfr7h-4Jim8nkIH1VHsDEhNilMEnCljfajHNZ8ADQ7o_T6UFHl5EsmBqx_OsqVZ8fY2_WGGdSAiWybvJ0JnOJPF8NBw7-pt6G3FIfWBGzR_XmrJPgx-SDSU7XngrrKAtu3xDnqbwQ-KVoaALNXPj6XubTQ?key=1SzbfSgRPeWoRWL0JVZBSg" alt=""><figcaption></figcaption></figure>

Check the privilege assigned to your user account or role if you cannot view a link from the list.

{% hint style="danger" %}
Contact your school’s system administrator to request view or edit access if you cannot access the rights management screen
{% endhint %}

## Filter Notifications

To narrow down the list of notifications:

* Under the **Notifications** header, click on the **filter dropdown**

<figure><img src="https://lh7-rt.googleusercontent.com/docsz/AD_4nXcXbiMcOKjSMFEPYItddPwhT4Hjb5dhZ8aRtC5-y4zayzaPTYoKHtTo2ZvnLhANTlzFYC72mypW25eYsK29HrYJqkywBWcUcp6U5ml55l-aYgISF4JxXSnzFse2GGM0ablfQseFbwoY6SZ-GbEYt_01YSJ7?key=1SzbfSgRPeWoRWL0JVZBSg" alt=""><figcaption></figcaption></figure>

* Select your desired filters:
  * **Type**: Choose between **SMS**, **Email**, or **Mobile App** notifications
  * **Time Range**: Set a specific date range to display only the notifications sent during that period

## Search for a Notification

* Use the **search bar** located above the notification list

<figure><img src="https://lh7-rt.googleusercontent.com/docsz/AD_4nXe6bcleZt1oISQyxkJhHPoVHpOPp_DGiVARyZRjHrC7tJtJWiO2iYJyRfkdc1gTjBU84h15UJwzwHr86g29WS0M0FIXsW8_sPiH9BWuQqqvZdpRYnfFkL5oE4ks63-f55Xl86y-UqalWlLkuZ8Pr3oN7S4H?key=1SzbfSgRPeWoRWL0JVZBSg" alt=""><figcaption></figcaption></figure>

* Enter a **keyword** related to the message content
* Matching results will be displayed automatically in the list


# Security

At Edusuite, we prioritize the safety and privacy of institutional data. The **Edusuite UNI** platform is built with robust, enterprise-grade security features to ensure the confidentiality, integrity, and availability of all user and system information. Below is an overview of the key security measures implemented within the platform:

#### **1.** [**Role-Based Access Control (RBAC)**](/product-guide-uni/admin-home/users/user-setup/user-groups)

Edusuite UNI uses **Role-Based Access Control** to ensure that users can only access the features and data relevant to their role (e.g., student, faculty, registrar, administrator). Permissions are configurable to match institutional policies and reduce the risk of unauthorized access.

#### **2. Secure Authentication**

**Hashed Passwords:** All user passwords are hashed using industry-standard algorithms before being stored.

#### **3. Data Encryption**

* **In-Transit Encryption:** All data transmitted between the client and server is protected using **SSL/TLS encryption**, preventing interception and tampering.
* **At-Rest Encryption:** Sensitive data stored in databases and file systems is encrypted to safeguard against data breaches.

#### **4.** [**Activity Logs and Audit Trails**](/product-guide-uni/admin-home/security/audit-trail)

The platform maintains detailed logs of user actions, allowing administrators to monitor system activity, detect anomalies, and trace changes for accountability and compliance.

#### **5. Session Management and Auto-Logout**

User sessions are managed with security best practices, including:

* Session expiration after a period of inactivity
* Auto-logout features to prevent unauthorized access from unattended sessions

#### **6. Regular Security Updates and Patching**

Edusuite UNI is continuously updated to address new vulnerabilities. Security patches are applied regularly, ensuring protection against the latest threats and exploits.

#### **7. Secure APIs and Integrations**

The platform uses secure, token-based authentication for all API connections. Third-party integrations are controlled and monitored to ensure they meet Edusuite's security standards.

#### **8. Data Backup and Disaster Recovery**

Edusuite implements automated **data backups** and **disaster recovery protocols** to protect against data loss and ensure continuity in the event of system failure or unexpected incidents.

#### **9. Compliance with Data Privacy Standards**

Edusuite UNI is designed to align with relevant data protection regulations, including:

* **Data Privacy Act of 2012 (Philippines)**

User data is handled in accordance with strict privacy policies to ensure ethical and legal compliance.

#### **10. User Education and Admin Controls**

System administrators have access to tools that help enforce strong security practices, such as password policies and user access reviews. Additionally, educational materials and alerts help users stay informed about potential security threats like phishing.

Security is a shared responsibility—and with Edusuite UNI, your institution benefits from a platform designed with safety at its core. Whether managing student records, financial data, or academic workflows, you can rely on Edusuite UNI to keep your information secure.


# Audit Trail

Last updated: March 2025

The **Audit Trail** feature records all user activities within the system. Each log entry captures specific actions performed by users, along with corresponding timestamps, providing full visibility into system usage and changes.

## Access and Navigation

You can access the **Audit Trail** by navigating to **Security > Audit Trail**.

<figure><img src="https://lh7-rt.googleusercontent.com/docsz/AD_4nXcagFBP0kP0e-K85JBXufKXHhg-GpkBgNf7aGUIlBwHm52wY4euO4oju4z0EvDN9E-6tviODSisSkGmGbaJjC0fyjAd1VzZ3w_lF6ri04R41VpiwAop4qJ_NRXjpf60ET9WeAbCy7rcxyXSQqgLYpcD0wc?key=p2cocGG6YV511mosOrIKYw" alt=""><figcaption></figcaption></figure>

Check the privilege assigned to your user account or role if you cannot view a link from the list.

{% hint style="danger" %}
Contact your school’s system administrator to request view or edit access if you cannot access the rights management screen
{% endhint %}

## Select a Date Range

To filter activity logs based on a specific time period, use the **date range selector** at the top of the page. Available options include:

* **Today** *(default)*: Displays all activities from 12:00 AM up to the current time
* **Yesterday**: Shows activities from 12:00 AM to 11:59:59 PM of the previous day
* **All Time**: Displays all recorded activities since the system's initialization
* **Selected Date Range**: Allows you to manually set both a start and end date to display logs within that specific range

<figure><img src="https://lh7-rt.googleusercontent.com/docsz/AD_4nXe-stC81MGzPPn4BDs_Z9dvJmAET_hi4RJ2aGeHwj3rHGAldCzC8ouS1c4hsDKbCxRMs2HY1Lrk7UD-sYvO6eBvad6D2xecsE4zzAsID9SPopi1VkiWzzcNQ8BBCfRN3BWik1sF2ZYNyLYIId-dIqyGj_HR?key=p2cocGG6YV511mosOrIKYw" alt=""><figcaption></figcaption></figure>

## Search for Activity Logs

To narrow down the results:

* Use the **search bar** located at the upper-right corner of the page

<figure><img src="https://lh7-rt.googleusercontent.com/docsz/AD_4nXfdY3NB0YICFYAt8OZItrXirdawrcqALOgJ_YTG-BQJGuDaSQL7vAf2eoqmAuFyQjjB5NCfBf7m5yHDXf6muHKUryl95goInGp17qlTy34np17eWWm5WlbCBez5ytIE65Pya2OVQL4XEKKU_27UeuJmtA8F?key=p2cocGG6YV511mosOrIKYw" alt=""><figcaption></figcaption></figure>

* Enter relevant keywords such as:
  * User names
  * Student numbers
  * Email addresses
  * Course codes
  * Action types (e.g., "created", "updated", "deleted")
* The system will display all matching activity logs based on your input

## Frequently Asked Questions (FAQs)

**Question:** How do we ensure that records in the system are secured and that only authorized users perform actions?

**Answer:** The system includes a comprehensive **Audit Trail** module that tracks every transaction performed by users. Each log entry includes the **date and time**, the **user account** responsible for the action, and the **specific changes made**. This ensures transparency, accountability, and traceability of all system activity, helping schools monitor and confirm that only trusted users are performing critical tasks.


# Reports

Edusuite UNI provides a comprehensive suite of system reports that offer valuable insights into key aspects of school operations. These reports are designed to support finance, student management, and faculty monitoring, ensuring efficient data-driven decision-making.

{% content-ref url="/pages/-M62vgBXllfDNNbIk5dr" %}
[Student Reports](/product-guide-uni/admin-home/reports/student-reports)
{% endcontent-ref %}

{% content-ref url="/pages/-M62vg4NPJwokXgrqC5m" %}
[Faculty Reports](/product-guide-uni/admin-home/reports/faculty-reports)
{% endcontent-ref %}

{% content-ref url="/pages/-M62vfsi2VenUAU0aLEw" %}
[Finance Reports](/product-guide-uni/admin-home/reports/finance-reports)
{% endcontent-ref %}


# Student Reports

Last updated: March 2025

These reports allow administrators to generate detailed data on students based on enrollment, academic progress, and demographics.

The **Student Reports** can be found under the **Reports** menu.

<figure><img src="https://lh7-rt.googleusercontent.com/docsz/AD_4nXeeKSMb70n0Lx0tnLVVEhr0Gnd5TUKP9sfWzbx2_BIQgR5IP87bmWutD95l6LD_TxzNt8vscBiw6OkmYnLoECu3CB_2tYvyyhq6K9IvrlfK1fkfA_dr3dZ-eSCiPrxMduw_mXcIBY5yawLaNax1pcC_RTpl?key=KGWD98BXGN9b2leSdrSM7A" alt=""><figcaption></figcaption></figure>

Check the privilege assigned to your user account or role if you cannot view a link from the list.

{% hint style="danger" %}
Contact your school’s system administrator to request view or edit access if you cannot access the rights management screen
{% endhint %}

## Student Directory

Generate a list of students based on the courses they are currently enrolled in, the programs they belong to, and their enrollment status.

<figure><img src="https://lh7-rt.googleusercontent.com/docsz/AD_4nXe3iLEwr-8BdxEsdIuFjYcKIj1r10bvtAIPWzVvTQxCSBbROwES8A3y1RTycJhKCGRpgAC7hnjNo2NKJf1ji3h0moo6WJNYcRxhTTX3yneidWwWMjbax1w0Q9ppGEhKA0EZ9anmV4RTCq1gklSlT8LaP1NP?key=KGWD98BXGN9b2leSdrSM7A" alt=""><figcaption></figcaption></figure>

**Available Filters:**

* **Course** – Filter by enrolled course
* **Program** – Filter by academic program
* **Status** – Show only students with a specific enrollment status
* **Term** – Select the academic term to filter the data
* **Grade Filters** – Apply filters related to academic performance
* **Other Filters** – Use additional filters as needed
* **Fields to Display** – Choose which student information to include in the report (e.g., name, student number, year level).

**Actions:**

<figure><img src="https://lh7-rt.googleusercontent.com/docsz/AD_4nXdVq2s9NFR3jWUwLJgMmf8taX6tVhmVSsT4By9wRmEYWIQNurjpXpa1_hS6EO_ZGz98bqIndxfJQNRe8M3lEKCBWT7Gh2ZeKNekdFWkYQQI03bUC_c3WU0UwaVnx_FtbCPBrnpbMCIpqZRP7M_r-mu11vid?key=KGWD98BXGN9b2leSdrSM7A" alt=""><figcaption></figcaption></figure>

* Click **Download Report** to export a file
* Or click **Email Me This Report** to receive it via email
* Previously generated reports will appear in the record section below

<figure><img src="https://lh7-rt.googleusercontent.com/docsz/AD_4nXeAVkfPvDYWGDxeUW0-YNwSOL2U_sQmn8xPXxLO-3FqUsuoBZpqZ4JAE9qg0HxghVB28PdpjC-6VcvQ6B278itVp9l0XsTcbrHltiWoXkivGPg9eGEoNxd8Q3X0BE2f7Q7bhaC6Xxs_u8TGoQCHCElbTSQ?key=KGWD98BXGN9b2leSdrSM7A" alt=""><figcaption></figcaption></figure>

## Enrollment Report

<figure><img src="https://lh7-rt.googleusercontent.com/docsz/AD_4nXf516jvSff5Mdh5u4nbAgnYfFbd2wcoRmnbGGHfgUWyCAS4T2FcRUIhfad9XhF1XAgWeuI7CInr4QOxG79AT_NiAS8rmZY-c-DeVmCISowCw47M_CLA4VFB_alQqyrTG3beeXXY0eXF4dfq0qFtuF4ebuz2?key=KGWD98BXGN9b2leSdrSM7A" alt=""><figcaption></figcaption></figure>

Provides detailed class enrollment information for each student in a selected term. The report is divided into two sheets:

* **Enrollment** – Students are tagged as officially enrolled by the cashier
* **Enlistment** – Students who selected subjects but have not been officially tagged as enrolled

**Included Data:**

* Student Number
* Student Last Name
* Student First Name
* Student Middle Name
* Year Level
* Program Code
* Program Name
* Student's Program Revision
* Subjects Enrolled
* Units per Subject Enrolled
* Block Section Name
* Free Section Name
* Course Equivalency of Subject Enrolled
* Faculty Assigned per Subject Enrolled
* Schedule per Subject Enrolled
* Room per Subject Enrolled

<figure><img src="https://lh7-rt.googleusercontent.com/docsz/AD_4nXcAkVeLOFQ3LHCtjwS1nGDE5d_itZjFQepTTgu26cL55YDOX1tASztvRpzn0hfhdZ1P6G8MqLLfwKuedly1guU9bikdRYzFRPNiZKXFqIkbp879Etio91n342f1x3ZP7t-5tRwwCVA7z6U8CY0shE_VcSqp?key=KGWD98BXGN9b2leSdrSM7A" alt=""><figcaption></figcaption></figure>

**Output:** PDF or Excel\
**Estimated generation time:** Less than 10 minutes

## Enrollment Summary

This report provides a summary count of students by **sex**, **year level**, **program**, and **college**.\
Default filters include all colleges and programs.

<figure><img src="https://lh7-rt.googleusercontent.com/docsz/AD_4nXcYmkXh-H_YIjXABW6yOXRfAbgQJbEqJNIlbffyVplH108J4-lyTGxXsCBmsFA7MqwsK_NDNMQdyFHdeXThcaVPhma_O-40psebB-gfGm8VXWa3XUh418_LHNRsxa3b3XukMayjOwW3bnp9k03p9hWTEGG5?key=KGWD98BXGN9b2leSdrSM7A" alt=""><figcaption></figcaption></figure>

## Grades Report

Exports all recorded grades of students for a specific term.

<figure><img src="https://lh7-rt.googleusercontent.com/docsz/AD_4nXcdNqUwM5wEnfNjegL6QrovllWriiyFo72bTcAnygL9c3DpKlYfFLRH3Ef1fFjquR7eIJ2AE2AfOt5PoQB1a3XjQQEjfaxNMiU4vBeZvRckZ3ixb-4MvRl2C7hLsB8J_mlXKyqjeZi_3VGAYFeiLvEI9Ry9?key=KGWD98BXGN9b2leSdrSM7A" alt=""><figcaption></figcaption></figure>

<figure><img src="https://lh7-rt.googleusercontent.com/docsz/AD_4nXfjwxetO0E5o8JwK5PJGokqy27s0I7INSpBiAtl-lkaY9bdcFDvyojWyU3tYd-PFyF_jlvQ9M_Xj2Fo25B-AyJCQ3iIaFzdIxx1kAw2Fng035GAgLtt_8DjoPAkeUmVEiyu3q3HJl1jYP61N_O4DnJ3BKI?key=KGWD98BXGN9b2leSdrSM7A" alt=""><figcaption></figcaption></figure>

**Included Data:**

* Student Name (Last Name, First Name format)
* Student Number
* Program Code
* Year Level
* Enrolled Course Code
* Enrolled Course Description
* Enrolled Course Unit
* Enrolled Course Equivalency Code
* Enrolled Course Equivalency Unit
* Grading Schemes (This will depend on your grading scheme setup)
* Prelim Grades
* Midterm Grades
* Finals Grades
* Faculty assigned to the Course
* Name of User who last encoded or updated the grades of the student
* Timestamp of encoding

Click **Download Report** or **Email Me This Report** to generate a copy.


# Faculty Reports

Last updated: March 2025

Faculty reports provide insights into teaching assignments and grading activities. The **Faculty Reports** can be found under the **Reports** menu.

<figure><img src="https://lh7-rt.googleusercontent.com/docsz/AD_4nXf6pW0dAlOLgmB0mGR_5auzkzJAnYyQhgUGcnDeb_9IUKjke6f0YfgrGAAJu_beVWNJuLfSUELw_nQn36Ei_s3HwNDHqCU1vq9qg0goDExHoMglA4DvsdURH8x5mzqCvIoMesR0?key=KGWD98BXGN9b2leSdrSM7A" alt=""><figcaption></figcaption></figure>

Check the privilege assigned to your user account or role if you cannot view a link from the list.

{% hint style="danger" %}
Contact your school’s system administrator to request view or edit access if you cannot access the rights management screen
{% endhint %}

## Faculty Load Report

Lists each faculty member’s assigned courses and teaching load for the selected term.

<figure><img src="https://lh7-rt.googleusercontent.com/docsz/AD_4nXfZRFslrDdhG60c_4CmCcHyZVudXPzK4bakic_ARCuHDs1vvxgcAe8Qrj_kuAbtM090V5rDo2TGlKVEzqe33I9eIV0i53vdWAVGtnP6ZL0NnzAajZ0vo8YTg9KB4cIxvtPOWE1I?key=KGWD98BXGN9b2leSdrSM7A" alt=""><figcaption></figcaption></figure>

**Included Data:**

* Faculty name and employment type
* Assigned subjects with codes and descriptions
* Section details and merged sections
* Units, schedules, rooms
* Total hours and enrolled student count

## Grades Encoding Monitoring Report

Tracks grading progress by showing the number of students graded per class.

<figure><img src="https://lh7-rt.googleusercontent.com/docsz/AD_4nXdWClzBgs1oQ1sAwI9_CK_TRADWGXiaLNW0-u-FHHL0X2ZgJaPumbkGlTqLYrDPzO7NqSYV1bydLx6rEVJ-xprhPJZItt8ws0FyktoM3LmhEl8d35cDudTCHcFHTOLc_x98HYTwKw?key=KGWD98BXGN9b2leSdrSM7A" alt=""><figcaption></figcaption></figure>

Select the term you want to download and click on the Download Report button.

<figure><img src="https://lh7-rt.googleusercontent.com/docsz/AD_4nXd1MvXkDoKr1LJNDAxpCdnF_flvqIbcnIg91wpiCGzPkz2v_yDYh9oco7cxmH3Eyb-4jGTTEa__j0J1sazZBeizKMfwCUNmc_pg_kFQjAjK7aanWP2RP-wuC2MfUOKh42aB1-tmznImrdKk4u9_OyutmvU?key=KGWD98BXGN9b2leSdrSM7A" alt=""><figcaption></figcaption></figure>

Information included in this report is as follows:

* Faculty Last Name
* Faculty First Name
* Employment Type
* Assigned Course Code
* Assigned Course Description
* Section Number
* Merged Sections
* Assigned Course Units
* Assigned Course Schedule
* Assigned Course Room
* Number of Hours per Subject Assigned
* Number of Students Enrolled in the Assigned Class


# Finance Reports

Last updated: March 2025

Finance reports help monitor tuition, payments, promissory notes, and overpayments. The **Faculty Reports** can be found under the **Report**s Menu.

<figure><img src="https://lh7-rt.googleusercontent.com/docsz/AD_4nXcGD-B1FUEISbwHy01ZxAxid5zr_6bg7gMJV3Y6COMR3hNftfsfZQWzaQRo_PbTDdTpN239whnpu7GHmDAVgGPDz2gO1Fg-qdlwm_rYGdVvtSphoSgBMX9AfJraJkDvBVAM7rQLOvhIakgzwtMphI-vQnH_?key=KGWD98BXGN9b2leSdrSM7A" alt=""><figcaption></figcaption></figure>

Check the privilege assigned to your user account or role if you cannot view a link from the list.

{% hint style="danger" %}
Contact your school’s system administrator to request view or edit access if you cannot access the rights management screen
{% endhint %}

## Summary Balance Report

Shows collectibles and outstanding balances per student.

<figure><img src="https://lh7-rt.googleusercontent.com/docsz/AD_4nXehekmkPb2G-U-S_lTK3c8mx9CEATNoS6cOeWMiCboSvFAm31RQNBu4iyd0WoVW5LacnUcc4wgFebIAhiOYLWthl5qxaJjdF427dPHnhqe8mvrRqrsGgy7GZ8zMD_uWYvyzcB7dwBaFdOslfnK_jv4Qju9Z?key=KGWD98BXGN9b2leSdrSM7A" alt=""><figcaption></figcaption></figure>

Select the term you want to download and click on the **Download Report** button or **Email Me This Report** button.

<figure><img src="https://lh7-rt.googleusercontent.com/docsz/AD_4nXdCKCDclKXnMOkg4THpM5qDrqNRb2VGnWNIBk__XUB_coe6JDBdx9S9CQQ2Du6h20SvtGiqBV-aaAtRdK_T2kcboZqeg-G_OI0L24CMp-kIFi9Nrw2Ryh0bSdbSdpLKyMAtSMsgOwTt-esEA-5WdLAzPBU?key=KGWD98BXGN9b2leSdrSM7A" alt=""><figcaption></figcaption></figure>

**Included Data:**

* Student Type
* Student Name (Last Name, First Name format)
* Program Name
* Student Number
* Year Level
* Student's selected Payment Scheme
* Enrollment Status
* Total Units Enlisted
* Total Tuition Collectible
* Total Lab Fee Collectible
* Total Miscellaneous Fee Collectible
* Total Discounts Applied
* Total Collectibles before penalties
* Total Penalties applied
* Overpayment transfers
* New Total Collectible
* Total Payment
* Total Refunds
* Balance
* Remarks (FULLY PAID or Empty)
* Balance Percentage

A summary section with total balance and collectible data is shown at the bottom of the report.

## Sales Report

Displays all financial transactions within a selected date range.

<figure><img src="https://lh7-rt.googleusercontent.com/docsz/AD_4nXe11cWl2IdeXuj1_MBLkWsl3ESBkMUoBsF0oD3SfwPsUWzwcSRjVyLx8fOY1vr2-mVPzuWJ5GlJp9Ai1zhaDUXipMp3zG7WntABd7BmPDNZuqCbEfRFBL4qEvE5KDeMMWgRqO3tJBN6mT3JsfM7uKpqp3bw?key=KGWD98BXGN9b2leSdrSM7A" alt=""><figcaption></figcaption></figure>

**Date Filters:**

* **Value Date** – Date the payment was made
* **Record Date** – Date the transaction was recorded

Set the parameters of the report you want to download and click on the **Download Report** button or **Email Me This Report** button.

<figure><img src="https://lh7-rt.googleusercontent.com/docsz/AD_4nXfABEDZrL9lx4FXnoqRe3LbLr5eSjkivoIu2mxMI7NicIuzeQUPcrwMwLPwcyKJO5HFUj944CPPJGCSrT3qtPUGxW43DBqAAv-wFu6qg5-PKJWWi4a8Ue9k6hKG0YQtXnEPg4X9_nvvRTYQmxm6umDHHYDq?key=KGWD98BXGN9b2leSdrSM7A" alt=""><figcaption></figcaption></figure>

## Chart of Accounts Report

Generates a detailed report of all fees, tuition, and applied discounts, aiding in financial tracking and analysis.

<figure><img src="https://lh7-rt.googleusercontent.com/docsz/AD_4nXedIgG2hVYsTYquFFJMWg0kb8ondRU1sppJi7OAqDHabGpinA4Ldt1AB5UvcwW-rur3Vcp7gFUTsEOtsxztl_nz3y6Pkm5FDpYXJX32FgKl5zfbGU-ldL8JqoP_Sg3GuoCxHNAUZfqr1ttLp-DyL4qK9aw?key=KGWD98BXGN9b2leSdrSM7A" alt=""><figcaption></figcaption></figure>

Select the term you want to download and click on the **Download Report** button or **Email Me This Report** button.

<figure><img src="https://lh7-rt.googleusercontent.com/docsz/AD_4nXeZMYXST4e5oM9DDYVyrDqRTfEFYo1jpzcz2o-cTksjqESqr9gtKFqBEU2z4v-L_DDlxC8uaup00A6xZCIh-t2Ma-gjqSIhoRsxyVegYPcKMMMGhVMIDZatnSVkp8fHJzSFJqBRG7HRnpWbi7UuW4kWqcsp?key=KGWD98BXGN9b2leSdrSM7A" alt=""><figcaption></figcaption></figure>

## Promissory Notes Report

Lists students who submitted promissory notes to the finance office.

<figure><img src="https://lh7-rt.googleusercontent.com/docsz/AD_4nXeWwYvTKC15LpBqdDSWOF3V_JDUeIeKYX4Lnc0_1Ia7hY4KTk9Kgg2yf8treBYxVrfVCJDW_YFrfpibq2FrvGhvWOkfvIYzORrwRmhnuGUITETHv7h6Rp5d84E3G_FWFMqTbk2f6ZaYPQSnluSJjD6Cju1f?key=KGWD98BXGN9b2leSdrSM7A" alt=""><figcaption></figcaption></figure>

Select the term you want to download and click on the **Download Report** button or **Email Me This Report** button.

<figure><img src="https://lh7-rt.googleusercontent.com/docsz/AD_4nXf0kIRDdeKFZ77kSha0QOWCGKQYpYSBw_wbVJ811sVXBxn_KFa8tYoqNE24j8j1iIQdp0jhXe1zY1mQwOctrngzmciDI5turlhsdn8KaeWB491zpNQzCWC31uPnKR7nE-Bttfj5ULDcqA13bpsSMPv5Zo4?key=KGWD98BXGN9b2leSdrSM7A" alt=""><figcaption></figcaption></figure>

**Included Data:**

* Student number
* Student First Name&#x20;
* Student Last Name
* Program Code
* Promised payment amount
* Status (automatically updates once full payment is made)

## Overpayment Report

Displays all students who have overpaid their accounts.

<figure><img src="https://lh7-rt.googleusercontent.com/docsz/AD_4nXfnq9HtJ3PqK-9apQOVLKGwnCpy9PJ6ZqoiOs7oGA0ECmRgJ8XYjsK98tuwV7Vcq0dDtr1fTb1R8exqzkiWw_DipwstuugC2KHpnXDlFcb-xTlx2hSZeKzWWo6eKkXhy-cFK8pe8tskWxo6iaEwzP4hJEI?key=KGWD98BXGN9b2leSdrSM7A" alt=""><figcaption></figcaption></figure>

**Filters:**

* Select a start and end date to view overpayments within a specific period.

Set the parameters of the report you want to download and click on the **Download Report** button or **Email Me This Report** button.

<figure><img src="https://lh7-rt.googleusercontent.com/docsz/AD_4nXdS_gpFtqz0jyDUVMVwLquH25gOYktdnLszPO-vdciApu7vXI0ZN03G3RpZocbeOv85JQMLI8YcqrrGowWHAGlCzsR5OMSZKdg9wRb0-10QkulsrJ0lt-Z_ZwwYh8Fy3ws9AZWvn_mBJeV1Q09I0hDHQzw?key=KGWD98BXGN9b2leSdrSM7A" alt=""><figcaption></figcaption></figure>

**Output Format:** PDF or Excel

## Other Fees Report

The **Other Fees Report** provides a list of all students who have been tagged with additional fees outside of standard tuition and charges.

<figure><img src="https://lh7-rt.googleusercontent.com/docsz/AD_4nXcqFVjUzjUT-wcmuQp736bZ_XOZXl15WxV7TjgWsHR7Zzb4QyCgAAQHwM_UhCIBAQceatey0bGNh0qJcnKZDKDG5Nu9pd0LwqViMt24bT1sUiXhWHGmw0JcO5Pbd1n-bxXUTZSk?key=KGWD98BXGN9b2leSdrSM7A" alt=""><figcaption></figcaption></figure>

* **Filter Options**:\
  Select the appropriate **term** to filter the report.
* **Report Includes**:
  * Fee Name
  * Student Name
  * Student Number
  * Program
  * Amount Due
  * Payment Details

## Late Payment Penalties Report

The **Late Payment Penalties Report** displays all students who were charged penalties for late payments.

<figure><img src="https://lh7-rt.googleusercontent.com/docsz/AD_4nXfjY0ad76eN3lonrjuQx9UVW121ZYt-k-kmbCOAlUSijKNeNlEAhN-cXxdSUHBW3VwMUEYH9vivriN3cTkHte-PzB1v5uxtQ9_z8SWieu4Pfy5_bDrCk60DNVmIXNlcUAvo_TEoeA?key=KGWD98BXGN9b2leSdrSM7A" alt=""><figcaption></figcaption></figure>

* **Filter Options**:\
  Select the **term** and specify a **date range** to narrow down the data.
* **Report Includes**:
  * Date the Penalty Was Applied
  * Student Name
  * Student Number
  * Penalty Details

## Adjustment Report

The **Adjustment Report** lists all students who have had assessment or enlistment adjustments.

<figure><img src="https://lh7-rt.googleusercontent.com/docsz/AD_4nXcVR3dXz8deDmw3f1Xlun9eIPPd5UGhTb2RkNA_4sxA2yMgi-aKm_JebeYzepzUoKUzL1V52XySGEvH-H7NrFS__qTDWha6t6cgvTGc3aSH22lTIvdGiSwAy-hJ9CuJCqb4OuqxKQ?key=KGWD98BXGN9b2leSdrSM7A" alt=""><figcaption></figcaption></figure>

* **Filter Options**:\
  Select the appropriate **term** to view the relevant records.
* **Report Includes**:
  * Student Name
  * Student Number
  * Program
  * Adjustment Details
  * Dropping/Cancellation Remarks
  * Adjustment Date
  * Adjustment Amount


# Settings

The **UNI Settings** in Edusuite provide centralized control over core configurations that affect the institution-wide operation of the system. These settings ensure consistency across modules and allow administrators to customize how Edusuite reflects the school's identity, communication style, and documentation format.

UNI Settings is composed of three main components:

{% content-ref url="/pages/-M62vte\_\_4Wsd8BGxiEo" %}
[School Settings](/product-guide-uni/admin-home/settings/school-settings)
{% endcontent-ref %}

{% content-ref url="/pages/-M62vuCqTNrwB2-DVv3D" %}
[Notification Templates](/product-guide-uni/admin-home/settings/notification-templates)
{% endcontent-ref %}

{% content-ref url="/pages/-MMy6ZVjXYwd6wpyL0dl" %}
[Report Templates](/product-guide-uni/admin-home/settings/report-templates)
{% endcontent-ref %}


# School Settings

Last updated: March 2025

## Access and Navigation

To access School Settings, navigate to **Settings > School Settings**

<figure><img src="https://lh7-rt.googleusercontent.com/docsz/AD_4nXcGML6nvSZOM7N8Mk5KJaphAQkinvqPCFUk3wjSMH5rOrlCjOdLIA42TUfrDZyiddRMQBY3X37F6JL2SqiX5HFM8A1DqEvfq9GQf7w-JUdaCpP5Fp216S4dYN0aiwD093mSsdqGbUlwhLR7mojBufJ3zkIi?key=MIswqNQgBsafW5O4VdpiQA" alt=""><figcaption></figcaption></figure>

If you cannot view a link from the list, check the privilege assigned to your user account or role.

{% hint style="danger" %}
Contact your school’s system administrator to request view or edit access if you cannot access the rights management screen.
{% endhint %}

This module allows administrators to configure foundational settings related to the school profile, academic terms, data imports, grading, and more. Below is a breakdown of each configurable section within School Settings:

{% content-ref url="/pages/-M6304-ri\_7o1bsswt6i" %}
[School Profile](/product-guide-uni/admin-home/settings/school-settings/school-profile)
{% endcontent-ref %}

{% content-ref url="/pages/-M630CdXWPkYaB5Y2oZk" %}
[Data Import Wizard](/product-guide-uni/admin-home/settings/school-settings/data-import-wizard)
{% endcontent-ref %}

{% content-ref url="/pages/-M630DNwnEE0qXXHdSr-" %}
[Term Settings](/product-guide-uni/admin-home/settings/school-settings/term-settings)
{% endcontent-ref %}

{% content-ref url="/pages/-M630EKB6R1rgSBqe8dn" %}
[Flowchart Simulator](/product-guide-uni/admin-home/settings/school-settings/flowchart-simulator)
{% endcontent-ref %}

{% content-ref url="/pages/-M630EbjruGP6aBx0a\_S" %}
[System Label Settings](/product-guide-uni/admin-home/settings/school-settings/label-settings)
{% endcontent-ref %}

{% content-ref url="/pages/-MSQgQ48sZV1b-NhTRW3" %}
[Student Number Generator](/product-guide-uni/admin-home/settings/school-settings/student-number-generator)
{% endcontent-ref %}

{% content-ref url="/pages/N8Tg1T7EnIVV2gMXOedT" %}
[Grading Settings](/product-guide-uni/admin-home/settings/school-settings/grading-settings)
{% endcontent-ref %}

{% content-ref url="/pages/4iiTcSQbYOVrfglhbc97" %}
[Integration](/product-guide-uni/admin-home/settings/school-settings/integration)
{% endcontent-ref %}


# School Profile

Last updated: March 2025

<figure><img src="https://lh7-rt.googleusercontent.com/docsz/AD_4nXcF-71PqZfYVUItRvaF-qN046A0xehSbhmgM23cx9df2DFQuvS8DiwMUKLmV8G3FW3gLyihLay8Lt3cVYRbRtHKuxY6XM3-fD9TLoMjXZNzvskmNnKzW9VboijyFYe4fS1GhuxZFj_bQ0JxKdoi8AG5jBiq?key=MIswqNQgBsafW5O4VdpiQA" alt=""><figcaption></figcaption></figure>

Admins can manage and update institutional information, which will reflect across various system-generated documents and views.

**Editable Fields include:**

* School Name
* School Logo (uploadable image)
* School Address
* Contact Number
* Email Address
* Website

<figure><img src="https://lh7-rt.googleusercontent.com/docsz/AD_4nXeX8HQwSqCAy_2Xl8ITN1gkfCOhy4R30ouj4jyXtpS3RemZC8YRbx_Uo2qUd7myR5LZTUM-nqQ7cPHQck_RWlUwYUXjFlJSJbEwBxmDF0DCu7WV5cOyRRS6OnhpnkWBr_076OKK-RhXQyNUOXPe-EK-l44?key=MIswqNQgBsafW5O4VdpiQA" alt=""><figcaption></figcaption></figure>

Once all fields are correctly filled in, click **Save Changes** to apply updates.


# Data Import Wizard

Last updated: March 2025

This tool allows for **bulk uploads** of essential data using pre-formatted CSV templates.

**Supported Uploads:**

* Rooms
* Courses
* Account Codes
* Students
* Faculty
* Users
* Grades

To use:

* Click **Import CSV File**

<figure><img src="https://lh7-rt.googleusercontent.com/docsz/AD_4nXfs3y0ejHlPfbYxM26RBpTj0ytR_DKoL2q8mojn--QqnNDpoK5-emBZV0M3byKXQKKf4IqxPN111H5PoCIsVGADuXLmDypnM2OKhqmygvz1-UgC8HY4IKGz676k9H0WFSS89TUsl6hrjh2EdPJgDzSPmwvu?key=MIswqNQgBsafW5O4VdpiQA" alt=""><figcaption></figcaption></figure>

* Upload or drag your file into the prompt

<figure><img src="https://lh7-rt.googleusercontent.com/docsz/AD_4nXcjWSqtqxD7j0moNvV0IR0JIl4CUiVtCmJRSalySbMUZUvpfyO4tHcAaYBjt_UblLcJEx-PQGpDgpbQdgLabzyim2gw9ODeW_5BtwAK2O5gPppYWul6W5J1VEVwbaFRI_nUfuXElJLz0exLwKov1WNealY?key=MIswqNQgBsafW5O4VdpiQA" alt=""><figcaption></figcaption></figure>

* Click **Import**

{% hint style="info" %}
Make sure to download and use the correct CSV template found on the same page.
{% endhint %}

<figure><img src="https://lh7-rt.googleusercontent.com/docsz/AD_4nXdlBqqMSgCOdY84GvT4gXPSzymec9bh2Ak9o-XYtx2WsZU_8gAvcq0qinmBR5p4iEoJ4S4rjt5MiZfw9S5dYCtjpWXK4HNY05W7-Rxzj3eC_zrmmSuOpzUSs9mFPREMLYDbcxKmtTS0fXo5P_0PoUznH681?key=MIswqNQgBsafW5O4VdpiQA" alt=""><figcaption></figcaption></figure>


# Term Settings

Last updated: March 2025

Configure important academic term operations and transitions.

<figure><img src="https://lh7-rt.googleusercontent.com/docsz/AD_4nXcurr5FeFOC2ef5udDBkmRmrec3vYb9-oMTMrqR9MrYTuAgrkT-051svF3nMizUgO7ZNZPkjjCgdwND1IeNwq5Bn_YCFxGtoHausQtGte5iyS2x502HXlbyZRzccmPPElQ00L47kJ9yfJ_7PjNm-glx6q8C?key=MIswqNQgBsafW5O4VdpiQA" alt=""><figcaption></figcaption></figure>

## Intent to Enroll

<figure><img src="https://lh7-rt.googleusercontent.com/docsz/AD_4nXcS8F8LEfncT4gzqL9KvMKog9eNpC1OKCMlIVgc39mFsSx5M0qwcP0MMq-cYoh7YIrW-YEKSVW1skGtDDNl6_edSTkHhCaGg0cLKSXUdiQkpSY63L7gm_j6XkfSLfZQ7G8g9CcV789rGsen_L4P166uAOI?key=MIswqNQgBsafW5O4VdpiQA" alt=""><figcaption></figcaption></figure>

When enabled, a banner prompt appears for students upon login, asking for their intent to enroll.

<figure><img src="https://lh7-rt.googleusercontent.com/docsz/AD_4nXdjzk-rSlvsgn_w10_B_KmBPy2mLQpY6vj7ocpwZ2S9Nxtmn-ZDnAt0MNhx0-FNm0dLqEoomWIaUkNhWID8kr5rwDShHk_hOT5A-rmDAAEOcEPZTBlLLDHpOrPtENp4KuIKqFP3fd5uFex_gRPd7G8C0KUQ?key=MIswqNQgBsafW5O4VdpiQA" alt=""><figcaption></figcaption></figure>

* Customize the message and notification settings
* Applies to all **active** and **inactive** students
* Click **Enable Intent to Enroll** to activate

Student's View:

<figure><img src="https://lh7-rt.googleusercontent.com/docsz/AD_4nXefzt_3LBFW0lEvFk6L-7Eg0N_e_UJir7mxZrHiOB37n_hKbfHvyfHAwaB-I6XWC8MOZJ94jh6VjCvO1yljYpD3D_r8RT_dXLQD3FB65G05IyLc7WZ083FFn8vlBFAfh6famvNgTf3a8eJFyOsDz-HhQw?key=MIswqNQgBsafW5O4VdpiQA" alt=""><figcaption></figcaption></figure>

## Faculty Profile Update

Faculty members can update their teaching profiles. Once completed, they must click **Save Settings**

<figure><img src="https://lh7-rt.googleusercontent.com/docsz/AD_4nXdN0mroQiHc9JdDtd6P9H1fjTZ0OrrYdNTAmgLxZVxw1R3QoeVye4U4A-Un9CdRHhtLqFXYgshTqP8jt8-x2BJXZ4QJHOfz-tMK5RCEWMPkd1GjCPjAMJyEQJ5F-okDaRnhJMsFZNHpwOL_hZL83KGE3EmP?key=MIswqNQgBsafW5O4VdpiQA" alt=""><figcaption></figcaption></figure>

## Mark Students as Graduates

Automatically identifies and updates students who have completed all course requirements.

<figure><img src="https://lh7-rt.googleusercontent.com/docsz/AD_4nXed4NthYFCjx9Q5TIEFTREw396jR1ECn9QZuwuP6PHD9M01Ux1VrqGKs6v1lqnsypdHlbrar1wlzNRrAu8tuVLcxE8ALhZ2WM8PK9samjtTBqkj7uaEZtD6Xef5IT9ONaVLlv76FOWVe5coHgriPNWGh-A?key=MIswqNQgBsafW5O4VdpiQA" alt=""><figcaption></figcaption></figure>

Steps:

* Click **Mark Students As Graduates**
* Wait for the list to load
* Click **Show List of Students**

<figure><img src="https://lh7-rt.googleusercontent.com/docsz/AD_4nXdkORaVlZcu2m6yE9D1dCq7jxRP2Txnt6NIymI0XhgP4g-20ElM63rLxoFxte0GtfzbhLaDboty-GyL50ZuseUe9lZde-hsMe82zEdDcCWV99SmGdnhc62wGtBHUx-gLc8RQC1rPwyGI8m2NG5u47aPXAoC?key=MIswqNQgBsafW5O4VdpiQA" alt=""><figcaption></figcaption></figure>

<figure><img src="https://lh7-rt.googleusercontent.com/docsz/AD_4nXd86NO9gSDwBj6cSWwDwrrmgCz11U2ma-KzsLlVVdw5QJ0Zvg9zrwmRLP8ehSCX0X95JWBqPRkAj9MewBqemtM1yVNZbjVkSwtKaYj1Ycu3Junv-S41zm_jEQ3GV4YhfSttELtqIjjpb9t26PCbk3pHXr0?key=MIswqNQgBsafW5O4VdpiQA" alt=""><figcaption></figcaption></figure>

* Once confirmed, click **Proceed**

## Update Number of Terms

Modify how many enrollment periods are available per school year:

<figure><img src="https://lh7-rt.googleusercontent.com/docsz/AD_4nXeWsF2nhguXVgVoKQJRHIwh2j-YR2MZjtva4ff6wCqLZ7zh7lsoE8pP8MpwC1hKSWrjWVw7TSbWkkjC-wN40CC8--snfkYKdW21q43LT9cWdMOlwd-fWF7co48OhuHYmkqBLxRra5a8gJVedRs9rpsOs6M2?key=MIswqNQgBsafW5O4VdpiQA" alt=""><figcaption></figcaption></figure>

* **Yearly** – 1 term
* **Semestral** – 2 terms
* **Trimestral** – 3 terms
* **Quarterly** – 4 terms
* **Quintile** – 5 terms

<figure><img src="https://lh7-rt.googleusercontent.com/docsz/AD_4nXfSsNWBHpf4YZYGfve3Fm1MhapXXqZ-IzkPZtMvHV-GX1uR36YjTPM63sraRtVETCnHEFQXZZr0m1TR6uydwvzm6i947gU4phOz0qUSlOh_-FHZBxKNtKIlSg1r7A1Hk4DEYoNh8AL0wkXfqvPmhJO8-d0?key=MIswqNQgBsafW5O4VdpiQA" alt=""><figcaption></figcaption></figure>

{% hint style="warning" %}
Update this setting only at the start of a new academic year, not mid-year.
{% endhint %}

## Start Next Term

Triggers the beginning of a new school term. System checks for conflicts before proceeding.

<figure><img src="https://lh7-rt.googleusercontent.com/docsz/AD_4nXeLdxvq_3i0v3HCz-6XoX8PgqYDC5YCrN-OXSoj2xfl9LaizoA9fF8aHpG_qVBYqxXUl59jT-ntYw5gGEsVkDaDU-uGXmrOcvZpw46K3QRS-sxzQJzI8m9V4QwuO9e2mi0Ixi0TiQaNUGOEPWJehHxXF6WS?key=MIswqNQgBsafW5O4VdpiQA" alt=""><figcaption></figcaption></figure>


# Flowchart Simulator

Last updated: March 2025

Simulates a student’s academic journey from first year to graduation based on the curriculum and demand.

<figure><img src="https://lh7-rt.googleusercontent.com/docsz/AD_4nXcWvWJC4Zuw-bOytux2TSX-PkMkL1Txaf1XJBkukUKNSInJP9pPqe6j6S2RrA95vll_TISRmy7cnUnTQaDkxDpVn-vXnguzI4-vVD1U3rBkJqitnpdbEnQotzy6eBfqkadO7rUtmSrtovMEsPhbigdjqC8?key=MIswqNQgBsafW5O4VdpiQA" alt=""><figcaption></figcaption></figure>

Steps:

* Select a student
* Choose the class demand
* Click **Simulate**

<figure><img src="https://lh7-rt.googleusercontent.com/docsz/AD_4nXdrR1fTxVdi5DInnMZMa_XEr8bdWv5SkJBWUusrbps--ySLZ0RjAAmV_J7UKDR7uFlAu8prHuEIwDPBxeYMS-miSyJEfs7800C2OotUOZbvxlo62Hooy5p9VwF9TiPjuVZDRarq05DOmWOMVdT7NCfY8wY?key=MIswqNQgBsafW5O4VdpiQA" alt=""><figcaption></figcaption></figure>

Use the **Show Legend** button to view color code definitions used in the simulation.

<figure><img src="https://lh7-rt.googleusercontent.com/docsz/AD_4nXcrRSf6KWCZa_wtrWExZ6z9AZOwF9h-ZnKFODxOxXDhIHoMvDyxaHxDDdklYibw4XcsVvWOpzDR0fOjE0stHqZheMgQl06OGVjsn7whl21qIbQojxbDHmAc8b9F3jqxKwk1VNX7FbpDMnroVEHj-jg7HLDn?key=MIswqNQgBsafW5O4VdpiQA" alt=""><figcaption></figcaption></figure>

<figure><img src="https://lh7-rt.googleusercontent.com/docsz/AD_4nXe5KE1Jn-QKdL64lidYAQ1Ptwj6WywUNnOH89NygsPWjo-CSQSjN9UPjYK1GhjDNMlY0hJSOmP7QXdukGGo7eTpf_WTyYruLLeR5G8Tzk5IVFWvhhpk-wuGwU6hCNuCICSKj8mSykMHSQ-rX11fO1J5WJ6-?key=MIswqNQgBsafW5O4VdpiQA" alt=""><figcaption></figcaption></figure>


# System Label Settings

Last updated: March 2025

This feature allows schools to customize system-wide terminology to better match internal conventions.

<figure><img src="https://lh7-rt.googleusercontent.com/docsz/AD_4nXe8i5F5C3ZcsLkW9_vvn71_MFpGikBH1GayZWI90iNA1i68KBH3klueiI5vOMUZAfXiEFQmOd-fxh8svEWreifKUw7zdZlvOmLKwHgkfkmA-LwKAhtXquaMlJYTa8brfTCGT9cE9XY4qQPvbFn33CWfo46i?key=MIswqNQgBsafW5O4VdpiQA" alt=""><figcaption></figcaption></figure>

**Categories available for renaming:**

* Term Settings
* Planning Setup
* Finance Setup
* Others

<figure><img src="https://lh7-rt.googleusercontent.com/docsz/AD_4nXfCmJZqtB3fUEe0Yfg7PwWyBfSDkjTAaZT4omEu8W2XY7qeH7ozbrc5-tIRSABHVlFPEv5LNjOdsZR9MV5DjuDyPqDpm9JGGQq7tinuSORmlfxbArUzSgDVeF5hUBmh5eTgqUayebZE6OKKf9gjd4eNtKsn?key=MIswqNQgBsafW5O4VdpiQA" alt=""><figcaption></figcaption></figure>

<figure><img src="https://lh7-rt.googleusercontent.com/docsz/AD_4nXeYmSssEPuQBo7evGeqo1BQTIDu8f0s2k18BYGu8aD5ZDWxkk7hxGV5sXQxNKPNvChD6H_YYK72p96Kx0tfpOsWWANLS3SOetRO2xqXg6f87uVHZEWYNyDyTYXvqDYxoHHgCdFqgL9jr8ayziH7-FEaH9sS?key=MIswqNQgBsafW5O4VdpiQA" alt=""><figcaption></figcaption></figure>


# Student Number Generator

Last updated: March 2025

Automates the generation of student IDs based on a school-defined format.

<figure><img src="https://lh7-rt.googleusercontent.com/docsz/AD_4nXdGfDbqU_eIKX9WnkCHubBkrQhU98nJ-q7JkoHxV4Wsh_rsqslNKFIQUqH3mDVD5kD6urxBwnwsSlw69B6SRKu9Lb2xKgWZ96LBN_nNnKh2-9Y1-NfkxdJZdjMg1p1AOKVQgibdtivgLeYA3IDP?key=MIswqNQgBsafW5O4VdpiQA" alt=""><figcaption></figcaption></figure>

## Key Features

<figure><img src="https://lh7-rt.googleusercontent.com/docsz/AD_4nXekBOihOFkX7ZHNo9HTsOWc0rA-tc8fCfF5lDmNnZikLxr-7BWmjxsDCS4h6-wzh387M5GK7rMits2ke0dDf8qC4E3q6fyqvs_1o9gSkJeuWNxpa-aCYrzkTebrHkM_rxY76D8i079Gdrv5D0AYw7sDwgLW?key=MIswqNQgBsafW5O4VdpiQA" alt=""><figcaption></figcaption></figure>

* Triggered when a student is manually added or verified in Registration
* Format can include year codes (e.g., `YY`, `EE`)
* Only one format is supported across all terms

## Steps to Configure

* Choose the school year
* Enter the starting sequence
* Format using available legends
* Save settings

<figure><img src="https://lh7-rt.googleusercontent.com/docsz/AD_4nXeXlHRLwrX2xFG0wPKwt0Lmdyv4pC_Mpel0dzhBBgCSnKTdvOPiItpicB0_UkRD5RsEYAdVSz4FnNFkpDtr5ASxeTjHveDv1tOc88Kcv2w37tCWgJWbrpvBAUZscheuqkMehlPaUghC8MOodVPxpOP05e1N?key=MIswqNQgBsafW5O4VdpiQA" alt=""><figcaption></figcaption></figure>

## Issuing Student Numbers

### From Student List

* Click **+ New Student**

<figure><img src="https://lh7-rt.googleusercontent.com/docsz/AD_4nXcnn96lM4XLN6GKySdKKl-iHnip1vqNmS3uEwknuqiACfC03_Xb7hnW_uESOEZRxt1BhkRc2DohoZBm-TsKIyp7phPe4A9riOsVnoMgf3_XwL55-fkAqq0KFaaoOwiAyIWQa2_1foy7CDW-zdUmKiPAZMUH?key=MIswqNQgBsafW5O4VdpiQA" alt=""><figcaption></figcaption></figure>

* Fill in the details

<figure><img src="https://lh7-rt.googleusercontent.com/docsz/AD_4nXcizPEV6ZckvxqJAlfNUTASua4THgSy9H8aTWE8juBpKlQCKJy9T_052pycQaCU75-oRNuyzsGGWeya0WWPGghw6WJZeasZS9jYVHOfs0kHkteO0fgKecPlhoEfDGKG1wwYsDwVCE03vYo_OuVayaZAeahS?key=MIswqNQgBsafW5O4VdpiQA" alt=""><figcaption></figcaption></figure>

* Click **Generate**. A confirmation pop-up will appear. Click Proceed to generate the next available student number

<figure><img src="https://lh7-rt.googleusercontent.com/docsz/AD_4nXekOzCgIqFvD7h67JUgpoEaRy4r6942xQNhaqk-c0K6hT7rvI7QNWNK3lK5McAn69UnpzS9dxFnV-M2st7dXMsVgM2qTatouGc46FxYNMw33kkq3Oh5YaCdfk8JxFadrm1iGaUMv6JATwD11l2pOPBE53U-?key=MIswqNQgBsafW5O4VdpiQA" alt=""><figcaption></figcaption></figure>

* Click **Add Student** to save the student's information with their system-generated ID number

### From Registration > Pending Registration

* Navigate to **Registration** > **Student Registration** > **Pending Registration**

<figure><img src="https://lh7-rt.googleusercontent.com/docsz/AD_4nXdMo5xbCamPff2qDT_Uo_1jhrT1zqoQwK5gvv3eJHuwmnGIKS0IT3139icOq0BFXpwBEn6J6KCpb9y9WHDOe8EC2FjdBxxF--Q-VueyCKQViMcdEYAlusmORjectvbc-N_nj227iPGyiDB0vm-WBdKwEDX4?key=MIswqNQgBsafW5O4VdpiQA" alt=""><figcaption></figcaption></figure>

* Click **Show Details** → **Accept** → **Generate**

<figure><img src="https://lh7-rt.googleusercontent.com/docsz/AD_4nXc1409qPv4WSejwDlk8z916Y3DelykfQngZuZzCabZ0t72Y55oOFlgr8uyolCTXisa8JaybcNotplKsxAmFQPlczveBtK90uZqXee6EF1vKYnI0RZJOr8mi0sPo3o8UYBXkcm-iTmcs9CBh0plKnlpH3PY?key=MIswqNQgBsafW5O4VdpiQA" alt=""><figcaption></figcaption></figure>

<figure><img src="https://lh7-rt.googleusercontent.com/docsz/AD_4nXcCF2TF_o5X9cGFusq39uME-4oeZjmIssscOfDS6IuYFUdyhfbmGVPalESw-COdED6cAEHHliQtS2rGyTcxgk41O_iEZfrIrqZ_aLhLGS2jPaCKiWKg8NsDMRhkIa6UdogrMdaYdEG4Ew2v7yHJnmIAIkkz?key=MIswqNQgBsafW5O4VdpiQA" alt=""><figcaption></figcaption></figure>

A confirmation pop-up will appear. Click Proceed to generate the next available student number.

<figure><img src="https://lh7-rt.googleusercontent.com/docsz/AD_4nXdgzY89zqdwoXQj5q9qFUK2oaYxgBNMSKXwxUJCzJo1YJjdPDMS3Ku_92-SlP3WiSDYbf6g9DIl-hrHLAG4GnPwowXy_ZPOom2woapn-UitmVakon47SJLBd9ALIsw0U28FTurioPLDgBlVmKlWVqWcrtWk?key=MIswqNQgBsafW5O4VdpiQA" alt=""><figcaption></figcaption></figure>

* Complete info and click **Accept**

### From Registration > Payment and Verification

* Select a student from the list and click the **Show Details** button

<figure><img src="https://lh7-rt.googleusercontent.com/docsz/AD_4nXf2t7Id1Lg8f76IYWx2y3WhvTHWSevPvJPvipk0N7MBwv62UGm6MXWak9rSlYj6Su-6he23rVFyQiJ0oeQSk87LA-9__dUiXgBv_1hAg5i5-0QCGEtCZpjhFYlE5XuTT3dU0_DT8BcJL5vH5tnGgw6eHnki?key=MIswqNQgBsafW5O4VdpiQA" alt=""><figcaption></figcaption></figure>

* Once the applicant's submitted form is reviewed and deemed acceptable for admission, click the **Verify** button in the upper right corner of the screen

<figure><img src="https://lh7-rt.googleusercontent.com/docsz/AD_4nXcda3Q8so0uiRKw_2eDNwNPkjKkn0C7VoE7irgi3y8YsaIHTcyapGa_RTfIxKIjaJdIOQ9yXdTWlpPtkJJJtHSR9gJT_zlRl8IPnoPw8Rio9bC-tQ-rjYSY72UK1Dnpri3KcaR8cvYh_0PF934F88c5vVrA?key=MIswqNQgBsafW5O4VdpiQA" alt=""><figcaption></figcaption></figure>

* In the Student Number field, click the **Generate** blue button

<figure><img src="https://lh7-rt.googleusercontent.com/docsz/AD_4nXfksnH4_hmOoF0n_pqOmpK7yvRSWiQMJwr3g5wlPzJOzFjAcSdS33i6sQuzlG9YsEEGEttmVs_LyoWYWr3U7o39m6NV2udKf5Tz3Cxkbwvpp5vU6CFtIygU6X_SHbRy33AGPMjRpDtvNETsmF47VhuISY2M?key=MIswqNQgBsafW5O4VdpiQA" alt=""><figcaption></figcaption></figure>

* A confirmation pop-up will appear. Click Proceed to generate the next available student number

<figure><img src="https://lh7-rt.googleusercontent.com/docsz/AD_4nXdBmCVVx4jKpAyYUxiBA-7EVNtXnjZXeDSLm8d_ZIy2sLu_EcwrEEkmhZooyie72DcnrcS8rRI7sNBoo3rha58DYfVdAsHWjgFKJbltAmez8gG-gldP8bgVbQFJyZxczCnBvDrGvteD6xStDulLWd2PSBI?key=MIswqNQgBsafW5O4VdpiQA" alt=""><figcaption></figcaption></figure>

* Complete the remaining required fields for the student's information. Click the **Verify** button to finalize the verification


# Grading Settings

Last updated: March 2025

Configure grading periods and access control for each term. Navigate to **Settings > School Settings > Grading Settings**.

<figure><img src="https://lh7-rt.googleusercontent.com/docsz/AD_4nXdA2PMWFQuJ9bwIobwo66pcYG2jkxmdakeRjdlH0cMf04bVrpCl4q4FRWg3Bz8Pu_OywLGs9umGQJU70LJ99mH35aw1ReP16VIpuCSKQrn0ojcn9gfYSHmQAyBkaIWmwMSikVM_Wtwv-xpJukeMPX7Nl5pZ?key=MIswqNQgBsafW5O4VdpiQA" alt=""><figcaption></figcaption></figure>

## Grading Scheme Fields

<figure><img src="https://lh7-rt.googleusercontent.com/docsz/AD_4nXdFGH9B12xJmt99aP-r_6hyvZ-OZf991bhJprN4AgqF3VA9hzzuRRhsJi9uqPrG6NXrTEoHVWSaTwyOhmeI0wveWeo4ZQWTAqZkBScjHAmzUVD8sPZe7naO_fH94UB3NbANf035QrU0gCQYdWI2wkh9vho?key=MIswqNQgBsafW5O4VdpiQA" alt=""><figcaption></figcaption></figure>

* **Label**: Name of the grading period (e.g., Prelim, Midterm)
* **Grading System**: Select how grades are computed
* **Payables Due Date**: Students with unpaid balances may be restricted from viewing grades
* **Grades Encoding**: Enables/disables faculty access to input grades
* **Grades Viewing**: Enables/disables student access to view grades

## Additional Actions

<figure><img src="https://lh7-rt.googleusercontent.com/docsz/AD_4nXflJLEUDai1NtxPfWe11ltkuVZvAsx3nLsLkF9WMwkNE1Jf47EB-hZVK6kIXay-MxR1ZhjtBNUCeaC1Qn1Jwo9KGM8XTc4jhtC4q9Agpn_hDnzHgKp6DWf5hgvB3KixR7_4aBjdwT-nlZHYVlXiTC0yKiOl?key=MIswqNQgBsafW5O4VdpiQA" alt=""><figcaption></figcaption></figure>

* **+ Add Grading Period** allows you to create new grading periods
* The **red X** button next to the period's label deletes the grading period&#x20;
* Toggle settings for:
  * **Sort Class List by Sex** - This toggle allows you to control whether students in your class list are grouped and sorted by sex

<figure><img src="https://lh7-rt.googleusercontent.com/docsz/AD_4nXf9GPNggEtqR63bIVk-65tvbfisQB487HjHwnfa8AcLeqmvI_6KSjajNg1pQwGBf2z-Nr8ucmGzc7-i457lCnjXFzwO6r0APlnFeO2-qFM6G-kT9qLWcZXZ5rHfeqLHDWGBLkvVAlZbEUX0810P6zsxKTcx?key=MIswqNQgBsafW5O4VdpiQA" alt=""><figcaption></figcaption></figure>

* **Enable Grading for No-Exam Permits** - This toggle switch controls whether faculty can update the grades of students who do not have the required exam permit

<figure><img src="https://lh7-rt.googleusercontent.com/docsz/AD_4nXdlob1o2UJjotOOSViYjiJdGK-LFJKJF0lVDYyHq0nzGC6sIR1DpKkLrHvlbtQPyWVCcSQr-fjoxFyn-VfN1xscoXAUuQbvwj_Ffse6SOyux0xnYMwYWFxfWdPdu5j96zyImd1sQVJgS0o4OtVuKJoXBhW2?key=MIswqNQgBsafW5O4VdpiQA" alt=""><figcaption></figcaption></figure>

* **Grades Access for Students with Overdue Balances** - This toggle switch controls whether students with overdue balances can access and view their grades

<figure><img src="https://lh7-rt.googleusercontent.com/docsz/AD_4nXeGpXGDVpK9_KzVYeq9oRD3RpX4VROCaJYA3zpFKw2Y5WPi4WfhZdnCFd304-7-zxDP9eNb-kutJxwQw0mgxIMZjeT84niHNXYMx2kc3xrSBmPQBkBaisPtf6YRVy-V73r6gONDGO51-aJ8N25HNvViH2AC?key=MIswqNQgBsafW5O4VdpiQA" alt=""><figcaption></figcaption></figure>

## Send Grades

This button allows you to send the grades of all currently enrolled students to their designated email addresses.&#x20;

<figure><img src="https://lh7-rt.googleusercontent.com/docsz/AD_4nXdySjvaLxRg0P5UYsGx9oPi8ulbyBebedUMEgbfkG6h4fHR2Ad3ssnlx5azYxRzUn5x3Cz9Z8DdwCLIkY-rW603dYvo9NLA3LRrfj-hwEQKRzxdLN11jtR0RyCEGjwnU2RvFnXuLmxLeyBiSeU00vIpApat?key=MIswqNQgBsafW5O4VdpiQA" alt=""><figcaption></figcaption></figure>

To send grades:

* Click **Send Grades to Students**
* Select which grades to send

<figure><img src="https://lh7-rt.googleusercontent.com/docsz/AD_4nXe8qqZzj5dFphWkS5-KeMhZjnfeRY_1da0KuZGnzg_SXlq4407_zhBAWw1GRE414yJ4KumtSzHFv-IzxDonLvsRk4A_23S_DKx8NFrMaEYvd1moQudVG03tUIcVJS60w7ma1zuoUTNmefCv5d6sXBw3Btiu?key=MIswqNQgBsafW5O4VdpiQA" alt=""><figcaption></figcaption></figure>

* Click **Send Grades**


# Integration

Last updated: March 2025

Facilitates data synchronization with third-party platforms.

## Canvas

Navigate to the Canvas Integration section, **Settings** > **School Settings** > **Integration** > **Canvas**

<figure><img src="https://lh7-rt.googleusercontent.com/docsz/AD_4nXcI5LD1gTGwbTp_UNV68TBuXnwJeXk2Tru5jfOmLTu86jvWpsP6plfkNmoWr3lpBat5cc-IMXrTGmA9ImrLjH6CGs6CCzWwqa_IEpnWyU79MHFqN2H9IAmVMjJrczpei9jy_CFt3gGCnzrJPz6FCDMQjFIh?key=MIswqNQgBsafW5O4VdpiQA" alt=""><figcaption></figcaption></figure>

To set up:

* **Check Canvas Administrator Status**: Ensure you have administrator privileges
* **Allow Pop-ups**: Enable pop-ups in your browser settings to prevent any interruptions during the data transfer process
* **Create a Term in Canvas**: Create a new term in your school's Canvas account and note its SIS ID
* **Input SIS ID**: Enter the SIS ID of the Canvas term you created in the designated field
* **Select a Term to Export**: Choose the term from Edusuite that contains the data you want to import to Canvas
* **Request Access**: Sync data from Edusuite to Canvas
* **Generate & Download Data**: Click the **Generate & Download Data** button to initiate the export process. A data file will be downloaded to your computer

<figure><img src="https://lh7-rt.googleusercontent.com/docsz/AD_4nXdc4d2mRFHOsvv5D0SgXgkbQaTm1WkqViEUXwLEDjq2r_oENP-rB9jEInO5kGPBfem9gM88IMJA-g5IRTGEC_Pj6rN5JrZ7X9-wsxzraV6VY6Vt1UhXz2NyXl-49mKcWMPZU9C8_ycPFhry9oAZ6dtlJCQD?key=MIswqNQgBsafW5O4VdpiQA" alt=""><figcaption></figcaption></figure>

## NEO LMS

Navigate to the Canvas Integration section, **Settings** > **School Settings** > **Integration** > **NEO LMS**

{% hint style="info" %}
Please contact Edusuite Support for assistance in enabling the NEO LMS integration for your school's UNI instance.
{% endhint %}

<figure><img src="https://lh7-rt.googleusercontent.com/docsz/AD_4nXd_70wf0LoYPTbKrfa00jC63fzNnCFnEXaXsj5T8pv0ipwrITrX0B2cL_Zcbnstz7oPL5ozPXy_DnVjmYnO8B7Hkfl1qHbSgstcFngpQxHLExbWVuhunZBXqgRfx40x7heO-zd-?key=MIswqNQgBsafW5O4VdpiQA" alt=""><figcaption></figcaption></figure>

To set up:

* Install two applications from the NEO LMS marketplace
  * The NEO LMS marketplace can be accessed by an admin in the Admin module > App Center
  * Install API and SIS Integration (Enterprise version of NEO LMS required)
* Choose your desired term to synchronize in the Term dropdown
* Chosen Term will appear as an Active Sync Job, which will display the status
* Completed sync job will be listed under All Sync Jobs with the corresponding Sync ID, Term, and Status

The following data are expected to be exported and synced into NEO LMS

* Student Information (Name, ID Number, Email Address)
* Faculty Information (Name, Email Address)
* Courses and Sections opened for the term (Class lists will only include officially enrolled students)


# Notification Templates

Last updated: March 2025

RegistrationThe **Notification Templates** feature allows schools to customize system-generated SMS and email notifications sent to users across various modules.

## Access and Navigation

You can access Notification Templates by navigating to **Settings > Notification Templates**

<figure><img src="https://lh7-rt.googleusercontent.com/docsz/AD_4nXdYjPldhbemHnsXhyJTPZVkltdkZKc-rtFW1rx9zyYXqbYJmgV-ul1OTUonH7IlnP-BV6adeaLsHpV-2oay8IyBwZRe0bCWqUKLi1qEXx7pYcs9cEK0Hmr20uohG8NE6r_2_L4m24SSpHxL76ptrN4c4aY?key=DSXmm_-1x-pL9EJ_NR4veg" alt=""><figcaption></figcaption></figure>

If you cannot view a link from the list, check the privilege assigned to your user account or role.

{% hint style="danger" %}
Contact your school’s system administrator to request view or edit access if you cannot access the rights management screen
{% endhint %}

## How to Enable/Disable Notifications

<figure><img src="https://lh7-rt.googleusercontent.com/docsz/AD_4nXcIHiPIKpIXhMjFAF6El-T9tfRebd4p9Nnb4VgULxtLfPh40lFOuOXlsN_sbMQOmSbLaQG37EwQ3XqlpV1qTcG4n-PQjQlGXVzfqAKCxYNirJsLn0ttZXKQCqyoHK9BfAaxIVSWXOPsag1dY5r7g2C8OUs?key=DSXmm_-1x-pL9EJ_NR4veg" alt=""><figcaption></figcaption></figure>

* To **enable** notifications via SMS, email, or the mobile app, simply check the corresponding boxes
* To **disable**, uncheck the selected notification channels

## Edit Notification Templates

* Click the **Pencil** icon beside the notification name you wish to customize

<figure><img src="https://lh7-rt.googleusercontent.com/docsz/AD_4nXekV7z4yyNL_5cZd6vuDZkCWOTFqiXk9OQJoDRuIMjrCvVjDBUZL0MJPzEApvpCAbxxzYQzW3izoFpqcwV2U8oXb-MSeWoeZt-l1yJBE9EX1f2iw78mxAqdfLb7Gk2TB4VgGOLgMk8RNTnehP2jvWDH82E?key=DSXmm_-1x-pL9EJ_NR4veg" alt=""><figcaption></figcaption></figure>

* A list of available **variables** will be provided to help you personalize the message

<figure><img src="https://lh7-rt.googleusercontent.com/docsz/AD_4nXe4SJ-hWzriQtP6J2vct68k5j98e0DknVauNFXI3FuRIvE86TQ7vlw73X-6itQMEhX_Wfks_jkHD-5elajfn9VJGVfTww5HeanjpQ9D0W32CZ1BW0MI8Z_UrhLPXke7_yIq3L8YuiNpypC9lb219PJply_z?key=DSXmm_-1x-pL9EJ_NR4veg" alt=""><figcaption></figcaption></figure>

* The editor supports **HTML**, and a **live preview** is displayed in a separate screen below
* After editing, click **Update Template** to save your changes

***

## Student Registrations Notifications

| Notification              | Triggered For | Description                                             |
| ------------------------- | ------------- | ------------------------------------------------------- |
| Pre-Registration          | Students      | Prompts students to fill out their registration form    |
| Verified Registration     | Students      | Notifies applicants when their registration is verified |
| New Student Registration  | Students      | Confirms successful submission of the registration form |
| New Guardian Registration | Guardians     | Confirms successful registration of a guardian account  |
| Accepted Registration     | Students      | Notifies applicants of successful acceptance            |
| Rejected Registration     | Students      | Notifies applicants if their application is rejected    |

## General Notifications

| Notification          | Triggered For | Description                                                                   |
| --------------------- | ------------- | ----------------------------------------------------------------------------- |
| Email Address Update  | All users     | Notifies users that their email address has been updated                      |
| Announcement          | All users     | Notifies users of announcements posted by the school                          |
| Intent to Enroll      | Students      | Prompts students to confirm if they will enroll for the next term             |
| Generated Report      | Admins        | Delivers system-generated reports to admins                                   |
| Student Grades        | Students      | Notifies students when their grades are available                             |
| Clearance Added       | All users     | Alerts users when a clearance requirement is assigned to them                 |
| Clearance Marked Done | Admins        | Informs reviewers when students mark clearance requirements as done           |
| Reset Password        | All users     | Sent when a password reset request is initiated                               |
| Email Verification    | All users     | Sent when users need to verify their email addresses                          |
| Account Activation    | All users     | Notifies users when their accounts are created or when their email is updated |

## Finance notifications

| Notification                 | Triggered For | Description                                                 |
| ---------------------------- | ------------- | ----------------------------------------------------------- |
| Payment Record               | Students      | Confirms that a payment has been recorded                   |
| Payment Cancellation         | Students      | Notifies students when a payment is canceled                |
| Promissory Note Record       | Students      | Confirms the recording of a promissory note                 |
| Tuition Due Date Reminder    | Students      | Sent two weeks before tuition due date                      |
| Statement of Account Preview | Students      | Sends a tentative assessment for the upcoming term with PDF |
| Statement of Account         | Students      | Sends the current term’s statement of account with PDF      |

## Enrollment Notifications

| Notification                   | Triggered For | Description                                                 |
| ------------------------------ | ------------- | ----------------------------------------------------------- |
| Enlistment Verification        | Students      | Confirms that the student’s enlistment has been verified    |
| Slot Expiration                | Students      | Alerts students that their subject enlistments have expired |
| Before Subject Slot Expiration | Students      | Reminds students about soon-to-expire enlisted subjects     |
| Cancel Enlistment              | Students      | Sends a confirmation upon subject enlistment cancellation   |
| Officially Enrolled            | Students      | Notifies students that they are now officially enrolled     |
| Enlistment Notice/Receipt      | Students      | Confirms successful enlistment of subjects                  |

## Faculty Notifications

| Notification                      | Triggered For | Description                                                    |
| --------------------------------- | ------------- | -------------------------------------------------------------- |
| Teaching Offers                   | Faculty       | Notifies faculty of their teaching load and schedule           |
| Intent to Teach                   | Faculty       | Prompts faculty to confirm if they will teach in the next term |
| Reconfirmation of Teaching Offers | Faculty       | Requests reconfirmation of offered subjects                    |
| Allow Updating of Grades          | Faculty       | Informs faculty that grade encoding is now open                |

## Ticket Requests Notifications

| Notification             | Triggered For     | Description                                                 |
| ------------------------ | ----------------- | ----------------------------------------------------------- |
| New Ticket Request Filed | Assigned handlers | Notifies assigned users when a new ticket is filed          |
| Ticket Resolved          | Reporter          | Informs the ticket creator that the issue has been resolved |


# Report Templates

Last updated: March 2025

The **Report Templates** feature allows you to upload and customize report formats using [Carbone](https://carbone.io/documentation.html). Carbone enables dynamic document generation using variables and data inputs.

## Access and Navigation

You can access **Report Templates** under the **Settings** module.

<figure><img src="https://lh7-rt.googleusercontent.com/docsz/AD_4nXfEZZqeFdChUIYPT1T3JB0mCIwsKKYx6wgb5J0Wq5efjJheoBgUiPGYbkyYZBjR2zg67ay3Y1DyqGjK5UIHjxRW9T8Kr7yRPuOwD3vpt8chkRciB2j6OoczksRPwpgfzgjQW8J_DkfjP3l2hZmbv9JD7D8?key=nElYkW4s2Bsu86uEVp7mPw" alt=""><figcaption></figcaption></figure>

Check the privilege assigned to your user account or role if you cannot view a link from the list.

{% hint style="danger" %}
Contact your school’s system administrator to request view or edit access if you cannot access the rights management screen.
{% endhint %}

## Add a New Template

* Click **+ New Template** located at the upper-right corner of the screen

<figure><img src="https://lh7-rt.googleusercontent.com/docsz/AD_4nXczXkq1vurUF-SQBGcT_Hzx9LcxNiFrTZ_YVKsRtPW60xLgA1UzbMSARF_lf6LWZWb9W1ASIHfYAwyNRcTXtf_arEmYp0l2VIE_Up359tAOB9PiXsxjisSU2loXhyzdt9o7vpLMfTkiZDpqFcPp42fTrl0?key=nElYkW4s2Bsu86uEVp7mPw" alt=""><figcaption></figcaption></figure>

* A pop-up form will appear. Fill in the following details:
  * **Template Type** – Select the kind of report the template is for
  * **Name** – Enter the template name
  * **Description** – Briefly describe the template’s purpose
  * **Template** – Upload your file in `.odt` (Open Document Format) by browsing or dragging and dropping it
  * **Applies To** – Set conditions for which users can use this template

<figure><img src="https://lh7-rt.googleusercontent.com/docsz/AD_4nXcM5EbGbnLqZJQzazXJrS818dbGTb_cBzgYpTHKz2Is5IWRvFf0v-hJ8kmblsAWswgCwONeMtL5nsDuW5cE4PB9W4uK7Vg9wqPwqZVjhH-Kr_lpY255Yb6RJSSa8pOtpb8XAJ3ABSpfNdpK-lmYDXj7iNCx?key=nElYkW4s2Bsu86uEVp7mPw" alt=""><figcaption></figcaption></figure>

* Once complete, click **Add Report Template** to save

{% hint style="info" %}
Only `.odt` Files are supported
{% endhint %}

## Update an Existing Template

* Click the **Pencil** icon next to the template you want to update

<figure><img src="https://lh7-rt.googleusercontent.com/docsz/AD_4nXfq4s3wfqIXS4_K9ScCNbpfokqZ3yti7bzDmMVezSyjSrHW5Bqu2Pb9tAi2PpVKZCpuFCJ_kg94pTmm5ogSb0g5LEuovukb_8jPFcjVCi1wVOzzRKEeU1yYHBF2J4mK8z6mjvIq5az-86d0vS_d0SZ3fcjD?key=nElYkW4s2Bsu86uEVp7mPw" alt=""><figcaption></figcaption></figure>

* Modify the necessary fields
* To replace the file, re-upload a new `.odt` file in the **Template** field
* Click **Update Report Template** to save your changes

## Download an Existing Template

Click the D**ownload** icon on the right side of any report template to get a copy of the uploaded `.odt` file.

<figure><img src="https://lh7-rt.googleusercontent.com/docsz/AD_4nXeAZv_pd2MWIz0irXwyAKuZbQ-lADeDyX8iZL9I4ZuTFjV2o-aybBk_LArStwO7Pc2Cf-UqNsnGDiGnXFxiJx-8TJiRKmL_qLq16YA2602bTs17NRvKZFqpPJewXKNyIdifciiUNh_OvQ2cE8B3GTXMd7aS?key=nElYkW4s2Bsu86uEVp7mPw" alt=""><figcaption></figcaption></figure>

## Delete a Report Template

Click the **Trash Bin** icon next to a template to remove it from the system.

<figure><img src="https://lh7-rt.googleusercontent.com/docsz/AD_4nXddnW0m--dAe-0o9_WRoYATm64m27YTVCpuqkTbtS9fxRUIjuMGunNZAIdyRubgH1aYHP12SO5ngab7A7McvOLY-RStsLGZQWQ5p0m51f2oD5HgdeEdhnro6aZvALhvFNAhBZzTNHvRfgT3c1-0TCDyBG-T?key=nElYkW4s2Bsu86uEVp7mPw" alt=""><figcaption></figcaption></figure>

## View Sample Data

Click **View Sample Data** on the right side of the screen to see available variables for a specific report type

<figure><img src="https://lh7-rt.googleusercontent.com/docsz/AD_4nXeJQ8jMQBmhoKbVsM2Rt-0FxEvPa93FN9UVcRcbP3H8bKBK07qZ1FWvi7vuLmMavU4ta-addW4A9Ornh03NC2rTyp4OCjl3y62bqwM5mjqf1ylZV59r0s4ErbbRvpsKZnyMOf6XRN_UDD6qYFOljmvNDJ4?key=nElYkW4s2Bsu86uEVp7mPw" alt=""><figcaption></figcaption></figure>

{% hint style="info" %}
Each report type provides different variables, so sample data may vary
{% endhint %}

<figure><img src="https://lh7-rt.googleusercontent.com/docsz/AD_4nXe7DyrXVrSH7-Fmp--Wi98MHuC4qIlXuZ02t7HIjwBTR2dT-lQrffd1ELnW174xdjY8KJ6FXUFHWau67btXcrhP_HXhsF5VfgFz9s4TGmL94flijtPpClgHnmcSCVn3esottcvtIJ-puYS5RmSfRTkEU48?key=nElYkW4s2Bsu86uEVp7mPw" alt=""><figcaption></figcaption></figure>

***

{% hint style="success" %}
For advanced formatting and usage, refer to the [Carbone documentation](https://carbone.io/documentation.html)
{% endhint %}


# Faculty

Dear Faculty, Professors, and Instructors,

Welcome to **Edusuite UNI!** Once logged in, you’ll have access to powerful tools for **class list management** and **online grading**, which will make academic processes more efficient and seamless.

Let's get started!

{% hint style="success" %}
**Edusuite is best accessed on a desktop computer with Google Chrome as your browser**
{% endhint %}

{% content-ref url="/pages/-M4jVWgGks\_a4csrLdIm" %}
[Account Management](/product-guide-uni/faculty-home/account-management)
{% endcontent-ref %}

{% content-ref url="/pages/-M4jXVyFmglGG\_7oMigu" %}
[Faculty Portal Home Page](/product-guide-uni/faculty-home/getting-started)
{% endcontent-ref %}

{% content-ref url="/pages/-M4jXn0XaLwVRPJ0rcsP" %}
[Manage Classes](/product-guide-uni/faculty-home/manage-classes)
{% endcontent-ref %}


# Account Management

Last updated: March 2025

This guide will walk you through the steps to access your **Faculty Portal** in **Edusuite UNI**.

## How to Access Edusuite

To start your experience with Edusuite, you will need to log in to your account.

Go to your school’s Edusuite URL. Your school’s Edusuite URL should look like this: \[YourSchoolsInitials].edusuite.asia

The default screen you'd see is the login page. **This is where you can see the latest public news and announcements** from your school. Important links can also be accessed from here.

<figure><img src="https://3973081029-files.gitbook.io/~/files/v0/b/gitbook-x-prod.appspot.com/o/spaces%2F-M1SysIMhMO_ls3VlZcw%2Fuploads%2F8yQKP3mXsRqv3gNiJKkA%2Fimage.png?alt=media&amp;token=01798dd5-543d-4cc8-9163-925824ddb2b5" alt=""><figcaption></figcaption></figure>

## Activate your Account

{% hint style="warning" %}
Contact your school’s system administrator if you have not received an account activation notification
{% endhint %}

* Once your school administrators have set up the Edusuite system for your school, you should have received an email notification to activate your account, similar to the example below

<figure><img src="https://3973081029-files.gitbook.io/~/files/v0/b/gitbook-x-prod.appspot.com/o/spaces%2F-M1SysIMhMO_ls3VlZcw%2Fuploads%2FDud5YAuwqp0QIygKwV3H%2Fimage.png?alt=media&amp;token=bd6d7b0b-f5e1-490e-bc13-770c8acd3dd5" alt=""><figcaption></figcaption></figure>

{% hint style="info" %}
Your password should have a minimum of eight (8) characters with at least one (1) uppercase letter, one (1) lowercase letter, one (1) number, and one (1) special character. **Spaces are not allowed**
{% endhint %}

* Clicking on the “Go To Edusuite” link brings you to the reset password page

<figure><img src="https://3973081029-files.gitbook.io/~/files/v0/b/gitbook-x-prod.appspot.com/o/spaces%2F-M1SysIMhMO_ls3VlZcw%2Fuploads%2FqF0vf4aHiS66fzw1x4Kg%2Fimage.png?alt=media&amp;token=a235415d-3fb7-497c-863e-ab2563127fed" alt=""><figcaption></figcaption></figure>

{% hint style="info" %}
To double-check the password typed, you may click the show/hide or eye icon to view your password
{% endhint %}

* Follow the instructions and wait for the confirmation that your password was successfully updated
* Proceed to log in to your Edusuite account

## How to Reset Your Password

* On the log-in page, click on the “Forgot Password?” link

<figure><img src="https://3973081029-files.gitbook.io/~/files/v0/b/gitbook-x-prod.appspot.com/o/spaces%2F-M1SysIMhMO_ls3VlZcw%2Fuploads%2FrDdy67OMdMbeU16SkDzz%2Fimage.png?alt=media&amp;token=4764fbba-678e-40a1-af48-0502efa28c0d" alt=""><figcaption></figcaption></figure>

* Enter your email address and confirm on the CAPTCHA

<figure><img src="https://3973081029-files.gitbook.io/~/files/v0/b/gitbook-x-prod.appspot.com/o/spaces%2F-M1SysIMhMO_ls3VlZcw%2Fuploads%2FsDrdmL5p7v3LNeGmLN5m%2Fimage.png?alt=media&amp;token=78fb3dba-3c43-49c9-84e5-9e0334766842" alt=""><figcaption></figcaption></figure>

{% hint style="info" %}
**The email address field is case-insensitive**

Password should have a minimum of eight (8) characters with at least one (1) uppercase letter, one (1) lowercase letter, one (1) number, and one (1) special character. **Spaces are not allowed**
{% endhint %}

* Click the **Send Reset Link** button
* Check your email for the reset instructions

## How to Log In

Enter your email address and password in the login fields, then click **Login** once ready to go.

<figure><img src="https://3973081029-files.gitbook.io/~/files/v0/b/gitbook-x-prod.appspot.com/o/spaces%2F-M1SysIMhMO_ls3VlZcw%2Fuploads%2Fg2v1lbDnLO2cp6Qc6g96%2Fimage.png?alt=media&amp;token=3a851909-a5fe-44f4-8a58-97e5995f9dce" alt=""><figcaption></figcaption></figure>

## How to Log Out

Once logged in, click on your display account name just below the school logo. Click on **Logout** if you are ready to exit.

<figure><img src="https://3973081029-files.gitbook.io/~/files/v0/b/gitbook-x-prod.appspot.com/o/spaces%2F-M1SysIMhMO_ls3VlZcw%2Fuploads%2FAD9yPZ70UCMvN0a4jFeY%2Fimage.png?alt=media&amp;token=30e8f78c-1622-44d8-9142-94f88b8b960a" alt=""><figcaption></figcaption></figure>


# Faculty Portal Home Page

Last updated: March 2025

This is the interface that faculty member will see upon logging into their account.

## Overview

<figure><img src="https://3973081029-files.gitbook.io/~/files/v0/b/gitbook-x-prod.appspot.com/o/spaces%2F-M1SysIMhMO_ls3VlZcw%2Fuploads%2F7YcrSrBvh0gQjuKbp9TF%2Fimage.png?alt=media&amp;token=a9514bdf-d8f1-427e-9985-7b30e43d94b3" alt=""><figcaption></figcaption></figure>

The Home Page on the Edusuite platform provides faculty members with a snapshot of their current academic activities, term information, and essential system functionalities.

#### **Term Selector**

* Shows widget data for the selected term
* Click this section to view detailed term-specific information

#### **Announcements**

* This section highlights important announcements or messages from the university

#### **Classes**

* Shows a list of the classes you are currently teaching
* Includes details such as class name, room, schedule, and assigned faculty

#### **Tasks**

* Displays a checklist of pending tasks that need to be completed

## Profile Page

The Profile Page allows you to view and manage your personal and professional information.

#### Accessing the Profile Page

* Go to the navigation menu or click your profile picture in the top-right corner

<figure><img src="https://lh7-rt.googleusercontent.com/docsz/AD_4nXeI-aGMLkP8RAC_Je4h_MNmH5wy_UZE1Z4QxcGzuy-EpQl_sQ6M_gti-_YAcIx3Q8VZTqwFabJ90uEdjdPzKKW9dVxI3plEFkLdOlVk5Jqnj451ymwbteBAtgx80DJwofHJ9QlGaUC4yjgnqRijjZkCavQ?key=8KpDoIO8Q-1PjzEMTsdeDQ" alt=""><figcaption></figcaption></figure>

* Select **Profile** to view your information

<figure><img src="https://3973081029-files.gitbook.io/~/files/v0/b/gitbook-x-prod.appspot.com/o/spaces%2F-M1SysIMhMO_ls3VlZcw%2Fuploads%2FHBUUGQIgSIRj8cbtaRCo%2Fimage.png?alt=media&amp;token=64213400-2803-4003-a84f-364c74bd1ef5" alt=""><figcaption></figcaption></figure>

#### **Basic Information**

* **Sex**: Displays your gender
* **Birthdate**: Your date of birth
* **Mobile Number**: Your registered mobile number

{% hint style="info" %}
The institution reserves the right to add and configure supplementary user information fields and groups as necessary
{% endhint %}

#### **Editing Your Information**

* Click **Edit** to update your information
* Make necessary changes and click **Save**

## Teaching Settings

The Teaching Settings module helps you define your teaching preferences and availability.

#### **Accessing Teaching Settings**

* Navigate to **Profile > Teaching Settings**

<figure><img src="https://lh7-rt.googleusercontent.com/docsz/AD_4nXeI-aGMLkP8RAC_Je4h_MNmH5wy_UZE1Z4QxcGzuy-EpQl_sQ6M_gti-_YAcIx3Q8VZTqwFabJ90uEdjdPzKKW9dVxI3plEFkLdOlVk5Jqnj451ymwbteBAtgx80DJwofHJ9QlGaUC4yjgnqRijjZkCavQ?key=8KpDoIO8Q-1PjzEMTsdeDQ" alt=""><figcaption></figcaption></figure>

<figure><img src="https://3973081029-files.gitbook.io/~/files/v0/b/gitbook-x-prod.appspot.com/o/spaces%2F-M1SysIMhMO_ls3VlZcw%2Fuploads%2FwqkNYX35kNQcxFcFvx9F%2Fimage.png?alt=media&amp;token=ad327a1f-6f13-411d-88f3-0e7c3204bbda" alt=""><figcaption></figcaption></figure>

#### **Intent to Teach**

* Indicates whether you intend to teach in the upcoming term

#### **Preferred Teaching Load**

* Displays your preferred number of teaching units per term

#### **Preferred Room Assignment**

* Specify your preferred teaching room or view your assigned room

#### **Days Available to Teach**

* Lists your available days and time slots for teaching assignments

#### **Courses Faculty Can Teach**

* Displays courses you’re qualified to teach.
* Allows you to rate your competency or preference for each course


# Manage Classes

Last updated: March 2025

The **Manage Classes** feature allows you to handle your teaching assignments, from historical data to current and future classes.

## Access Manage Classes

Go to **Utilities > Manage Classes**

<figure><img src="https://lh7-rt.googleusercontent.com/docsz/AD_4nXftgRdM5lvS2whwLgot91kGcpKHq1OhgDGjuvIyCuiHvpmrat086VqqeNBBpezeOacvZapTdHpFprZPeqMabvBMkFZM2gEXGURPQuV1LPq0jGCMhHIY9UYRJLn3u5BJVpumC9ISniYwA1khafNYvSARMHc?key=8KpDoIO8Q-1PjzEMTsdeDQ" alt=""><figcaption></figcaption></figure>

## Classes

<figure><img src="https://lh7-rt.googleusercontent.com/docsz/AD_4nXcxqA-exgQbSGYD5Gsuqc6QRVAJYTJ-vGXL8hztjDr7GNN0wpFJWRHbV7C_iTqkiy9wls5EajIpKqxy7EYDFGJ9oC9FIPw631F0_qTb6eDKzJ4_RdivaaSK0TkuSRFCw4HZkUB2vonSJH6V8Tb6C85aBfJe?key=8KpDoIO8Q-1PjzEMTsdeDQ" alt=""><figcaption></figcaption></figure>

* Use the drop-down menu to select the academic year (SY)
* All associated classes for the selected SY will be displayed

### Offered Classes

<figure><img src="https://lh7-rt.googleusercontent.com/docsz/AD_4nXfIkywQ0htn4_M7gxdaUtxJkZItsD4HM5_S2juD1DwBEbbRHNWWsZmKybohYsmcbzYQ4JHbIyDBZ967_VSIYjxkqFTKbfN1ykoMydTfN-xF04NBXMDHHF1MwWFcPNs7Dl5xZn5ZiA?key=8KpDoIO8Q-1PjzEMTsdeDQ" alt=""><figcaption></figcaption></figure>

* View classes available for assignment
* Accept or reject offers:
  * ✅ Click the **check mark** to accept
  * ❌ Click the **X mark** to decline

### Selected Term Classes

* View the classes you're teaching in the selected term

<figure><img src="https://lh7-rt.googleusercontent.com/docsz/AD_4nXfVOeVU2XHhnjM6Jg_HOO1-gvp0SzyC747caw3SzktV_19-HM019y0ZK2LQXKL_BhvWhf74pURdzD7CqifxNh1cd7YxoZXOJmmS2zs-YIjYHqzbE87RcShm5P3LjCtbz2-cVHgpTeg2dh1nWZact329T5cz?key=8KpDoIO8Q-1PjzEMTsdeDQ" alt=""><figcaption></figcaption></figure>

* Click a class to view details like enrolled students, grades, and attendance

<figure><img src="https://lh7-rt.googleusercontent.com/docsz/AD_4nXcglbqn2l60PKqdDLVuJc9Dt4iFPtamXz_DBhSGqc-gkbHrHQzkpQkv0RrDNLJSeCAxsPs7mVwpDZu0RWhi54PhHmd9YSekgkEF1KJq1hZKrO3EsyMnjMuImaryJvMnZT4PRstArYDhFABfj6I-Ek8SENCT?key=8KpDoIO8Q-1PjzEMTsdeDQ" alt=""><figcaption></figcaption></figure>

***

## Grading

Easily update student grades for your classes.

### How to Update Grades

<figure><img src="https://lh7-rt.googleusercontent.com/docsz/AD_4nXf-vAIXBKScJGY8F_VFzgBmE5PwXYRoG421B6G9fEfjNc12wGMGdcIBFxyjEsUZW43yyd1EslGziaeIQCXOf7K5_5il4tWQOfvF2t9BgDq8vGVwf5PKtnL6e37196LQyC6G9M5NO_baeFsH9wfiaUL66QKL?key=8KpDoIO8Q-1PjzEMTsdeDQ" alt=""><figcaption></figcaption></figure>

* Click the grade field for the desired student
* Enter the new grade
* Click **Save Changes** to confirm

### **Download Class List**

Generate a downloadable version of your class list.

#### **Steps to Download**

* Click **Download Classes**

<figure><img src="https://lh7-rt.googleusercontent.com/docsz/AD_4nXeeVpgUIbqcCW_Zp5Yb93btv3_Rh3Ah3xB0TPJ0j539eX_vkc176yF4Tuxxhtx7OXamrhThmsp2kO3BfCZ3mr2MgtuyTTqlMQqdYI3Vptcr050ENOXcksSg75Vv_C346BdOftEu5aBbeyFz_rBoU4ZHsL49?key=8KpDoIO8Q-1PjzEMTsdeDQ" alt=""><figcaption></figcaption></figure>

* A pop-up window will appear

<figure><img src="https://lh7-rt.googleusercontent.com/docsz/AD_4nXcEInhjuZF19pGcW2cuHxe9S5atyQkiaM8HB1Wzde0VQ7cAzMejeP_kBwhmpskz-wuaiQumxTHSgTgZXgPBJDOKm2FQkPBauRxH4d3e0n4ObZE64qzGQcY81FswUIqKoHJDg_M1qn65PCvvIqK6Ozb-9h4?key=8KpDoIO8Q-1PjzEMTsdeDQ" alt=""><figcaption></figcaption></figure>

* Configure your preferences and click **Download Class List**

{% hint style="success" %}
A sample file will be generated based on your selected settings.
{% endhint %}


# Student

Dear Students,

Welcome to **Edusuite UNI**—your intelligent and intuitive platform for managing the higher education journey with ease and confidence. Designed to support students, parents, and schools alike, Edusuite UNI simplifies processes, enhances communication, and keeps you informed every step of the way.

With **Edusuite UNI**, you can:\
✅ Complete online registration and enrollment with ease\
✅ Track academic performance, class schedules, and grades\
✅ Stay updated on announcements, events, and deadlines\
✅ Access financial records and manage tuition payments

This user guide will walk you through Edusuite UNI’s key features, helping you maximize its benefits and stay actively involved in the student’s academic experience.

Let’s begin your smart university journey together!

{% hint style="success" %}
**Edusuite is best accessed on a desktop computer with Google Chrome as your browser.**
{% endhint %}

{% content-ref url="/pages/-M1T0IPYz9l6ckgw\_j1P" %}
[Account Management](/product-guide-uni/student-home/getting-started)
{% endcontent-ref %}

{% content-ref url="/pages/-M4jYDwUtmtRo0erU7w\_" %}
[Student Portal Home Page](/product-guide-uni/student-home/getting-started-1)
{% endcontent-ref %}

{% content-ref url="/pages/-M1T0O14Lf5ByYiNPdQB" %}
[Enlistment](/product-guide-uni/student-home/enlistment)
{% endcontent-ref %}

{% content-ref url="/pages/-M1T0Sqc\_z8HsbybHz7C" %}
[Payment History](/product-guide-uni/student-home/transaction-history)
{% endcontent-ref %}

{% content-ref url="/pages/-M1T0PoSencTYSxIRyQ1" %}
[Grades Viewing](/product-guide-uni/student-home/viewing-of-grades)
{% endcontent-ref %}


# Account Management

Last updated: March 2025

This guide will walk you through the steps to access your **Student Portal** in **Edusuite UNI**.

## How to Access Edusuite

To start your experience with Edusuite, you will need to log in to your account.

Go to your school’s Edusuite URL. Your school’s Edusuite URL should look like this: \[YourSchoolsInitials].edusuite.asia

The default screen you'd see is the login page. **This is where you can see the latest public news and announcements** from your school. Important links can also be accessed from here.

<figure><img src="https://3973081029-files.gitbook.io/~/files/v0/b/gitbook-x-prod.appspot.com/o/spaces%2F-M1SysIMhMO_ls3VlZcw%2Fuploads%2FnV3YdiE6TdqZ1RD5PbzR%2Fimage.png?alt=media&amp;token=88cbc977-a5f7-42e8-8d7a-0628d44359ec" alt=""><figcaption></figcaption></figure>

## Activate your Account

{% hint style="warning" %}
Contact your school’s system administrator if you have not received an account activation notification
{% endhint %}

* Once your school administrators have set up the Edusuite system for your school, you should have received an email notification to activate your account, similar to the example below

<figure><img src="https://3973081029-files.gitbook.io/~/files/v0/b/gitbook-x-prod.appspot.com/o/spaces%2F-M1SysIMhMO_ls3VlZcw%2Fuploads%2F3o9ujgMWpHCzxd2XJfbi%2Fimage.png?alt=media&amp;token=a166b0c5-cd71-40c6-87cd-5b285b19d295" alt=""><figcaption></figcaption></figure>

{% hint style="info" %}
Your password should have a minimum of eight (8) characters with at least one (1) uppercase letter, one (1) lowercase letter, one (1) number, and one (1) special character. **Spaces are not allowed**
{% endhint %}

* Clicking on the “Go To Edusuite” link brings you to the reset password page

<figure><img src="https://3973081029-files.gitbook.io/~/files/v0/b/gitbook-x-prod.appspot.com/o/spaces%2F-M1SysIMhMO_ls3VlZcw%2Fuploads%2Fb5YwFOr92lR5LcfswZUg%2Fimage.png?alt=media&amp;token=3b07375f-eeea-4cbf-9bcd-696b993b03c9" alt=""><figcaption></figcaption></figure>

{% hint style="info" %}
To double-check the password typed, you may click the show/hide or eye icon to view your password
{% endhint %}

* Follow the instructions and wait for the confirmation that your password was successfully updated
* Proceed to log in to your Edusuite account

## How to Reset Your Password

* On the log-in page, click on the “Forgot Password?” link

<figure><img src="https://3973081029-files.gitbook.io/~/files/v0/b/gitbook-x-prod.appspot.com/o/spaces%2F-M1SysIMhMO_ls3VlZcw%2Fuploads%2FAokFqigzyAx9Uzm7gwEm%2Fimage.png?alt=media&amp;token=200d9e96-9581-4b22-86f1-0d1ff7d9b50d" alt=""><figcaption></figcaption></figure>

* Enter your email address and confirm on the CAPTCHA

<figure><img src="https://3973081029-files.gitbook.io/~/files/v0/b/gitbook-x-prod.appspot.com/o/spaces%2F-M1SysIMhMO_ls3VlZcw%2Fuploads%2FIEzSSZM4QLkUZBI6H7ze%2Fimage.png?alt=media&amp;token=30d87503-6e67-4a5d-9af1-6d28bfad408a" alt=""><figcaption></figcaption></figure>

{% hint style="info" %}
**The email address field is case-insensitive**

Password should have a minimum of eight (8) characters with at least one (1) uppercase letter, one (1) lowercase letter, one (1) number, and one (1) special character. **Spaces are not allowed**
{% endhint %}

* Click the **Send Reset Link** button
* Check your email for the reset instructions

## How to Log In

Enter your email address and password in the login fields, then click **Login** once ready to go.

<figure><img src="https://3973081029-files.gitbook.io/~/files/v0/b/gitbook-x-prod.appspot.com/o/spaces%2F-M1SysIMhMO_ls3VlZcw%2Fuploads%2FykXKJtk0YULdWWSSyXYW%2Fimage.png?alt=media&amp;token=1f59df0d-ad16-4827-ad79-2ee1275fa52b" alt=""><figcaption></figcaption></figure>

## How to Log Out

Once logged in, click on your display account name just below the school logo. Click on **Logout** if you are ready to exit.

<figure><img src="https://3973081029-files.gitbook.io/~/files/v0/b/gitbook-x-prod.appspot.com/o/spaces%2F-M1SysIMhMO_ls3VlZcw%2Fuploads%2F8sLzdCJsxOfrseVXi5J7%2Fimage.png?alt=media&amp;token=a6fb78c0-f065-48a3-9465-937ffbc83c49" alt=""><figcaption></figcaption></figure>


# Student Portal Home Page

Last updated: March 2025

This is the main landing page a student will see upon logging in to their Edusuite UNI account. It provides access to key features and an overview of the student’s academic status, financial records, and tasks.

## Account Menu

<figure><img src="https://lh7-rt.googleusercontent.com/docsz/AD_4nXdZhLskZ9_Hg3sYGKRp6UvXCCo7Ew99Gj6dFlCytYxmLRFznAwZZYSrdVOwuaoWxT6QbGxG4_WSs-ZTjtyOuhj-HaVEZna3hxWDRre-pGblrpmhNLS2Te7x5TDwNsN7tANsslOaRA65b7ahQvodtN-CQ0TS?key=DiTHpF8QYb4DpO1yUeUCpQ" alt=""><figcaption></figcaption></figure>

* **Home** – The default landing page after login
* **Profile** – Allows students to view and update their personal information
* **My Grades** – Displays the student's grades

{% hint style="warning" %}
This section will appear grayed out if the student has a hold order preventing grade viewing.
{% endhint %}

* **My Payments** – Provides a summary of the student’s payables, payment history, and assessment details
* **Other Fees** – Displays any additional fees tagged to the student

## Term Selection

<figure><img src="https://lh7-rt.googleusercontent.com/docsz/AD_4nXcanR1BIXpufd-WBlwkDIHx8CtcXLrv-At9WrxwrlQJh2C0DL1cs9_bZYVxwOW4pk0jjSxI-zEvkCJUd3bRuFnyPTcEZy-4IIEeOK4POR7E6-a8yNX236__InH4X9VoXJ-ON9gN8QWQJjL0s7kl-yEr5DCx?key=DiTHpF8QYb4DpO1yUeUCpQ" alt=""><figcaption></figcaption></figure>

* Displays data widgets for the selected academic term
* By default, students can view the **previous**, **current**, and **next** terms
* Additional terms will be shown if there are outstanding payables associated with them

## Announcements

<figure><img src="https://lh7-rt.googleusercontent.com/docsz/AD_4nXe8m9rIptX010nuWn0eyd4aRMMVJONpjl0k3_3n0W4t7szqxw1lUcc20I87_iD3_awDAakd0fyzg5hrBHxQBtmzyv87Gb_q5T3aK9iCwWo1nxnVlhIqVogPzWUXyyLAEwdMbQ-gIzhJmb47PctiPxKaLLFZ?key=DiTHpF8QYb4DpO1yUeUCpQ" alt=""><figcaption></figcaption></figure>

* Displays official announcements from the school
* An **Enrollment Banner** will appear here during enrollment periods
* An **Enrollment Button** will also be displayed, but will be disabled if the student has an active enlistment hold order

## Tasks

Lists all clearances and hold orders currently assigned to the student

<figure><img src="https://lh7-rt.googleusercontent.com/docsz/AD_4nXd-kZF7DnXmldw3-zlzS51n0J1yjYWyncwTKfwF8K3DbiXEJFOvDfhnAk-keeyFi1w9OBtTJByOEpjnVOCk_7peq6rguXTa9BMwh3JPditYfJ3C6mDjWGTMOHOzql07OQJE8W8rOf6Hg4o1t4meAL4iWWM?key=DiTHpF8QYb4DpO1yUeUCpQ" alt=""><figcaption></figcaption></figure>

## Student Widgets

<figure><img src="https://lh7-rt.googleusercontent.com/docsz/AD_4nXciLpPdQSZRba36Za0kg5n3rMYRGsmI7UdGLPeC_6pLvGDL81oLRAO6-xMYhpbNEJlfwsN24EHFvYJs7THYOMFVRJJO5CMBfI8L9aiVkG93Axv8UgTkR5NVDz-Oc5iI-4X7eqhLg11kczAw_dWvb2_oJbfR?key=DiTHpF8QYb4DpO1yUeUCpQ" alt=""><figcaption></figcaption></figure>

* **Classes** – Displays the list of enrolled classes for the selected term, including:
  * Course codes and titles
  * Schedules
  * Grades (if available)
* **Academic Standing** – Summarizes:
  * Total units taken
  * Units currently being taken
  * Remaining units required for program completion


# Profile Verification

Last updated: March 2025

The Profile Verification feature allows students to review and update their personal information. Completing this step is **required** to proceed with enrollment.

## Access and Navigation

Navigate to **Profile** from the main menu of your student account.

<figure><img src="https://lh7-rt.googleusercontent.com/docsz/AD_4nXdm9dGaqEs_zP46-TXr2Ggy4mW9WLTwYB54eBus07uLoLFCp9j3MpLmoKphByQzxXgexIWEUuSNhDW1-DGOCHyMJv-ntTxwpaRG4SDD3oSKSr-wBj6AJUuM8G8jdowagTV4tyCPaTmOAocc7GnYrk-mivk?key=IfVF70O0EFTlWXW3rJ8ZkA" alt=""><figcaption></figcaption></figure>

## Edit your Profile

To update your information:

* Click **Edit** next to the relevant information field group

<figure><img src="https://lh7-rt.googleusercontent.com/docsz/AD_4nXf5llDhK3_GKP9NU3fVjcg8KV-t9VT6IBBXwEfOW2NsJVYSfUS8lN2kzSUIQHF1q9IlTZcQ0Hlx2gL8CwEbllxktNn0vSNy9PsQ47XqsK-aBVrdA1WEPPMGmfzON6XWrs1n0XqjEqXfQA8HxDiobUQKyGJl?key=IfVF70O0EFTlWXW3rJ8ZkA" alt=""><figcaption></figcaption></figure>

* Make the necessary changes
* Fields marked with a red asterisk (\*) are required and must be completed
* Ensure all required fields across all sections are properly filled out
* Click **Save Changes** to apply your updates

<figure><img src="https://lh7-rt.googleusercontent.com/docsz/AD_4nXfqDeiXqFOwLsdE-t0S1ytjL5JnAObdgPJxBMF957ywzgLCp3UpB7Y4r4al3jLRpioC6S4MnZobsQDDyiqz5CCB1rfI_Ug4zr26xlsMU3YUmxdrO4QOFAq9tO8FiqIUACCB7oz0Q4QIfBlpzJKPl66DUCo?key=IfVF70O0EFTlWXW3rJ8ZkA" alt=""><figcaption></figcaption></figure>

## Verify your Profile

Once all profile sections are complete:

<figure><img src="https://lh7-rt.googleusercontent.com/docsz/AD_4nXc6aBauUL0jo5Lvf1vGmSWCAaXEhvKKnYZaSQbwUOUE5DhjYjPFZV_doa6pPz58xLRF2ylDXSyahpoo_h4yYM1Ie9sUQ1CNXUYSwAVY7v_1JoVx3sKc2CeTXtxHQvFDzTARXntOo-DP-27pM1MqaSdmGGZo?key=IfVF70O0EFTlWXW3rJ8ZkA" alt=""><figcaption></figcaption></figure>

* Click the checkbox labeled **“I verify that the information is correct”** at the top of the page
* Once verified successfully, the verification banner will disappear
* Your profile is now verified, and you may proceed with enrollment


# Enlistment

Last updated: March 2025

The Enlistment feature allows students to select and enlist in their desired courses and class schedules for the upcoming term.

## Access and Navigation

You can access the **Enlistment Page** by clicking the **“Go to Enrollment”** banner on your Home page.

<figure><img src="https://lh7-rt.googleusercontent.com/docsz/AD_4nXe5FaKevBxL788kHaZElzFniCIrnp8aRbD33779m5I5kxFgSEqg50btx0VMr7pihNexmhK--rVFqtqpSrg0TtZGKk_CK6oLZzP2y1pC-Jg3TRub2EKQLlv4TDvKeX83VFH0Wfr7oHU0zR5PQE0hDdCY38f4?key=l9zHQdyvd6Xcu9CqHKkVRw" alt=""><figcaption></figcaption></figure>

## Terms and Conditions

Before proceeding, you must accept the enrollment **Terms and Conditions** by clicking the **“I Agree”** button.

<figure><img src="https://lh7-rt.googleusercontent.com/docsz/AD_4nXc6RHdBMwvCa7YU502Er7HbrQXEhbYn6mkOeZxBFXrWDGACfhjtGE7nUBXbd6KJdSbqy1JXdFo94LHKdDvDaBHMF81FB4mCrbSWf9cmv_oovDt8pk71SILjIIp5kbtRLEOMh6KGEWsoP0GEUxZvQDsYkGcg?key=l9zHQdyvd6Xcu9CqHKkVRw" alt=""><figcaption></figcaption></figure>

## Add Courses

To add courses to your enlistment:

* Click the **+ Add Class** button

<figure><img src="https://lh7-rt.googleusercontent.com/docsz/AD_4nXerEJy_Ui3F3eH2W4IYnabkYFboIrcxhbbwZnmDcAqukL30olngxep4Tkjy-n_1jZJorQqqF1zWDe0z8wtnYcKkrcGNNNf9B1EnnB3yqKa7JrNYXpJwItmUujw5-0_6495Bs7SfXso_aKzzSJmtUvCuZsk?key=l9zHQdyvd6Xcu9CqHKkVRw" alt=""><figcaption></figcaption></figure>

* Select from the list of available courses
* Once a course is selected, a second dropdown will appear listing available schedules

<figure><img src="https://lh7-rt.googleusercontent.com/docsz/AD_4nXczWt7QD_NR2CruPDkVmQ8Hd2JFKEf7BLZmUV2iVDp0p_iTsRu6At6jqBYcE-u-qDs8lddx90jt6nulMsAnAasdbDSJvUPnrDcwyN6vY58C966QSWJG4fr057nlB2Lc65YEuEjj50huL-sLpXfHK9EViJfq?key=l9zHQdyvd6Xcu9CqHKkVRw" alt=""><figcaption></figcaption></figure>

* Choose your preferred schedule

<figure><img src="https://lh7-rt.googleusercontent.com/docsz/AD_4nXd4QlH8mAqW0nDWZoHJs3fgqyKrY2LfQK5rzBgmnO28YB85EpDO0Ljnr64a-NmRbHl9dCLmIk9EdSFl4fJ0RHi038viLyfKpc_NO8jyL-AUqdHXzW92nUHxIWAwmibu0pLYdBvF8_5eWYazgaU5l1dIGdsh?key=l9zHQdyvd6Xcu9CqHKkVRw" alt=""><figcaption></figcaption></figure>

* Click **“Add”** to include the course and schedule in your enlistment list

## Submit your Enlistment

* After selecting all desired courses and schedules, click **“Enlist”** in the upper-right corner of the page

<figure><img src="https://lh7-rt.googleusercontent.com/docsz/AD_4nXepIR34Q2F81llaQgKVash0CuGO3Jx2xfWL3PO_A6oVqwj_29b3VclAP5mVmp2pxGEnWz0qJl2FxjUm1Su_GMQlvZKKeDJa1zY2NsOCcTUFaW9jVpggzjVdVLJM7Si23CWEH-lgBhEB51KXlhN0IyQ52M_2?key=l9zHQdyvd6Xcu9CqHKkVRw" alt=""><figcaption></figcaption></figure>

* Your enlistment request will be queued. Processing time may vary depending on the number of students currently enlisting

<figure><img src="https://lh7-rt.googleusercontent.com/docsz/AD_4nXdt4KKsJ98Hb-hjGIjkFAt1-umWH83JtsZeVF7vglzF9jRu3lEEsn6iTa7DNhg2ClEdJHiNNFJXZUIFK-QHH0-q1rOQ3m2F6CrlWPpTmaB6ze4Coo0ADnIz24Wj4QzsZ3xY5GS4GkakdtrIOpm1CJlYuwSw?key=l9zHQdyvd6Xcu9CqHKkVRw" alt=""><figcaption></figcaption></figure>

* A success message will appear once enlistment is completed

<figure><img src="https://lh7-rt.googleusercontent.com/docsz/AD_4nXdgFDd7lVYP2g2LdMnLlJYRLCgsWfViFZB92Sdhgt--NK4aNJE0kG4kZ8Px1cIECBLlGb1rG6NXcIzBmLg6I9j3F4e2nIRypqlVEE13s_O9OwhnnPdFv1TT4mkX-7PuPm428EDEOIyqHMhXYtBY_Kq0gOFs?key=l9zHQdyvd6Xcu9CqHKkVRw" alt=""><figcaption></figcaption></figure>

## View Assessment

Once you have successfully enlisted:

* Click **“View Assessment”** in the upper-right corner of the page

<figure><img src="https://lh7-rt.googleusercontent.com/docsz/AD_4nXdJs07r0IqU3gTPhGdgUkMzFWiGuA9vMUs9osVvQ-2T1U-hMl-RzRLDcqb2eA-TL2Kcca5wY7Cw6O2nnrQN3ahCwNXUSTY3LS3IN62qbgBRVaSv3fS7WahWfanWTvCn_ShI_5y42bU1ZiZ1S8lXLZHE8gX1?key=l9zHQdyvd6Xcu9CqHKkVRw" alt=""><figcaption></figcaption></figure>

* A pop-up window will show a detailed breakdown of your fees
* To select or update your **Payment Scheme**, use the dropdown menu

<figure><img src="https://lh7-rt.googleusercontent.com/docsz/AD_4nXcIdfw3OIsfpKGmmcctqkAjJgLHJ6b5EUdVcLUh0rNOQrCQAKgewMfU9nTIdpPlAfdkbiWnjUdXoGRegW0ah0dcvTgvDF5RuXUpCOkBaZvH7keviQA13GpVHsb1j6YeN3z-2FDwcGXK_gUAQ5Hs9isUdrY?key=l9zHQdyvd6Xcu9CqHKkVRw" alt=""><figcaption></figcaption></figure>

* After making changes, click **“Update Payment Scheme”** to save

## Remove Courses

To remove a previously selected course:

* Hover over the course and click the **Trash Bin** icon

<figure><img src="https://lh7-rt.googleusercontent.com/docsz/AD_4nXcTTClcpJhGRZqz9mE-sxu6PObgqCxZv_IHTmsRofIEo-TRydyxq_bFnt8TFvFEZoFBi5bi7Lg4xKHmuU14F6vyW6y_i0JQe8y1uRp64dHW14O4CbpUIs_c3cddVKgLD0gONP2V3epeIUmRRkvtSFKkkLms?key=l9zHQdyvd6Xcu9CqHKkVRw" alt=""><figcaption></figcaption></figure>

* After making the changes, click **Enlist** again to submit the updated list

<figure><img src="https://lh7-rt.googleusercontent.com/docsz/AD_4nXepIR34Q2F81llaQgKVash0CuGO3Jx2xfWL3PO_A6oVqwj_29b3VclAP5mVmp2pxGEnWz0qJl2FxjUm1Su_GMQlvZKKeDJa1zY2NsOCcTUFaW9jVpggzjVdVLJM7Si23CWEH-lgBhEB51KXlhN0IyQ52M_2?key=l9zHQdyvd6Xcu9CqHKkVRw" alt=""><figcaption></figcaption></figure>

* Your changes will be queued and processed
* A confirmation message will appear once the update is successful

## Frequently Asked Questions (FAQs)

**Question:** I can’t click “Go to Enrollment”

**Answer:** Hover over the button to see the reason. Common requirements that may prevent access:

* Pending clearance or hold order
* Unverified profile
* Enrollment is not yet open for your program

***

**Question:** I was auto-enlisted\
**Answer:** Your school has enabled automatic enlistment. For clarification, please contact your school administrator.

***

**Question:** I can’t add, remove, or change my enlisted courses\
**Answer:** The school may have restricted enlistment modifications. Please reach out to your school admin for assistance.

***

**Question:** I encountered an enlistment error\
**Answer:** Take a screenshot of the error message and contact your school for further help.


# Grades Viewing

Last updated: March 2025

The **My Grades** feature allows students to view their academic performance, including individual term grades, Transcript of Records (TOR), and Prospectus-based curriculum tracking.

## Access and Navigation

To access your grades, click **Grades** from your account menu.

<figure><img src="https://lh7-rt.googleusercontent.com/docsz/AD_4nXcoeK3Wy_387SXB0Z2_Qlgf3hYgsQpy-b0y5lRRl3fkf9JWlFs1a37okaekIqNmnelqdJis6w1iDef0fcZqDWJLLsixRAdfNyDvI117qZgkXIxlar3ilLrMmVoYKC_JXhMfHoyAiM-5wPWl4t-oWGqD4saC?key=1T-tvMGFPHwtTFBXL6BMIw" alt=""><figcaption></figcaption></figure>

## TOR and Prospectus View

* Use the buttons on the **upper-left** side of the Grades page to toggle between views:
  * **View TOR** – Displays a list of all courses you have completed across all terms

<figure><img src="https://lh7-rt.googleusercontent.com/docsz/AD_4nXfDMavSeYJnrB3Jpt41_MM1SODDpRTXkHQ5qmd66l0fJZJRW3ylcRE2KsGqWGe2kea0cBwMEj_tQXaClvencEqU6Joi6QrTbh2FW6GipOXI45DjEzRYXnwT2Obz0PZzErKvBmqEHeg7VPNVPf8SehLyAoQ?key=1T-tvMGFPHwtTFBXL6BMIw" alt=""><figcaption></figcaption></figure>

* **View Prospectus** – Organizes completed courses according to your current curriculum structure

<figure><img src="https://lh7-rt.googleusercontent.com/docsz/AD_4nXcQ9C4D8Bzdm_Ddf8mhCMtE6bhhZEq9UgLzMe_VdqrYlXjlIdFOa77BU1EmICdnyKh36B3OnrMKJa_mGToPV_hm92GDApz117Qwx6gnX0sRsgZQTFYkRYKISCvjzifIrUnCwRPnGyLT6rqJPwUrcmwUx_hn?key=1T-tvMGFPHwtTFBXL6BMIw" alt=""><figcaption></figcaption></figure>

{% hint style="warning" %}
Only one button will appear at a time, depending on your current view.
{% endhint %}

## Download Term Grades

To download your grades for a specific term, click the **Download Term Grades** button on the **upper-right** side of the page.

<figure><img src="https://lh7-rt.googleusercontent.com/docsz/AD_4nXff46ZYbQsQHsigMtg_3cEwiu-FsqkUJhWpF1MNZv2luipNe7HfOsR3aNo_7LAIjKJUgd_cfP-1gyYO5HHEz8G9WOoijjEnmxJV6EXuJ0z4zFj-o5eNZJ716mEPLFQWXC3GzY_bmLRYv_2S5NDb3-iN30E?key=1T-tvMGFPHwtTFBXL6BMIw" alt=""><figcaption></figcaption></figure>

## Frequently Asked Questions (FAQs)

**Question:** I can’t view my grades

**Answer:** Possible reasons:

* Grades viewing is not yet enabled by your school
* You have a **pending clearance** or **hold order**
* You have an **outstanding balance** on your account

***

**Question:** I can’t download my Term Grades or TOR

**Answer:** Check with your school if the **download feature** for Term Grades or TOR has been enabled.

***

**Question:** I can’t view my TOR

**Answer:** TOR visibility may be restricted by your school. Contact your registrar or school admin for more information.

***

**Question:** What’s the difference between the TOR view and the Prospectus view?

**Answer:**&#x20;

* TOR View – Displays all courses you've completed, regardless of curriculum structure.
* Prospectus View – Organizes courses based on your curriculum, showing what you’ve completed and what’s remaining.


---

[Next Page](/llms-full.txt/1)